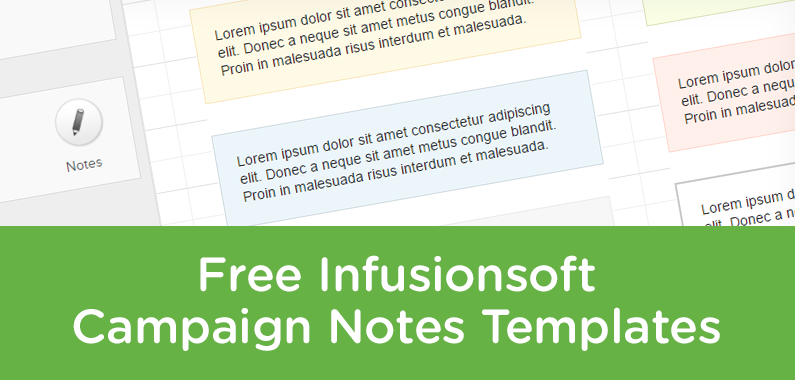
Update: There’s a new section at the bottom of this post with some fancy animated notes you can swipe.
At some point or another all new Keap users ask about the notes widget in the Keap campaign builder.
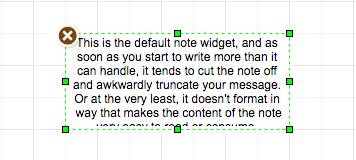
In a sense, they’re useless. They don’t actually have any function, and don’t actually affect the campaign in any meaningful way.
But, in another more accurate sense, the more you build campaigns, the more you realize just how valuable they can be.
You can use these notes to leave messages for other users, to store links you’re using, color codes you may need, lists of things you still need to do, or just to log changes you’ve made so another user knows what has been done and what hasn’t.
The content from today’s blog post was shared in the Monkeypod Membership area by a member, Brian Johnson. I absolutely love little tricks like this that help keep your campaigns neat and tidy, so I asked for his permission to share this as a blog post, and he happily agreed. Thanks Brian, you rock!
By default, the note widgets aren’t as useful as they could be.
But you have quite a bit of control over the appearance of K campaign Notes. All it takes is a little HTML code.
What? You don’t know the first thing about HTML?
Fear not!
Changing the appearance of campaign Notes is as easy as copying a short line of code from this Notes Templates file and pasting it into a Note in your campaign. That’s it. You now have a nice, custom-styled Note.
Yellow
----------------------------------------
<div style="background:#fffae6;font-size:14px;line-height:1.3;color:#292929;text-align:left;border:1px solid #fae6be;padding:20px;">xxxxxxxxxx</div>


Blue
----------------------------------------
<div style="background:#ebf5fa;font-size:14px;line-height:1.3;color:#292929;text-align:left;border:1px solid #d2dce1;padding:20px;">xxxxxxxxxx</div>


Green
----------------------------------------
<div style="background:#faffe6;font-size:14px;line-height:1.3;color:#292929;text-align:left;border:1px solid #dce6be;padding:20px;">xxxxxxxxxx</div>


Red
----------------------------------------
<div style="background:#fff0eb;font-size:14px;line-height:1.3;color:#292929;text-align:left;border:1px solid #ffd7cd;padding:20px;">xxxxxxxxxx</div>


Gray
----------------------------------------
<div style="background:#f7f7f7;font-size:14px;line-height:1.3;color:#292929;text-align:left;border:1px solid #ebebeb;padding:20px;">xxxxxxxxxx</div>


White Background with Grey Border
----------------------------------------
<div style="font-size:14px;line-height:1.3;color:#292929;text-align:left;border:2px solid #cccccc;padding:20px;">xxxxxxxxxx</div>
The templates file provides six different Notes style options, plus instructions for creating bold text and headings.
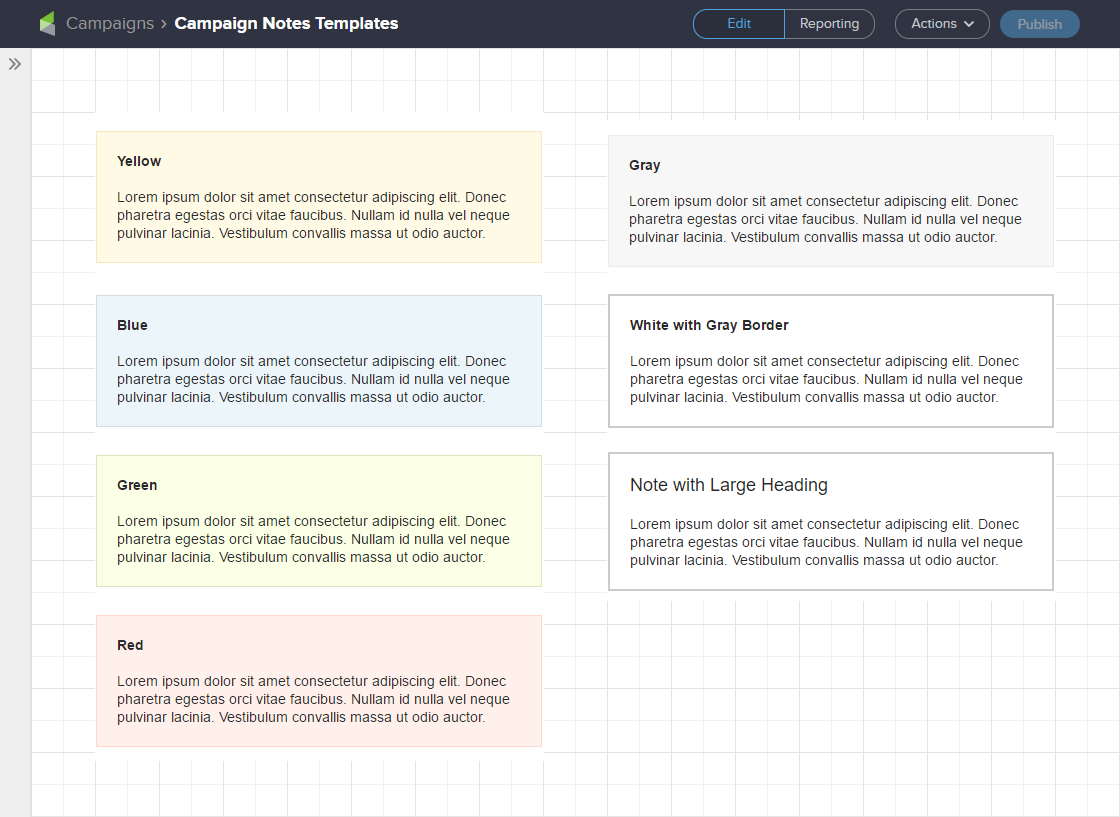
You may choose to use background colors to signify the subject matter in Notes. For example: blue for Notes that document information about the campaign; red for important, time-sensitive reminders like tasks that need to be completed before publishing or changes that need to be made; yellow for general reminders, or instructions for team members / clients, or things to consider implementing in the future; etc.
How to Use the Notes Templates
It’s best to open the Notes Templates TXT file in a text editor. Your computer should have a factory-installed text editor like Notepad or Notepad ++ (PC), or TextEdit (Mac). Avoid opening the file in a word processing program like Word — it’s not that big a deal, but using a text editor will ensure line and text spacing doesn’t get messed up.
Let’s get started.
- Open a campaign and drag the Notes element onto the campaign canvas.
- Delete the placeholder text ‘Lorem ipsum dolor sit amet.’ The Note should now be empty.
- Select one of the templates from the Notes Templates file, copy it, and paste it into the Note in your campaign.
- Double-click on the placeholder text ‘xxxxxxxxxx’ in the Note to select it and enter your text.
That’s it. Resize the Note and move it around the canvas just like you normally would.
Make Changes to the Notes Templates
You can use the Notes templates as a starting point for creating your own Notes styles.
Let’s take a look at each individual piece of the HTML in the templates to understand what the code does and how you can edit it.
First, a quick comment about colors. Colors in the Notes templates are HTML HEX values — the three or six characters after the hashtag (#). To change a color you’ll need to know the HEX value of the color you want. If you don’t have a graphics program that uses HEX values, w3schools.com has an HTML Color Picker you can play around with to find HEX color values.
Background Color
The default background color of a Note is white #fff. Each Notes template has a different background color. To change the color edit the six characters after the hashtag (#).
Border Color
By default Notes don’t have a border. Each Notes template has a different border color. To change the color edit the six characters after the hashtag (#).
Font Size
The default font size in Notes is 12px. The Notes templates set the font size to 14px. To change the font size edit the number.
Line Height
Line height is the space between the lines of text. The default line height in Notes is 1.2. The Notes templates increase line height to 1.3, giving a little extra breathing room between lines to improve legibility. To change the line height edit the number.
Font Color
The default font color in Notes is black #000. The Notes templates change font color to #292929, which should be plenty dark for most people. If you want to change the font color to black, you can delete the following code or change it to ‘#000’.
Text Alignment
Text is centered by default in Notes. The Notes templates left-align text. If you want the text centered delete the following code.
Padding
Padding creates space between the text and Note borders. Notes don’t have any padding by default. To change the size of the padding edit the number.
Style Some Text in a Note Differently
All the code talked about to this point applies styles to the entire Note. You can also apply styles that only affect some of the text in a Note.
When pasting the following code into a Note, make sure you don’t delete any of the code that is styling the entire note — i.e., this code goes between the <div> tags where your Note text is.
Bold Text
To make text bold place an HTML strong tag before and after the text you want bolded. Be sure to include the backslash in the ending strong tag.
Headings
To create headings an HTML span tag is placed before and after the text. Be sure to include the backslash in the ending strong tag. To change the size of the heading edit the number.
And that’s really all you need to know to start using the swipe content to make your Keap campaign notes a little sexier. My hope is that this makes your life easier, your documentation clearer, and your campaigns more effective, and if it does, give Brian a shout out on twitter to say thanks!
Animated Note Swipes
If the plain text note templates aren’t eye catching enough for ya, here are some fancier notes you can swipe that will produce a little bit of movement on your campaign canvas.

To create these I basically just downloaded a campaign from the Keap/Infusionsoft Marketplace, and then copied the code they had in their notes – changed a few colors, and voila.
Bouncy Green
<div class="info-box-1"> <p> <!--//////////////////////////-->Remember to treat yo'self when this campaign produces results that exceed your wildest expectations.<!--//////////////////////////--> </p> <div class="wrapper"> <span class="bounce_arrow-1"> <div class="arrow-guide-1"> <svg xmlns="http://www.w3.org/2000/svg" xmlns:xlink="http://www.w3.org/1999/xlink" width="36" height="27" viewBox="0 0 36 27"> <defs> <path id="b" d="M29.667 8c0 8.1-6.567 14.667-14.667 14.667S.333 16.1.333 8 29.667-.1 29.667 8z" /> <filter id="a" width="134.1%" height="148.2%" x="-17%" y="-19.3%" filterUnits="objectBoundingBox"> <feOffset dy="1" in="SourceAlpha" result="shadowOffsetOuter1" /> <feGaussianBlur in="shadowOffsetOuter1" result="shadowBlurOuter1" stdDeviation="1.5" /> <feColorMatrix in="shadowBlurOuter1" result="shadowMatrixOuter1" values="0 0 0 0 0 0 0 0 0 0 0 0 0 0 0 0 0 0 0.1 0" /> <feOffset dy="1" in="SourceAlpha" result="shadowOffsetOuter2" /> <feGaussianBlur in="shadowOffsetOuter2" result="shadowBlurOuter2" stdDeviation="1" /> <feColorMatrix in="shadowBlurOuter2" result="shadowMatrixOuter2" values="0 0 0 0 0 0 0 0 0 0 0 0 0 0 0 0 0 0 0.2 0" /> <feMerge> <feMergeNode in="shadowMatrixOuter1" /> <feMergeNode in="shadowMatrixOuter2" /> </feMerge> </filter> </defs> <g fill="none" fill-rule="evenodd"> <g transform="translate(3)"> <use fill="#000" filter="url(#a)" xlink:href="#b" /> <use fill="#37B273" xlink:href="#b" /> </g> <path fill="#F0F0F0" d="M18 0c.631 0 1.143.512 1.143 1.143v10.955l4.906-4.906a1.143 1.143 0 0 1 1.616 1.616l-6.857 6.857a1.143 1.143 0 0 1-1.616 0l-6.857-6.857a1.143 1.143 0 1 1 1.616-1.616l4.906 4.906V1.143C16.857.512 17.37 0 18 0z" /> </g> </svg> </div> </span> </div> </div> <style type="text/css"> .info-box-1 {width: auto; margin: 12px; padding: 0px 18px 2px 20px; box-sizing: border-box; line-height: 40px; display: inline-block; border-radius: 14px; box-shadow: 0 1px 3px 0 rgba(0, 0, 0, 0.1), 0 1px 2px 0 rgba(0, 0, 0, 0.2); background-color: #37875E; } .info-box-1 p {color: #ffffff; text-align: left; font-size: 16px; font-family: "Proxima Nova", sans-serif; font-weight: normal; font-stretch: normal; font-style: normal; line-height: 1.4; letter-spacing: normal; } .arrow-guide-1 {width: 100%; margin-left: 0px; margin-top: -6px; } .wrapper {width: 100%; } @keyframes bounce {0%, 100%, 20%, 50%, 80% {-webkit-transform: translateY(0); -ms-transform: translateY(0); transform: translateY(0) } 40% {-webkit-transform: translateY(-8px); -ms-transform: translateY(-8px); transform: translateY(-8px) } 60% {-webkit-transform: translateY(-6px); -ms-transform: translateY(-6px); transform: translateY(-6px) } } span.bounce_arrow-1 {position: absolute; -webkit-animation-duration: 2.6s; animation-duration: 2.6s; -webkit-animation-fill-mode: both; animation-fill-mode: both; -webkit-animation-timing-function: ease-in-out; animation-timing-function: ease-in-out; animation-iteration-count: infinite; -webkit-animation-iteration-count: infinite; color: white; } span.bounce_arrow-1 {animation-name: bounce; -moz-animation-name: bounce; } </style>
Bouncy Blue
<div class="info-box-1"> <p> <!--//////////////////////////-->Remember to treat yo'self when this campaign produces results that exceed your wildest expectations.<!--//////////////////////////--> </p> <div class="wrapper"> <span class="bounce_arrow-1"> <div class="arrow-guide-1"> <svg xmlns="http://www.w3.org/2000/svg" xmlns:xlink="http://www.w3.org/1999/xlink" width="36" height="27" viewBox="0 0 36 27"> <defs> <path id="b" d="M29.667 8c0 8.1-6.567 14.667-14.667 14.667S.333 16.1.333 8 29.667-.1 29.667 8z" /> <filter id="a" width="134.1%" height="148.2%" x="-17%" y="-19.3%" filterUnits="objectBoundingBox"> <feOffset dy="1" in="SourceAlpha" result="shadowOffsetOuter1" /> <feGaussianBlur in="shadowOffsetOuter1" result="shadowBlurOuter1" stdDeviation="1.5" /> <feColorMatrix in="shadowBlurOuter1" result="shadowMatrixOuter1" values="0 0 0 0 0 0 0 0 0 0 0 0 0 0 0 0 0 0 0.1 0" /> <feOffset dy="1" in="SourceAlpha" result="shadowOffsetOuter2" /> <feGaussianBlur in="shadowOffsetOuter2" result="shadowBlurOuter2" stdDeviation="1" /> <feColorMatrix in="shadowBlurOuter2" result="shadowMatrixOuter2" values="0 0 0 0 0 0 0 0 0 0 0 0 0 0 0 0 0 0 0.2 0" /> <feMerge> <feMergeNode in="shadowMatrixOuter1" /> <feMergeNode in="shadowMatrixOuter2" /> </feMerge> </filter> </defs> <g fill="none" fill-rule="evenodd"> <g transform="translate(3)"> <use fill="#000" filter="url(#a)" xlink:href="#b" /> <use fill="#4368C7" xlink:href="#b" /> </g> <path fill="#F0F0F0" d="M18 0c.631 0 1.143.512 1.143 1.143v10.955l4.906-4.906a1.143 1.143 0 0 1 1.616 1.616l-6.857 6.857a1.143 1.143 0 0 1-1.616 0l-6.857-6.857a1.143 1.143 0 1 1 1.616-1.616l4.906 4.906V1.143C16.857.512 17.37 0 18 0z" /> </g> </svg> </div> </span> </div> </div> <style type="text/css"> .info-box-1 {width: auto; margin: 12px; padding: 0px 18px 2px 20px; box-sizing: border-box; line-height: 40px; display: inline-block; border-radius: 14px; box-shadow: 0 1px 3px 0 rgba(0, 0, 0, 0.1), 0 1px 2px 0 rgba(0, 0, 0, 0.2); background-color: #6586DA; } .info-box-1 p {color: #ffffff; text-align: left; font-size: 16px; font-family: "Proxima Nova", sans-serif; font-weight: normal; font-stretch: normal; font-style: normal; line-height: 1.4; letter-spacing: normal; } .arrow-guide-1 {width: 100%; margin-left: 0px; margin-top: -6px; } .wrapper {width: 100%; } @keyframes bounce {0%, 100%, 20%, 50%, 80% {-webkit-transform: translateY(0); -ms-transform: translateY(0); transform: translateY(0) } 40% {-webkit-transform: translateY(-8px); -ms-transform: translateY(-8px); transform: translateY(-8px) } 60% {-webkit-transform: translateY(-6px); -ms-transform: translateY(-6px); transform: translateY(-6px) } } span.bounce_arrow-1 {position: absolute; -webkit-animation-duration: 2.6s; animation-duration: 2.6s; -webkit-animation-fill-mode: both; animation-fill-mode: both; -webkit-animation-timing-function: ease-in-out; animation-timing-function: ease-in-out; animation-iteration-count: infinite; -webkit-animation-iteration-count: infinite; color: white; } span.bounce_arrow-1 {animation-name: bounce; -moz-animation-name: bounce; } </style>
Caveat: I’ve swiped this code from smarter folks than myself – so unfortunately I can’t assist with modifying it, or troubleshooting if it stops working at some point. Good luck!
Advanced Customization
Speaking of folks smarter than myself, here’s a video from another Keap Partner, John Borelli, where he walks through some fancier options you can use to make your campaign notes really sing.
Campaign Builder Finishing School
Here’s a short video from my Campaign Builder Finishing School series where I talk a little more about this idea. If you want to check out the whole series, you can get access here.


Thanks for the cheat sheet! I knew you could do this, but was always “too busy” to actually do it. This cheat sheet will make it so easy to implement. 🙂
Agreed! I always knew this stuff was possible, but I never tool the time to put together a swipe file with a few good options. Well, thanks to Brian, now we’re both all set!
Awesome!!
RIGHT?!?! Thanks for reading Hector.
Use this approach all the time Greg… but I like to program the HTML into TextExpander so I can just type a short abbreviation like “;bb” (for blue box) or “;br” (box red)… without having to remember the HTML or go find it or copy/paste it, etc… TextExpander is an awesome like app for stuff like this…
Brilliant!
I LOVE textexpander! Great idea, Troy!
Love it, Greg! Keep up the great work, and thanks for sharing!
Thanks Trevan! Appreciate the kind words.
Greg you’re awesome! And this post is excellent. Thanks for this, and for all you do!
Thanks for reading Bob, and for the praise!
Thanks for the cheat sheet, Greg and Brian.
Two more Notes-related tips that might help.
TIP #1: Instead of having to save/open the cheat sheet file, you can also (1) copy all of its contents, (2) go to Infusionsoft > Admin > Users > [select your User] > Notes tab, then (3) paste the cheat sheet contents into the Notes field for your User…than way, whenever you’re logged in, you have the cheat sheet contents available for copying within your own User contact record. Cool!
TIP #2: If you have a really long Note you want to create, but you don’t want it taking up a large amount of space on your campaign’s canvas, you can actually kinda hide your Note’s contents until you want to reveal them for reading.
How do you do that? Simple! By (1) opening this little magical form I created for my own use (but you can use it as much as you like for free): https://www.powerinthegroup.com/hover/, then (2) entering your long Note’s contents into the form on that page, then (3) submitting the form to get your Note’s contents reformatted in a special way that (4) you then paste into your campaign’s Note.
The reformatted content you paste into your campaign’s Note will look something like the following:
Hover To See Note!
If you pasted that content above into a Note on your canvas, the ONLY thing you’d see is the ‘Hover To See Note!’ part…but once you hover your cursor over that text, then the long part of your Note will appear, complete with line breaks or whatever else you typed into the form.
I call them Hover Notes. And I just had the webpage/form coded for my own personal use.
I’ve used this little trick to create Notes that are dozens of lines long, usually related to why I didn’t delete such and such a Tag in this Sequence because otherwise it would mess up how I need that Tag much later in that that other Sequence and so on.
Like I said, feel free to use this little Hover Note generator as much as you want.
One thing to note (pun intended) about the Hover Notes is that you CANNOT control the font, size, background color, etc. because what’s happening if your Note’s contents are being displayed as a title tag for an anchor link (if that doesn’t mean anything to you, don’t worry…just means you can’t format the styling of the Hover Note’s contents).
Happy to be of help!
Cheers,
Grant
Thanks so much Grant! Great share.