A few months back I wrote two blog posts about the importance of email permission, and the value of designing an email preferences center so that your prospects can tell you exactly what they want and what they don’t. Trust me, they’re more interesting than they sound.
Tactics like this are especially valuable for a number of reasons; but primarily because it helps ensure that your prospects are only hearing about the things they’ve told you they’re interested in, and as a result, your audience will be that much more engaged
Well today I’d like to show you a simple way to take this concept one step further. I’m going to show you how to create an opt-out link for a single sequence, or a single campaign.
Yup, that means if you’ve got 10 emails promoting a special offer of yours, and after email number two the recipient decides it’s just not for them, this will allow them to opt-out of that particular promotion, while still remaining eligible for future specials and promotions you may offer.
It’s actually pretty simple, but most people don’t do it because they’re working hard enough to make the campaign builder function and this takes a little bit of extra planning.
So let’s look at an example:
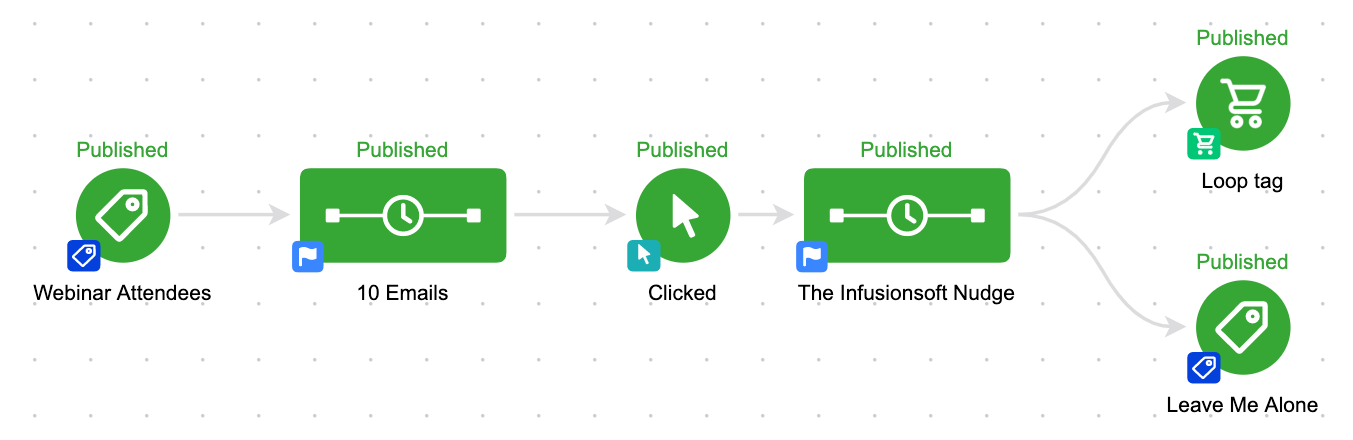
Here’s our campaign – we’re taking everyone who attended our webinar, and we’re driving them toward buying our consulting package.
Pretty straight forward, but in this scenario if someone doesn’t want those emails, their only choice is to unsubscribe completely.
Even if we have an email preferences center, if they express their preferences it won’t pull them out of this campaign.

So what we need to do is something that’s becoming more and more common place in the Keap space – we need to add a “kill switch”.
This usually refers to a goal that you add at the end of the campaign, so that in the case of emergency you can achieve it in order to pull your contact(s) out of the campaign entirely.
But the twist in this case, is that we’re creating a kill switch, or stop trigger, that the contacts themselves can achieve if they decide they don’t want any more promotions.

So there it is. We’ve added a second goal (labeled “Leave Me Alone”) listening for contacts who no longer want to be bothered by this sequence – and we’ve configured it to listen for a tag.
But wait…
Where and how does this tag get applied? Glad you asked.
Well, in each of the 10 promotional emails we have to add a link. It doesn’t really matter what the link points to (I usually link it to a generic thank-you page).
But the value of adding this link is that when it’s clicked, we can also apply a tag – and by applying the tag, we then achieve the goal, and pull them out of the campaign.

Yes, you’ll need to create a unique tag for each time you want to set this up. I usually create a category called “Trigger Tags” for things like this.
Now, for those of you reading along judging me because I decided to use a Tag Applied goal instead of using a Link Click goal, let me explain why. Yes, you could use a Link Click goal in the above scenario and it would have worked just fine.
But, what if the campaign was a little more complex?
Good point. Link Click goals can only track links that are in a sequence they are directly attached to.
So, if your campaign was longer, or had a few extra sequences or steps, it’d quickly get difficult to keep everything organized. Like, let’s say you have been paying attention and you decided to include The Keap Nudge
Or maybe you’ve got a much more complex campaign, and multiple paths and entry points.
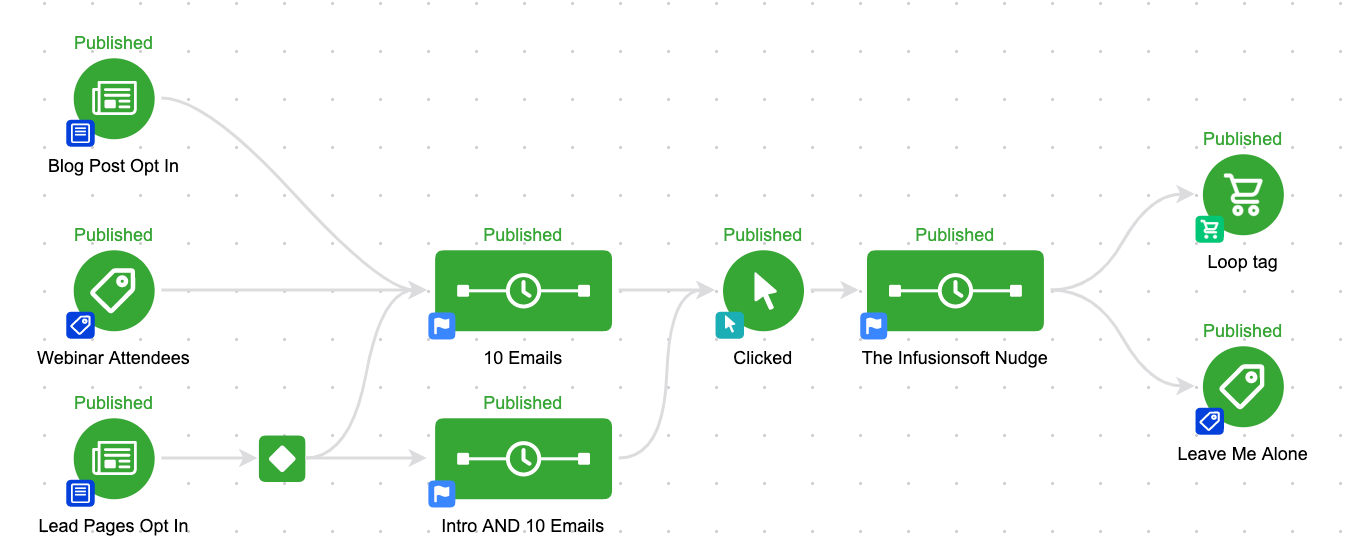
You contacts could be in either of the email sequences, and if they get tagged they’ll jump right to the “Leave Me Alone” goal, and they won’t get another email from this campaign at all.
As you might remember from Campaign Builder Gotcha 1: When a goal is achieved, by default, it will stop anything upstream from it. Even if it’s not directly connected.
The challenge in remembering this is that some goals (task, link click) can only measure or track the sequences to which they’re directly connected.
So, how do you use this? Well, I use this in pretty much all of my nurture campaigns. If you opt-in to learn about one of the courses on using Keap or the OG Membership, I have educational nurture sequences in place – but you’ll also notice that I give you the option to remove yourself from that process if it’s not providing value to you, without removing you from my blog updates list – or whatever else you may be getting from me.
More of a visual learner? Check out this quick video:


Brilliant stuff Greg. This is exactly what I was looking for.
Nice job laying it out and also for providing the logic behind it.
Talk soon.
Nick
Right on. Glad it made sense to ya, and thanks for reading! Cheers.
Done.
I sooooooooo needed this for my clients that don’t need (want) my monthly newsletter but still need to receive emails that are pertinent to specific assignments that we do for them. This should reduce me having to call them and beg them to opt back in if they want to download their pictures.
SWEEEEEET!
BOOM. Instant progress. Glad to hear it solves that one for ya Delane!