The Infusionsoft Nudge

The Infusionsoft Nudge

If you’ve got a social media account of any kind you probably couldn’t help but notice the excitement generated by a few select football plays this weekend.

First, there was the wild conclusion to the Michigan v Michigan State game. (As you may know, I’m an MSU alum and was pretty pleased about this)

And then there was another play with the Indianapolis Colts trying some trickery with an unconventional line-up.

As I sat down to finish writing a blog post this morning I kept getting distracted by posts about those plays. They were popping up in my Twitter feed, my Facebook feed, and I even got a few texts and emails from people rehashing the excitement in one way or another.

So, I decided to postpone the blog post I had been writing, and tackle this one instead. (See what I did there?)

I want to talk about the importance of having a contingency plan.

Now, the U of M play doesn’t really deserve to be bashed too hard. They were punting the football away, on fourth down, with 10 seconds left in the game. One way or another, the ball was mishandled and MSU was able to get to the kicker; and the ball flew almost directly into the hands of an MSU player who was already streaking toward the end-zone.

Really tough luck.

Yeah, the kicker probably should have fallen on the ball instead of trying to handle it, but hindsight is 20:20 and it was a broken play once the snap was mishandled. Football playing on a field
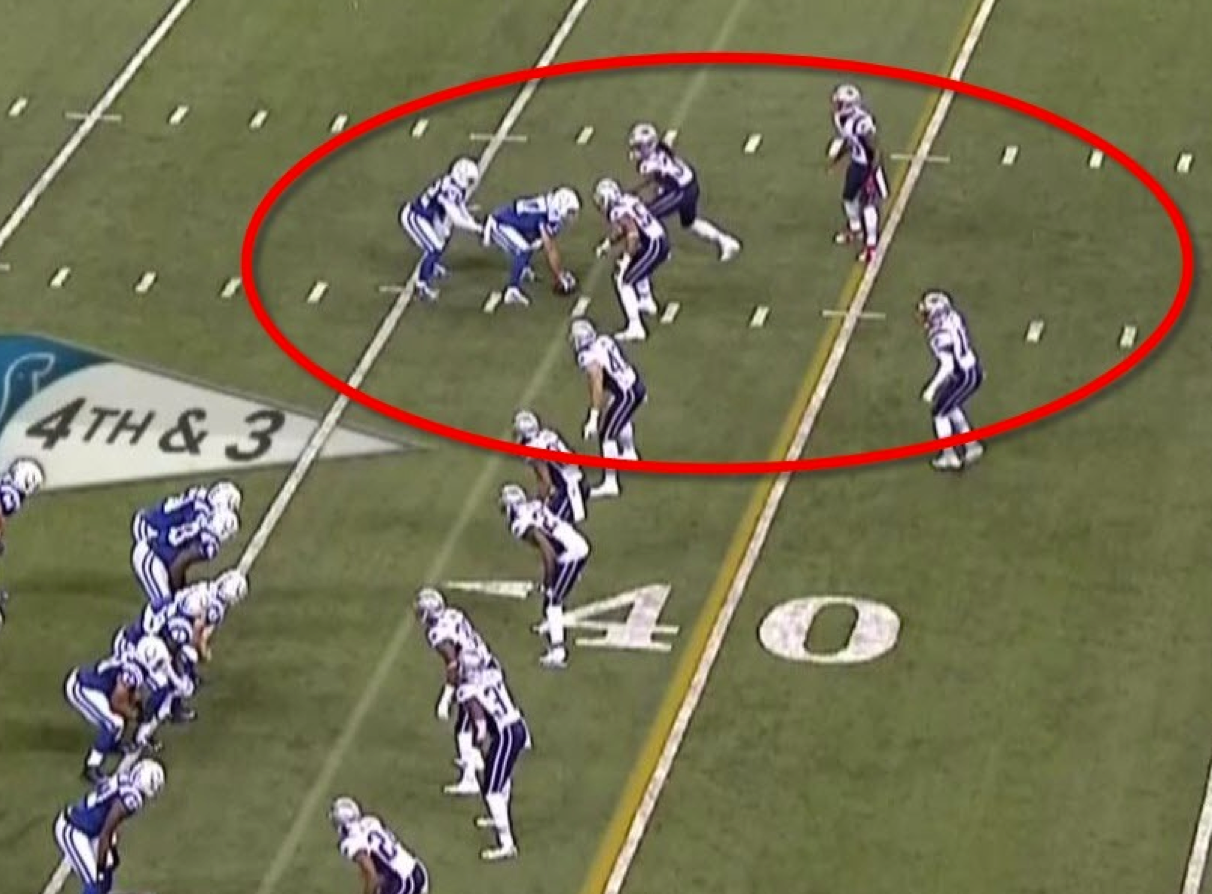
So that one may not illustrate my point as clearly here, but as an MSU fan, I felt like I needed to mention it. It’s the Colt’s fake punt play that really baffles me. They were trying to trick the defense. The coach even said so after the game.

They had a play designed to move some players around, and the whole goal of the play was to catch the defense unprepared, perhaps to lure them into some sort of penalty, and generally cause confusion which they could then exploit.

But as players shuffled around and then settled into their spots, it became clear (to most people anyway) that this play wasn’t going to work out very well.

In fact, it looked like it would certainly be a loss of yardage as the Colts were now set to snap the ball to a seemingly undefended player. They stood for a few seconds…and then they snapped the ball anyway.

And sure enough, they were sacked for a loss of yards and gave the ball to the Patriots with excellent field position.

Now I’m not saying you shouldn’t practice and run trick plays.

Some coaches and teams have made their names running unorthodox plays. What I’m suggesting is that whether it be with football, or with marketing, you need to have a contingency plan.

You need to have a safety net in place.

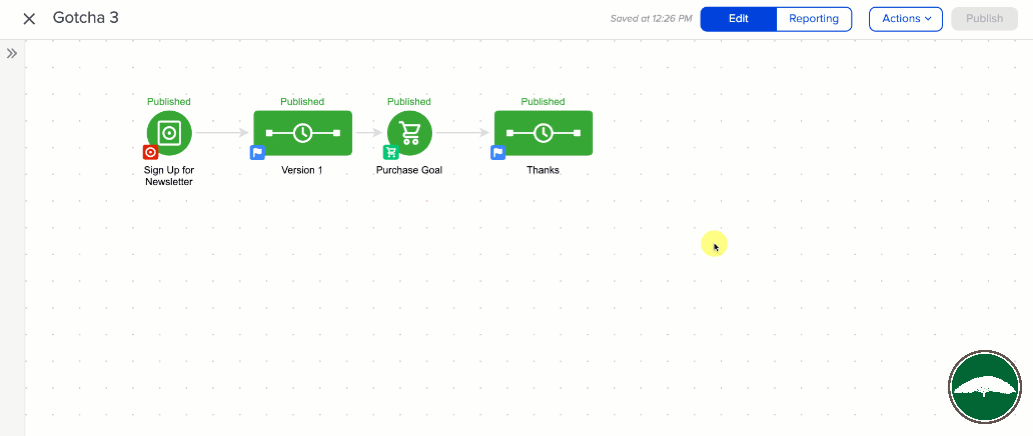
Let me share a real life example from a campaign my friend Tyler recently launched. You see, Tyler runs a successful business where he teaches strategies for how to trade stock options. Recently he launched a membership program so that he could make himself available in one-to-many typesetting, instead of his usual consulting packages.

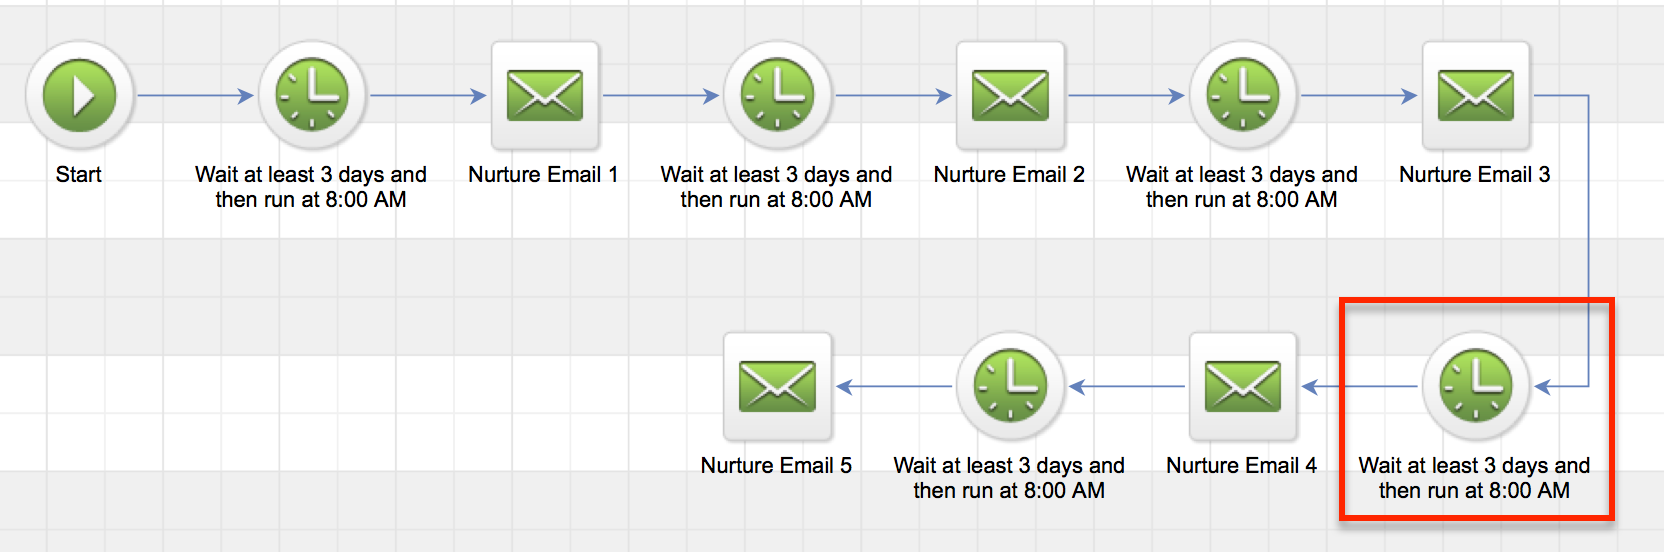
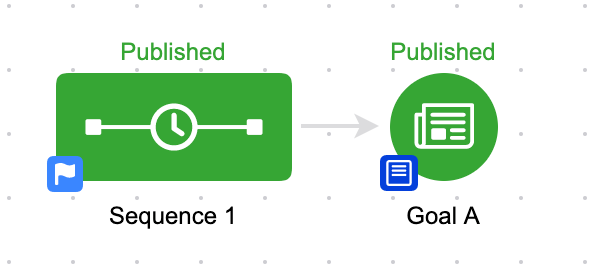
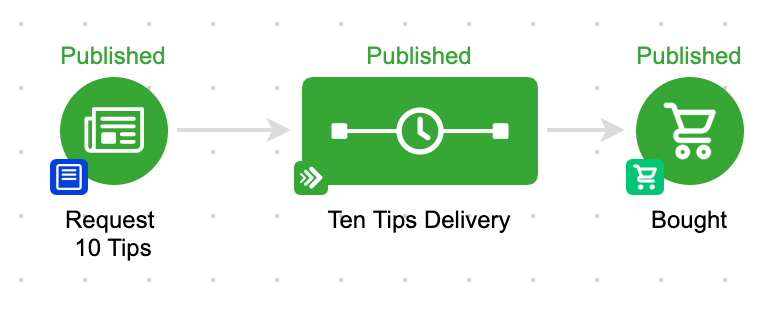
So, Tyler sent out an email message to his audience announcing the new membership he’d be building and driving people to the page where they could learn more about it.

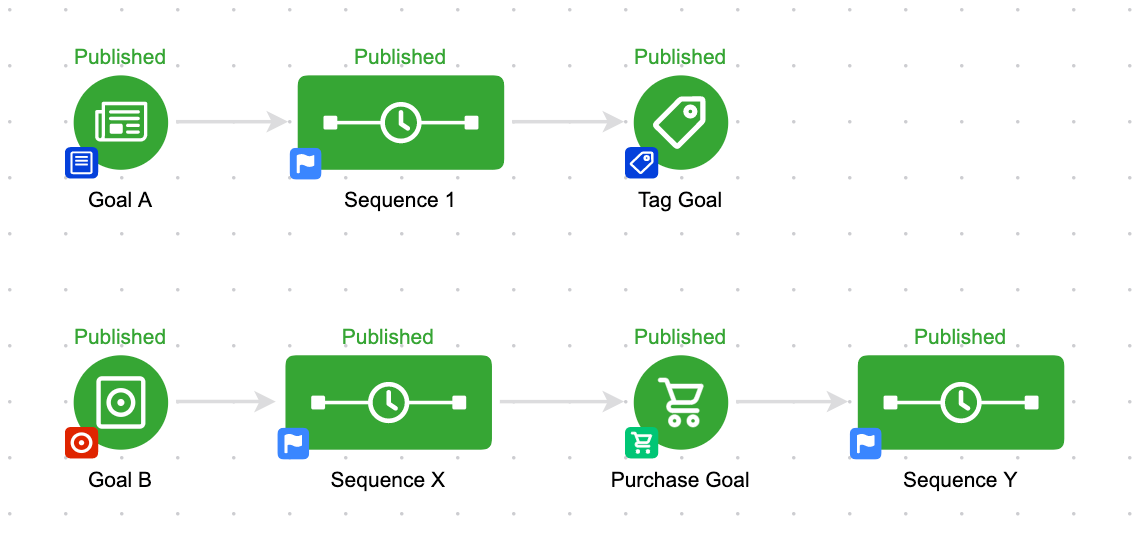
He built it like this:

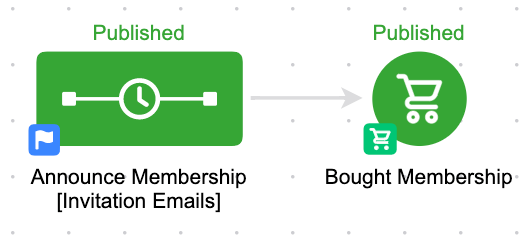
Pretty straightforward. Totally functional.

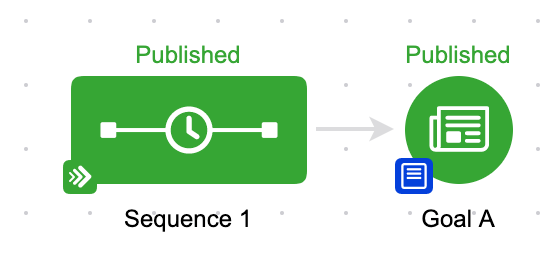
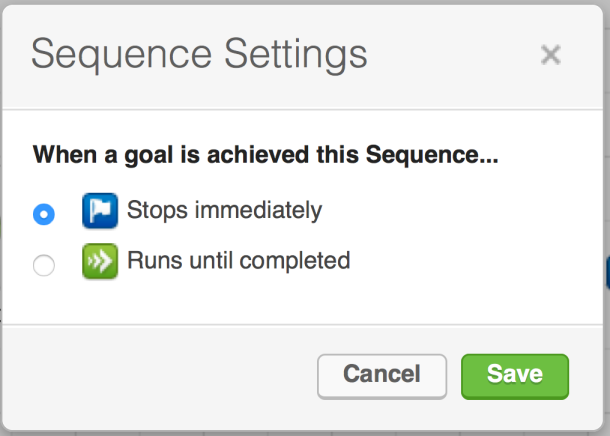
He built it as a campaign instead of a broadcast because he wanted to send more than one email plugging the membership and the benefits, and he wanted all the emails to stop in someone signed up. We had a conversation around this scenario, and decided to drill in a little deeper.

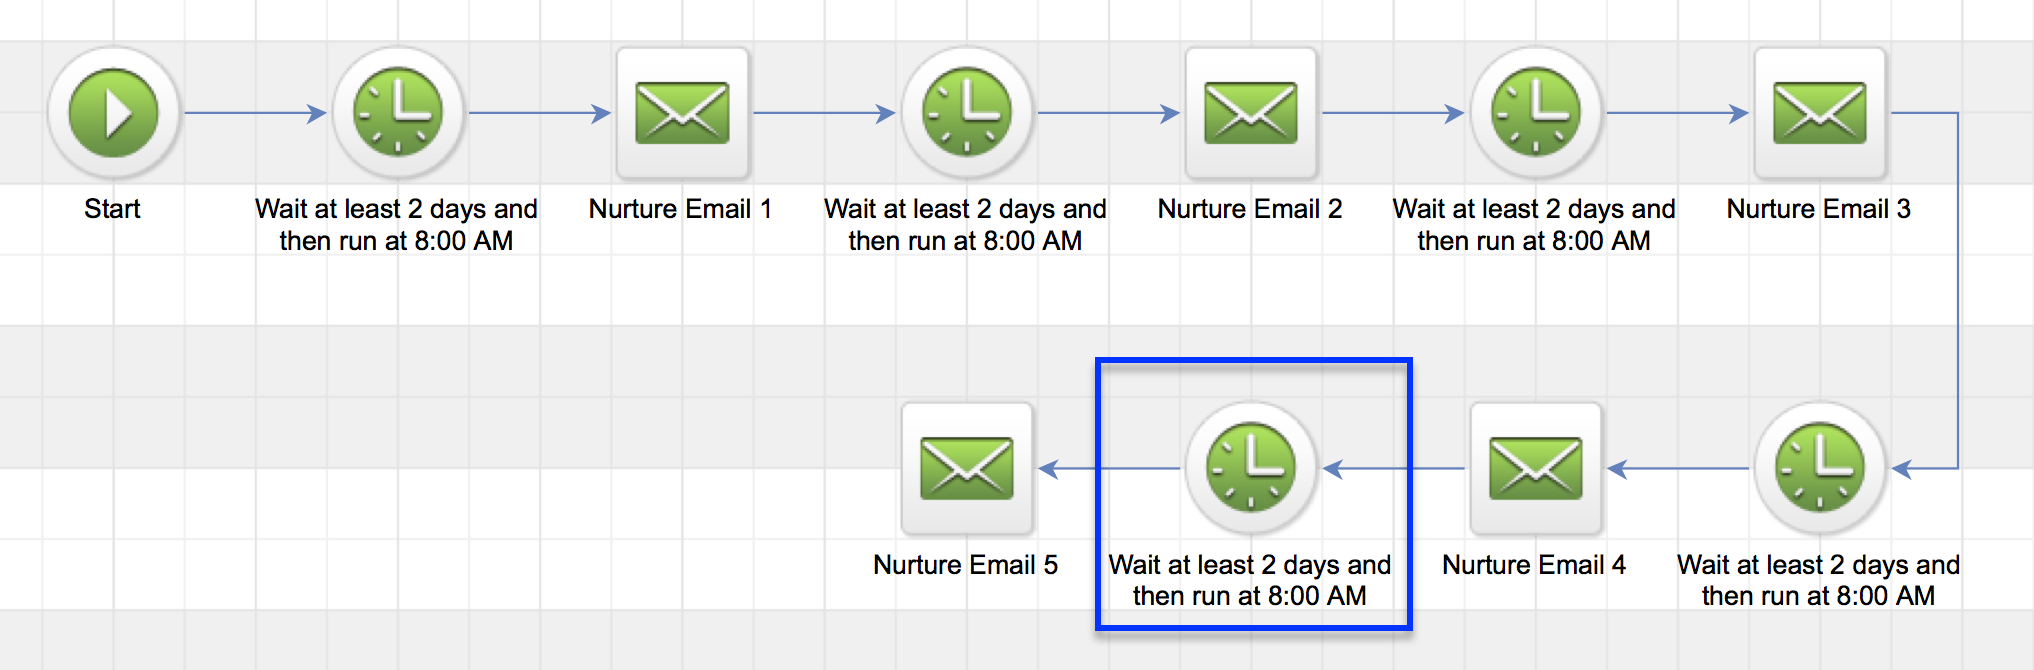
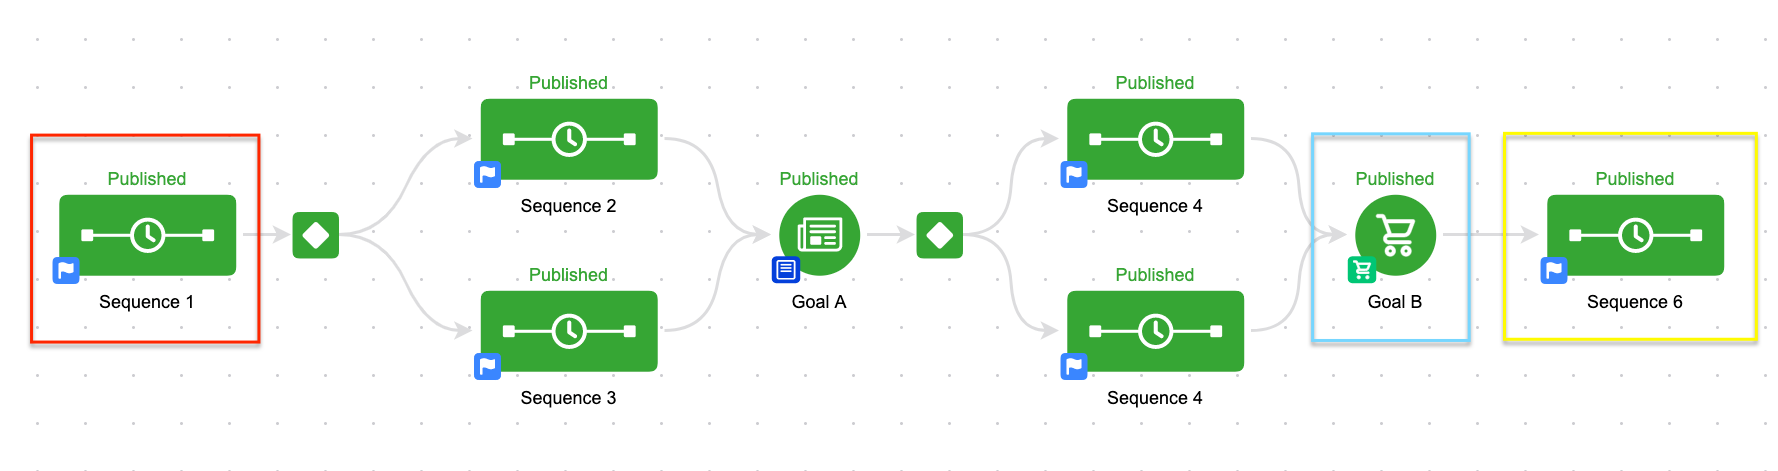
If we want someone to buy, first we need them to click through to the sales page. And because we know that clicking is something Infusionsoft can track, that gives us the ability to add in what I like to call “The Infusionsoft Nudge”. You see, if you ever have two actions you want someone to take, you can (and should) always include a nudge. So that if they take action number one, but don’t take action number two, they get a reminder prodding them to move along.

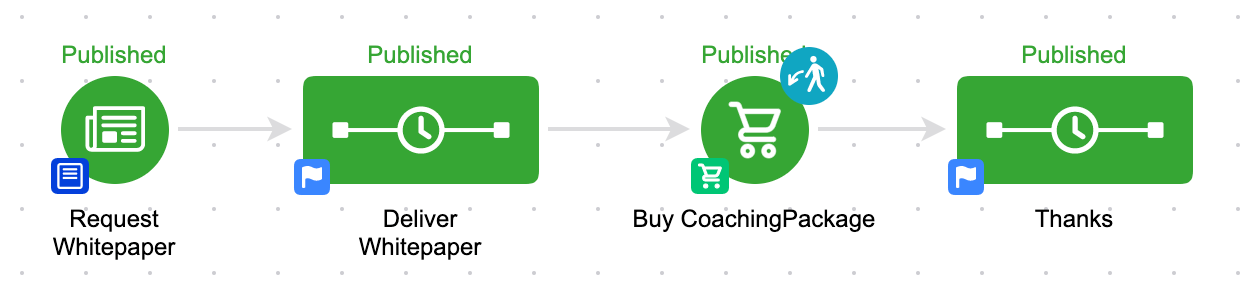
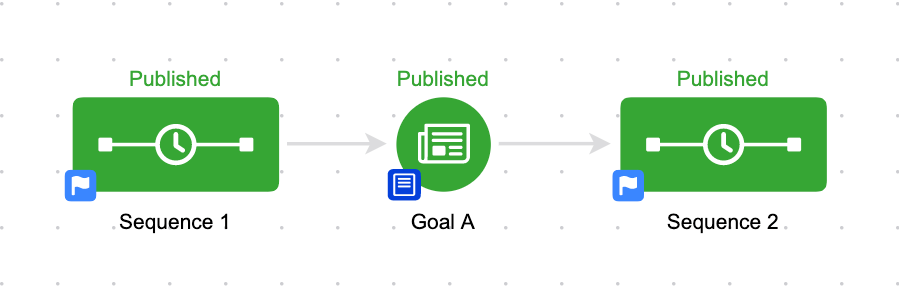
Here’s how it looks for Tyler:

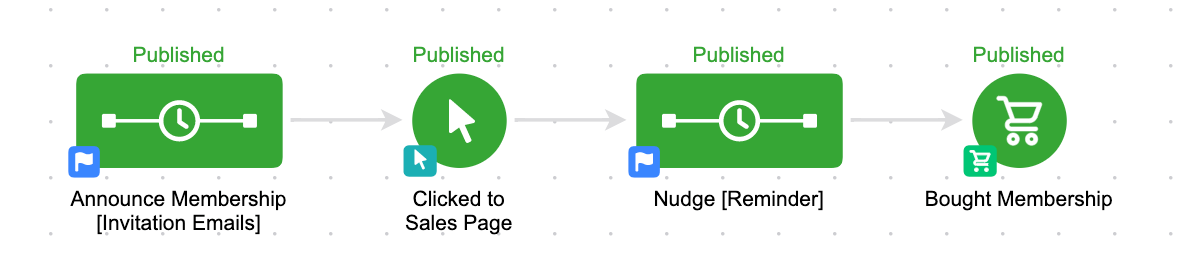
The first sequence and the last goal are still identical. But now what we’ve done is we’ve added a follow-up for those people who click but don’t buy.

This is our safety net.

We’ve still built out what we’d like to happen ideally, but we’ve also structured our contingency plan in case it doesn’t happen exactly as planned.

This simple strategy can be employed literally any time you need someone to do two things.

Like, click and then register. Register and then attend. Buy and then buy again. Submit the first part of a form, then submit the second part. If you are designing any sort of strategy, you should always ask yourself:

What do I want to happen? What are the other scenarios that could happen? What will I do in each of the scenarios?

And then practice your plan B, your plan C and your plan D. If the Colts had simply said “We want this to happen, but if it doesn’t, we’ll call a timeout” they’d probably have been much more successful.

If you’d like to learn more about this concept, or see it in action, you can download the Abandoned Cart Recovery sequence from the marketplace, or check out my CB: Trilogy course where I cover this concept (and much more) in depth.

Campaign Builder: Gotcha #3

Campaign Builder: Gotcha #3

As you probably have gathered if you read the first and second post in this series, the campaign builder is a powerful tool.

But there are also some key nuances to it, which if you aren’t expecting, can totally catch people off guard and cause their fair share of grief.

So, in this third Gotcha I want to address one of the single hardest things for people to really grasp as it pertains to the campaign builder.

In fact, on two separate occasions I’ve seen Keap Certified Partners selling education on this exact topic in which they still get their facts wrong – or, omit a critical piece.

I’m talking about what you can expect to happen when you republish a live Infusionsoft campaign that has people in it.

First of all, you should know that republishing is a whole subject on it’s own, and there are so many “what if” type scenarios that it’d be impossible to cover them all here.

So what I’m going to address is specifically what people commonly refer to as “The Rule of 7 Days”, or as I like to call it “The 7 Day Shadow”.

(Note: The Rule of 7 Days was eliminated in an Infusionsoft update in Dec 2017.)

It’s also worth calling out that the Advanced Automations course from Keap Academy dives into this, and all of the other campaign builder nuances – so if you’re looking to really wrap your head around the rest of this topic, I’d start there.

But for now, here’s the module of that course that talks about republishing:

CB: Gotcha #3

In a perfect world, we’d all build our campaigns out from start to finish, we’d launch them, and we’d get it right the first time and we’d never have to go back and make any changes.

I remember talking with an event attendee once and they got genuinely frustrated when I said “Just don’t make any changes to your campaigns and you won’t have to remember any of this stuff.”

And of course I meant it in jest, but the reality is that the 7 Day Shadow, and any of the other republishing nuances ONLY come into play when you are making changes to a live campaign that has people in it.

UPDATE: As of December 2017 the Rule of 7 Days, or 7 Day Shadow is being removed. I’m leaving this section of the article here for historical context, but it may no longer describe the behavior in your app.

So, without further ado, let’s talk about The 7 Day Shadow. And I’ll even explain why I like this name better than “The Rule of 7 Days”. Here’s the way that it works: When you republish a campaign, the system will recalculate the steps in each individual sequence for each contact.

Steps that have already been processed, will not be processed again.

This means that if I change the timers, and an email that you’ve already received is now scheduled to happen tomorrow, it will NOT send that email, because it recognizes that you’ve already received the email. It also means if you change the content of an email, or the subject line, it will not resend that step to people who have already received it.

NOTE: Delay timers are the only timers affected by this. Field timers and Date timers ONLY run on the exact date (or during the range) for which they are scheduled.

Changes you made to the sequence can only impact Active or Queued Contacts that are in that sequence.

This means that if you make changes to a sequence, it can impact the people who are still actively receiving that specific sequence. Or, if contacts are still in that sequence and are queued (because they haven’t moved on) it could impact them too. But any changes you’ve made will not affect contacts who are “Done” (meaning that they’ve progressed into the next sequence, or they’ve achieved a goal to exit the sequence).

Any steps you’ve added that are scheduled for the future, will be scheduled as if they were always there.

If I’m receiving your 3 tips sequence, and I’m on tip number two and am scheduled to receive number three tomorrow (shown in blue), and you decide to come in and add an fourth tip (shown in red). When you republish it will schedule the fourth tip for the future, and I’ll receive it a day after the 3rd as intended. It’ll be as if it was there the whole time. FourTips

New or updates steps scheduled to occur in the past 7 days will process immediately.

This is the hard part for people to wrap their heads around. Think of it this way – if you add a new step, or you change the timing of the existing steps – the system is going to recalculate the whole sequence (for the people that are active and queued).

And if the new step you added, or any of the existing steps for which the timing been modified, happen to fall within the last seven days, then the step will process immediately. (In most of the examples I use I’m referring to emails, but the campaign uses the same logic for all sequence steps) Let’s take a look at a few examples using two of my childhood crushes to really wrap our heads around this:

Example 1:

Topanga Lawrence has been in your nurture campaign for exactly 9 days. Your campaign is structured to send an email every three days. So, she’s just received her third email, and is scheduled to receive email number four in exactly three days. She’d be waiting on the timer indicated in red below. (I’ve built it using that “snake” layout just to keep it all on one screen) Nurture Campaign 1 Okay, so now let’s say you decide that you need to change the sequence timing. And instead of sending an email every three days, you decide that you want to send an email every two days. So you come into the sequence, and you change all of the timers, and then you republish.

Here’s what you can expect: Topanga has still been in the sequence exactly 9 days. But now, with the new timing, it means that email four should have been sent yesterday. It’s scheduled to be sent 8 days after someone enters the sequence. And since Topanga has been in there 9 days, email 4 would have been sent within her last 7 days. So, it’ll process immediately.

After it sends email four, then Topanga will queue up on the blue timer below waiting for Email 5. Which is scheduled for 10 days after the start of the sequence, and would be tomorrow for Topanga. Nurture Emails 2 Are you with me so far? Let’s look at another example.

Example 2:

Let’s say Kelly Kapowski is in the same sequence. But she’s been in there for 45 days. That means that she has completed all the steps you had scheduled, but she hasn’t moved on. So she’s considered “queued“.

Now you decide to extend your nurture sequence, so you add another two day delay, and then a 6th email.

Well, when you publish this new step, the system is going to recalculate the steps in the sequence, and when it realizes there’s a new step, it’ll decide whether or not it should be sent to Kelly, based on where it falls with respect to how long she’s been in the campaign. Nurture Emails 3 Because the new step is scheduled to happen 12 days after someone enters the sequence, and Kelly has been in the sequence for 45 days, this step would not have been sent to her in the last seven days. And therefore, it won’t be sent to her at all.

Now, if you added a bunch of steps (every other day), giving you 22 total emails (over 44 days), so the last of which would fall 44 days after someone entered the sequence.

Now, when you publish Kelly WOULD receive email #22. Because it should have been sent in her last 7 days. It should have happened on day 44, and she’s been in there 45 days.

But here’s the catch, Kelly will also receive emails 21, 20, and 19. Because those emails would have been sent 38, 40 and 42 days after she entered the sequence.

So, because she’s been in there 45 days, all four of those emails are within her last 7 days. This is why I call it a 7 Day Shadow. As the contact spends time in the sequence, their shadow stays with them.

It doesn’t matter if they’ve been in the sequence a year, if you add a step that falls 360 days after the start of the sequence, that step will process immediately for that particular contact. I know, it get’s a little hairy. Here’s one way to remember it.

If A is equal to the total amount of time that a contact has been in the sequence.

And B is the amount of time from the start of the sequence to the scheduled step.

If A-B is less than 7, then the step will process right away.

There are a few things to look out for here. If there is a long gap, and you add multiple steps, it’s possible that some contacts might get the last email (email 44 in the example above) without getting the in between email. It’s also possible that multiple steps could fall within their last 7 days, and so they could receive more than one step at the same time (which could also be confusing).

So, what do we do about it, right? That’s kind of the natural question here. It’s a little tricky, and of course you want to create the best possible experience for your customers, right?

Well, there are a handful of ways to handle this, and I dive into a few options in the third chapter of the CB: Trilogy course, but for the purpose of this post I recommend a tactic I call “switching the tracks”.

It works like this.

Switching The Tracks

When you want to make changes to a sequence that has contacts in it, and you aren’t sure what will happen. You make a copy of the sequence, and make all your updates to the new sequence.

Then, once it is ready to go, you just simple detach the original sequence, and switch the tracks to route new contacts into the new sequence you’ve now built. It’s not perfect, because you now have contacts in two sequences, and the folks in the original don’t get you fancy new updates, but this way guarantees that you know what your contacts will experience, and that no one gets emails out of order, or multiple emails at once.

So, that’s the 7 Day Shadow. I like this better than “Rule of 7 Days” because I think it’s clearer that the rule is on a per contact basis. I’ve heard people say that changes you make don’t matter after a contact has been in the sequence for more than 7 days. This is wrong.

I’ve heard people say that after a contact has been queued for 7 days, they drop out of the sequence. Also wrong.

What matters is how long the contact has been in the sequence. And how long after the start of the sequence the step is scheduled. That’s all. If you made it this far, thanks for reading. Lemme hear those questions!

Where do I learn more?

The Keap Academy platform features a robust course, The Advanced Automations Complete Collection, covering the fundamentals for building campaigns, from basic to advanced features and settings.

Campaign Builder: Gotcha #2

Campaign Builder: Gotcha #2

Last week I wrote a post about a gotcha that can trip people up as they’re building campaigns in Keap. Well, this week I want to tackle another common misunderstanding I see.

By default, what happens when a goal is achieved?

  1. The sequence before it is stopped.
  2. The sequence after the goal is started.

This brings us to gotcha number two.

NOTE: To cover this gotcha in with the level of detail it deserves, this blog got a little longer than I anticipated. So, I recorded a quick video overview as well, if that’s more your speed, scroll to the bottom for the TL;DR version.

Gotcha #2:

The key part of that question above is “by default”.

And the reason I’m emphasizing that phrase is because that isn’t always the case.

Keap has specific sequence settings, and goal settings that can affect the expected behavior, and can make number one or number two above untrue.

If you don’t thoroughly understand the different settings, then it’s really easy to think you have things figured out, and be totally caught off guard when something doesn’t work the way you expected.

First, let’s talk about sequence settings.

Have you ever noticed how each sequence in your campaign has a little badge in the lower left hand corner?

By default, it looks like a white flag on a blue background. This little graphic is the indicator as to whether or not this sequence will stop when a goal downstream is achieved, or whether it will keep going.

If you ever went to the dentist as a kid, you probably remember paging through Highlights magazine while in the waiting room – and if you were like me, you took great pride in your ability to dominate the “Spot the Differences” game.

You know, they’d show you two similar images, and your job was to identify that in one picture the kid had an extra freckle, or an untied shoelace.

Anyway, this is kind of like that. The campaign is identical, with the exception of the little colored badge on the lower left hand corner of the sequence.

In the first image the sequence WILL stop when Goal A is achieved, in the second sequence it WON’T stop when Goal A is achieved.

The reason this confuses people isn’t because it happens frequently. Most people have never clicked on that flag, and have never changed this setting:

I’m covering this here because it breaks the commonly accepted rule “sequences stop when goals are achieved”. When things break the rules we’re used to, it can get confusing.

Now, the natural question at this point is “Why wouldn’t I want my sequence to stop?” – and the best answer to that is that sometimes you’ve set certain expectations, and you need to deliver on what you said you’d do.

Like in this campaign here:

If we’ve set the expectation that we were going to send someone ten tips, well, even if they buy the upsell we’re offering, we still want to deliver the ten tips we’ve promised. (Yes, there are dozens of other ways to handle this specific scenario, but I’m illustrating a point here guys…)

If you find this type of stuff valuable, or you want a place to ask questions – then you might get a lot of value from our private community. Check out the OG Membership details here >>

Okay, let’s move on to the second half of this Gotcha. Goal Settings.

When a goal is achieved, a contact starts the sequence following the goal, right?

Well, yes. Normally. But again, there is a setting that controls this. You see, goals work either globally, or locally. By that I mean they can either be configured for all contacts anywhere, or only for contacts who are already in that campaign.

What this means is that you can build goals that are listening for anyone anywhere, but you can also build goals that are only listening for contacts already in that campaign to take an action.  The global goals are commonly referred to as “entry points”.

Trust me, this sounds a lot more complicated than it actually is.

Let’s look at a few examples:

We’ll start with a really easy one. In the above scenario, if any contact achieves Goal A, they will be added to Sequence 1. In this scenario, this goal is considered an entry point to the campaign because there isn’t anything prior to it.  So, if a goal doesn’t have a sequence before it, then it is automatically an entry point, and is fair game for any contact.

But for goals that are “landlocked”, they are not naturally entry points. Check this one out:

In this scenario, if someone requests my whitepaper, they’ll get the whitepaper delivered in the next sequence, and then they’re driven to purchase, and after the purchase they’ll get some sort of thank you.

But, if someone buys my coaching package who is not in this campaign, then they will not be added to the thank you sequence. The purchase goal is landlocked, and is not currently an entry point. So that means that the goal is only listening for purchases from the group that is already in this campaign.

Again, the natural question is: “Wouldn’t I want the thank you sequence to go to all people who buy, even if they skip the whitepaper part?” And the answer is that “Yeah, you probably would”.

But what if you wanted to have some sort of specific follow up, and you wanted to craft your thank you message to be really specific. Something like:

“Hey, thanks for buying my coaching package. As you probably saw in the whitepaper, I’m really focused on three things, X, Y and Z. And this coaching package is the perfect way to take the methodologies I talked about in the whitepaper and translate them into results for your business.”

Well, the way it’s currently configured, you could be that specific because you know the only people who can get into the “Thanks” sequence, are those who also came through the whitepaper sequence.

GoalSettingsBut, let’s say for a moment that you didn’t want that. Well, if you click on the colored badge in the lower left hand corner of any goal, you can denote whether or not you want that goal to be an entry point. It’s called Goal Settings.

This one little setting is often overlooked, but it can be really useful for your more complex campaigns; where you may need to have multiple entry points throughout the campaign.

One thing to note, is that some goal types don’t permit you to make the goal an entry point.

For example, link click goals, and task completion goals don’t allow you to configure them as entry points, because in order for someone to achieve one of those goals they would have to have been in the sequence prior to the goal.

Additionally, if there isn’t a sequence prior to the goal, it also won’t let you set it as an entry point. It’s an entry point by default.

So, now that we’ve changed the goal setting, let’s take a look at that same campaign.

You should notice that the Purchase goal now has a visual indicator letting us know that it’s now an entry point. The little icon in the top right, a dude with a green arrow, shows us that contacts can achieve that goal, and be added to the campaign at that point.

Okay, so, here’s the last twist to all this.

When we talk about a “Campaign” – we’re talking about EVERYTHING that is on the same canvas. So that means if they are anywhere in the campaign, that all goals in that campaign are considered entry points. Even if they are seemingly unrelated, and there’s no connecting lines between them at all.

Here’s an example:

This is one campaign. Even though there are separate and parallel processes, because they’re built on the same campaign builder canvas, the system thinks of them as being the same campaign. So, if someone is in Sequence 1, and they achieve the Purchase Goal, they’ll not only stay in sequence 1, but they’ll also start Sequence Y.

Okay. Like I said originally, this sounds more complex that it actually is.

What I’ve found with things like this, is that it can be hard to understand these concepts before you actually need them because the information seems rather abstract.

So, that’s why I’ve included so many examples, with the hopes that if you come across one of these you’ll have an idea of what the expected behavior looks like.

But please, ask questions if you’re unclear on any of this. I’m happy to elaborate.

If you love this stuff, and you want to dive deeper, I strongly recommend checking out the Advanced Automations Complete Collection course from Keap Academy, covering the fundamental basics and bells and whistles – everything you need to know about the campaign builder.

Oh, and if you’re the type of person who prefers a video tutorial, here’s an overview:

Where do I learn more?

The Keap Academy platform features a robust course, The Advanced Automations Complete Collection, covering the fundamentals for building campaigns, from basic to advanced features and settings.

Campaign Builder: Gotcha #1

Campaign Builder: Gotcha #1

The Campaign Builder is the single most powerful marketing tool I have ever seen. For me, there’s no question about it.

It can solve so many problems, and can work for so many different businesses.  But the very nature of having a tool that is this robust, is that there is a level of complexity associated with learning it.

I want to highlight three of the most common “Gotchas” that I see with the Keap campaign builder. I chose the to use the term “Gotcha” carefully- these aren’t bugs.

They aren’t myths. They’re just intricacies for using the campaign builder, and once you understand them, things will work a lot more smoothly for you.

Gotcha #1:

Goals start and stop sequences. Most people know that, right? But their impact can extend beyond the sequences to their immediate left and right.

Let me show you what I’m talking about.

This is a pretty basic scenario here. If you have contacts in Sequence 1, and they achieve Goal A, they’ll go into Sequence 2. No brainer.

Now let’s step our game up just a little bit. Have a look at this one:

This is effectively the same scenario, with just one twist. Sequence 1 is not directly connected to Goal A.

It doesn’t matter.

If someone is in Sequence 1, and they achieve Goal A, they’ll jump over Sequence 2 entirely, and they’ll be added to Sequence 3.

This is because, by default, goals stop everything “upstream” from them. So, if the contact is in this campaign, and the sequence connects to the goal (directly or indirectly), then by achieving that goal, the contact is extracted from their current sequence and added to the appropriate new place downstream from the goal.

Let’s try this one more time. Check this one out:

So, now things have gotten a little more complex. But the logic doesn’t change one bit. If you’re in Sequence 1 (red) and you achieve Goal B (blue) you’ll be removed from Sequence 1 and added immediately to Sequence 6 (yellow).

The reason this works is because these two icons are connected. I know there isn’t a line connecting them directly, but they’re indirectly connected. Sequence 1 connects to Sequence 2, which connects to Goal A which connects to Sequence 4 which IS connected to Goal B.  Right, kind of a round-about way, isn’t it?

Think of it this way. Goals are things we want our prospect to do. And sequences are the things we do in order to encourage them to achieve those goals.  So, if someone is in Sequence 1, and they achieve Goal B, the campaign builder just says “Oh, okay, great. We don’t need sequence 1, 2, 3, 4 or 5. We can just skip all that jazz and push them into Sequence 6.”

In the above campaign, they could be in any of the first 5 sequences, and if they achieve Goal B, the outcome will be identical. It’ll stop them where they are, and will add them to sequence 6. If it helps, you could draw lines connecting Sequences 1, 2 and 3 to Goal B, but functionally the campaign won’t work any differently, and aesthetically it’ll be…um, painful.

I’ve been mentally preparing this post for a while now, but this facebook post, and an awesome conversation with Christopher Sutton this morning was just the impetus I needed to finally write it.

Here’s the reality: The campaign builder has quirks. Nuances. Intricacies. Call them whatever you like. If you’re going to use it, you’re bound to come across them from time to time. The only solution I know to prevent frustration is to arm yourself with education. Once you know how it works, even if you don’t agree with it, you can at least plan for it.

If you don’t educate yourself, then there’s a higher likelihood that you’ll think something is a bug, simply because you don’t understand it. Or you’ll hire someone to build something for you, but not be able to use it because you don’t understand how it was built. If you’re looking to understand the campaign builder from the very basic fundamentals, to the more advanced features and nuances, there are a number of ways to do it – start with the Advanced Automations complete collection from Keap Academy.

Dig this? I’ve got Gotcha #2 ready for ya right here. Let me know if you have any questions or thoughts on this one!

Where do I learn more?

The Keap Academy platform features a robust course, The Advanced Automations Complete Collection, covering the fundamentals for building campaigns, from basic to advanced features and settings.