


Love what you are seeing?
We have created several courses where we dive more into the technical aspects. So, if you like what you read here, you'll love our courses!!


By:
Greg Jenkins
|
February 9, 2026
|
Technology
Have you ever felt that Keap's reporting was lacklust, or just plain weak? Lots of people have.
I've heard that sentiment more than a few times.
It's clunky, I'll give you that. But I think that Keap's reporting is actually much more powerful than most people give it credit for. In fact, I think that in all my years of working with Keap, formerly Infusionsoft, I can only think of three or four instances in which I truly couldn't find the information I was looking for.
Click here if you wanna jump straight to the video example.
Listen, there are plenty of awesome ways to get information from Keap here's one for finding your open rates from campaign builder emails from my friend Brett at Blick Digital.
And if you want something more robust, there are tools like Graphly out there. I'm not trying to undermine or discredit any of the other resources out there, I just want to share a free trick of mine in case it helps you find the information you need faster or easier.
Okay, no more beating around the bush: Tags.
I use tags to give me nearly any number of stand-alone metrics that I want.
"But Greg, I already have a lot of tags."
No big deal, you're gonna have a few more.
Listen, you can't have "too many" tags, you can only have tags that mean something to you, and tags that don't. If you have tags that aren't carrying valuable information - then yeah, maybe you should tidy those up. But if you have thousands of tags and they all carry meaningful data, then you're doing just fine.
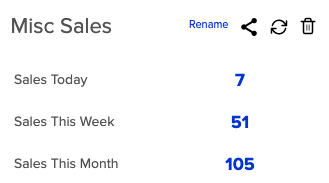
Let's say that when you log in, you want to know how many sales you made last week. In fact, let's say you want to know how many sales you've made each week for the last four weeks, and you want that data right when you log in, every single time.
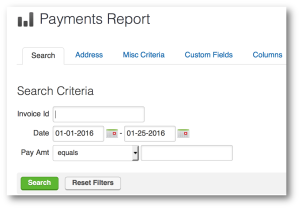
Well, you can use the All Sales Report or Payments Report, but your only date criteria for those reports is a static date range. So, if I wanted to find out how many sales I made last week, or the three weeks before, I'd have to run the report four different times. And even then I still couldn't save it because the calendar dates are static, and so the reports wouldn't update, and in a week I'd have to come back in and run another report for the current week. Garbage. Not gonna work.
So, maybe you get a little creative, and you decide to use an Order Search. The orders section allows you to use some diffe
rent date range logic. Now we've got the ability to run searches for any orders and use some dynamic date ranges.
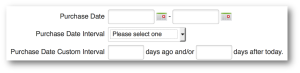
So, this is a bit of an improvement. Now I can use a purchase date interv

al, and this will always be as it pertains to today. So, I have the choice of selecting Today, Last 7 Days, Last 30 Days, Month to Date, and Year to Date. But, even if you choose Last 7 Days, it doesn't give you the choice to say Current Week. Or, The Week Before This Week. You can use the third option for date criteria, which is Purchase Date Custom Interval, and that lets you do X number of days ago and or X number of days after today.
Pro-tip: Did you know you can use negative integers in the Purchase Date Custom Interval fields? So, you can say 60 days ago and/or -30 days after today; which will show you purchases made between 60 and 30 days ago.
The Three Timer Types [in Keap]But, it's still based off of today, and those numbers that you put in are fixed, they won't adjust based on what day of the week you're looking at the report, etc.
Conundrum, right?
Well, thanks for sticking with me, because I've got your answer. It's tags. But not tags on their own, ya see, it's more the strategic application and removal of tags. And the reason most people don't do this is that they underestimate just how powerful the timers in the Keap campaign builder are.
So, if you want to track sales from this week, and sales from last week, and the week before that. Here's how you do it. Build this campaign:
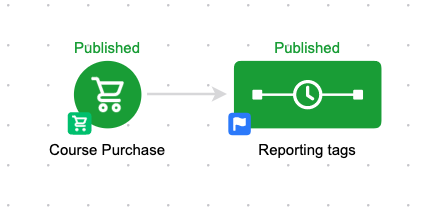
Okay, before anyone goes anywhere, that's just the campaign structure - I promise there's more. But honestly, it is this simple. This campaign is tracking ALL purchases - but you could easily adapt it so that you're reporting on each of your products independently. Just set it up once, and then decide if you want to clone it.
Okay, so, the goal triggers the sequence, and then the sequence is where we manage our tags. Here's how that looks:
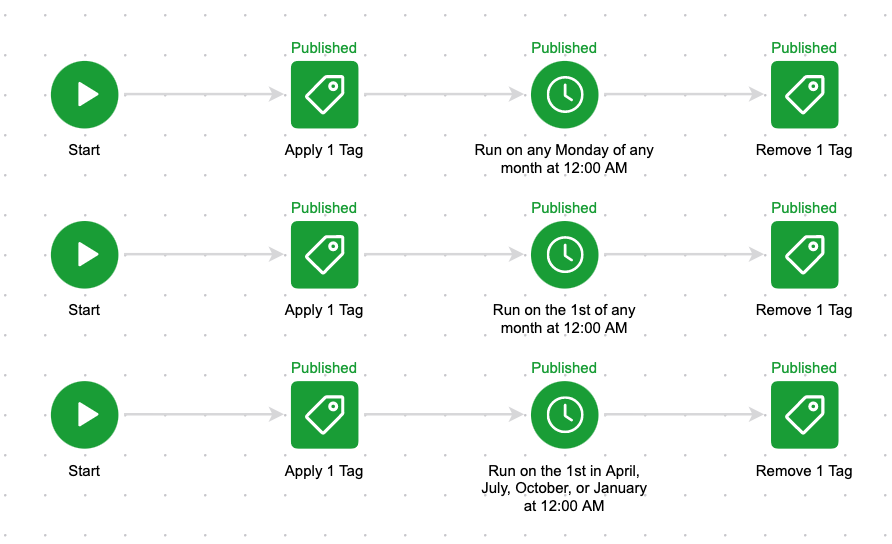
So, when someone purchases it starts the top and the bottom line in this sequence. The top is tagging them as "Purchase this Week" and the bottom is tagging them as "Purchase this Month".
Then I use timers to wait until the end of the week (Sunday morning at 12 am) and I remove the "Purchase This Week" tag and apply the "Purchase Last Week" tag, and on the bottom I do the same thing - I wait until the start of the next month (12 am on the 1st of any month) and I remove the "Purchase this Month" tag and apply the "Purchase Last Month" tag.
You guys, this isn't terribly complicated, and I hope that doesn't disappoint you.
But this tagging structure is so powerful because the timers allow someone who purchases on Monday to have the "Purchased This Week" tag for 5 days, but someone who buys on Saturday only has it for less than a day - it adjusts based on when someone enters the sequence.
The bottom line of logic does the same thing but on a monthly basis - if someone buys on the 5th of the month, they're going to have the "Purchase This Month" tag until the 1st of the following month (no matter what month it is), but someone who buys on the 28th may only have that tag for a few days before it's swapped out for the "Purchase Last Month" tag.
So all you need to do is run a saved search for contacts who have the "Purchased This Week" tag, and the "Purchased Last Week" tag and then let the campaign handle the application and removal of the tags so that the contact shows up on the right searches at the right times.
Or blog subscribers this week, vs blog subscribers last week, etc.
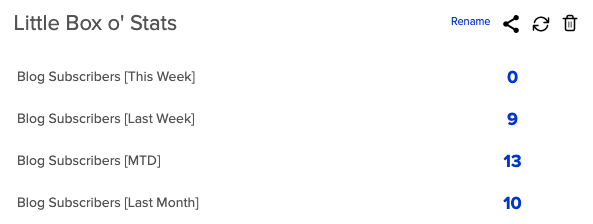
This type of flexibility allows you to compare apples to apples - it helps you identify trends in your business, and it gives you powerful data that can drive your marketing decisions. Oh, and if that wasn't enough, of course these reporting tags can be used in conjunction with your other reports and searches to make them that much more targeted
Think about the metrics you want to track in your business, and start to put together some simple campaign structures to create that data. I'd love to hear any thoughts on this or other reporting tricks you've sorted out on your own.
And if you're looking for specific reports to help you make the most out of your Keap data, here's a great post on the Novak Solutions blog highlighting five of Paul Sokol's favorites.
The example I've used was based on a purchase, but you can use this same tag based reporting set-up to track anything - I also use it for new opt-ins for my various e-books, and to track my blog subscribers as well. Create a tag category of it's own just for Reporting Tags.
We have created several courses where we dive more into the technical aspects. So, if you like what you read here, you'll love our courses!!