The Infusionsoft July 2016 Update

The Infusionsoft July 2016 Update

It’s 120 degrees or so in Phoenix these days (or so I’m told), and everyone knows that when you can’t go outside you might as well work on the Infusionsoft July Update, right?

Well, regardless of the reason, the product team is pushing out another valuable release, and I figured I’d take a moment to share the highlights:

Feature #1: Sharable Dashboard Custom Statistic Widgets

What it does: This allows you to configure a dashboard widget for one user, and then share it to other dashboards for your other users.

Why it matters: This is really valuable for accounts who have a lot of users, or for people who have a lot of Infusionsoft accounts (ICPs, VAs, Partners, etc).

Here’s the deal – you’ve always been able to create saved searches and give other people access to those searches.

But in the past, they had to know where the search was in order to go access it. And if they wanted to add it to their dashboard, they had to know how to add a widget, and then how to configure that widget to give them the information that they wanted.

Not anymore.

With this update you can configure a custom statistics widget (RIP Lil Box O’ Stats) and then once you’ve got it just so, you can push that widget (stats and all) through to the dashboards of other users. Giving them all of the reporting insight, and none of the effort of configuring it.

Feature #2: Create Dashboard Widgets to report on Campaigns

Create_Reporting_Widget
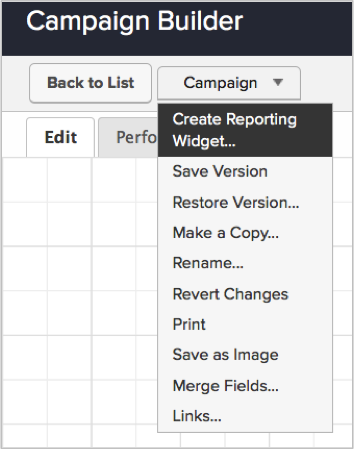
What it does: This allows you to quickly and easily create a widget on your dashboard to give you a handful of statistics from your campaign.

Why it matters: This information has always been available to us, but in order to access it you had to use the performance tab in your published campaign, or you had to create the report from scratch under the Marketing>Reports section.

Not anymore.

With this new release Infusionsoft will automatically choose 5 goals (goals only), and will a widget to your dashboard telling you exactly how many people have achieved this goal in the last 30 days.

Caveat: Yes, I’m a huge Infusionsoft fan; but I also have really high expectations for them, and this particular feature is….a good idea. It is. I think this is a step in the right direction, but I don’t think it’s quite there yet. The good news is, if their recent track record of improving is any indicator, I think Infusionsoft will get there over the next few releases. In order for this widget to really be usable, we need a few things to be added:

  1. I need to be able to choose the goals that I want to track. Most of my campaigns have more than 5 goals, and having the system determine 5 random goals isn’t going to give me the insight I need.
  2. We need to be able to adjust the date range. Right now it defaults to show you those 5 goals and their activity over the last 30 days. I’d like to be able to switch that to 24 hours, MTD, YTD, last 7 days, etc.
  3. We need to be able to apply additional filters to this report. Show me how these goals are performing for those who don’t have the “customer” tag. Or who are assigned to Greg and not Craig.
  4. Right now it only draws goals that are exit points, or entry points. I’ll definitely want to be able to measure important milestone goals along the way.
  5. Finally, why isn’t this widget sharable? I mean, forgive me, I’m not a developer – but if you’re busy coding up a new widget. And you’re also busing coding up the ability to share widgets. It seems like maybe we’d be able to share the new widget. Please?

Like I said, good step in the right direction. I’m looking forward to seeing where it goes from here.

The other big features that they’re releasing with this update have to do with the beta email builder.

  1. They’re allowing you to select legacy templates now when you want build an email, and as you bring that template into the email builder it will automatically convert the legacy elements to the new mobile responsive equivalents. It won’t be an exact translation, because not everything from legacy has a 1:1 counterpart in the new builder, but it should be pretty close.

  2. In that same vein, you’re now also able to convert existing emails over to the mobile responsive beta builder. Yup, that means if you have hundreds of emails you’ve built and have been using, and you’d like to convert those over to mobile responsive emails, you don’t need to rebuild everything. You can  use the converter tool to migrate the old content into its fancy new home.
Seek Customer Experience Lessons

Seek Customer Experience Lessons

Running a business for the last year has changed me in a number of ways. (In fact, that should probably be a blog post of its own in the near future.)

Anyway, if you run your own business, then I’m sure you can relate. There’s something about building and managing a brand that affects the way you look at other businesses. You start to think “Oh, that was really smart” and “Um, I’m not sure I would have done that the same way”.

Actually, I’m not even sure that running your own business is a prerequisite for that – all you have to do is pay attention to how you interact with other businesses and then consider how that can help you in your day-to-day role; whether that’s as an entrepreneur or not. Sounds simple enough, right?

Well, it is simple. But the reality is that most people see these lessons, and they just choose not to do anything with the information. Here’s what I mean: We’ve all had a bad customer experience before. You know, where things just didn’t go as you expected, and you didn’t feel valued. And we’ve all had a great customer experience before – the kind where you WANT them to give you a survey so that you can rave about it to someone. The trick here, and what I think a lot of people overlook, is taking that experience and figuring out what you can take away from it.

Yeah, it’s one extra step. But it’s that simple step that prevents 90% of people from taking their day-to-day interactions, and drawing direct benefit from them that they can pass on to their customers and to their prospects.

Let me illustrate with an example:

On June 13th I received an email from Brendan, the CTO at Wistia. Wistia is the video hosting service I use for all my videos, and for the past year they’ve been really solid. I recommend them pretty regularly. So, I get this email, and it’s an apology. It turns out that a customer had made them aware of a security vulnerability in their application that could allow a logged-in Wistia account owner to view other customers’ receipts or invoices.

They go on to say: “We deployed a fix for the issue within 30 minutes of learning about it. While we have no reason to believe that anyone intentionally accessed your receipts, we don’t know definitively that they were not accessed, which is why we’re writing to you now.”

Customer Experience Email

That’s it. There was an issue. It was reported. They fixed it. And now they’re letting me know. Heck, they even included a brief 30 second video explaining the issue and apologizing again. (See the video)

So, Wistia had a security vulnerability, great. Why am I raving about it?

Well, I’m not raving about the vulnerability. I’m raving about the way they handled it. The Customer Experience they created. You see, if they hadn’t sent an email notifying me, I probably never would have even known that the issue had existed, or that it had been resolved. My life would have been pretty much unchanged.

But sending the email did a couple of things: It brought an issue to my attention. And yes, that issue wasn’t a fun one, but by bringing up a tough subject, and doing it delicately, and with empathy – they’ve fortified their relationship with me; and demonstrated that I can trust them. They took ownership of their mistake, educated me on what they were doing about it, and issued a genuine apology.

That’s good enough for me. Heck, look at the comments that their other users left on that video. People loved the transparency and care that Wistia demonstrated. This mistake may have actually made their customers love them more.

Wistia Customer ExperienceSo, I felt pretty good about the whole interaction – but remember, that’s not enough for me. I looked at this situation again to what I could take away for Monkeypod, and here’s the customer experience lesson:

People are more likely to forgive you when you make a mistake if you own it, are authentic, and give a meaningful apology. I don’t have a plan for making any mistakes that merit an apology anytime soon, but I am happy to say that now I do have a plan for how I’ll handle it if I do. Because hey, there’s a reasonable chance that some day I will. And the way Wistia handled this is a template for how I like to think I’d respond to a similar situation.

How about you? Any interactions lately (good or bad), that you can harvest lessons from for your own business?

Integrating WebinarJam and Keap

Integrating WebinarJam and Keap

Update 2023: Nathan Householder did a deep dive into WebinarJam’s updated features and settings and was kind enough to record this demo showing Keap users how to connect with WebinarJam. Enjoy.

Note: The article below was last updated in August of 2018 with a contribution from Chad DeLaura covering how to integrate when you’re doing a webinar series. (See Update)

I no longer use WebinarJam and so have not kept up with the various changes and updates they’ve made – the instructions and suggestions below may work just fine, but it’s also possible that they are no longer current.

For a complete list of tools that I use and recommend check out the Monkeypod Toolbox Ebook.

So, in case you haven’t heard, WebinarJam is a tool that allows you to run a Google Hangout like a full scale webinar. It’s basically a plugin, or an overlay, that gives you a suite of tools to use during your Hangout. And, it’s pretty darn solid.

I have done my share of webinars in the past, but I hadn’t done any since starting Monkeypod, and that was bothering me. I mean, webinars are a proven way for to disseminate information, provide value, and engage with your audience. So, I decided to get back into it, and I started researching Webinar platforms and I kept coming back to WebinarJam as the best mixture of tools that I need while still being affordable. (It’s about $2000 less per year than GoToWebinar, I think.)

If you’re new to webinars, WebinarJam is great because it has a step-by-step wizard that allows you to easily create your webinar (see the wizard steps highlighted in yellow).

WebinarJam_Wizard

This wizard walks you through the normal steps you’d nee to set up to host your webinar (like presenter details, webinar schedule, the registration page design, etc), but because this tool was designed by marketers, they also included steps in the wizard that are a little more advanced (like integrating with your email marketing platform, and prompting you to create polls and offers ahead of time that you can deploy during your webinar).

The integration with Infusionsoft is really pretty straightforward, in fact, there are two. The simple integration simply passes their information back to your Infusionsoft account, and the deep integration is a little more robust. The deep integration requires that you add your Infusionsoft account name, and API key to authenticate.

WebinarJam_Infusionsoft_Integration

And once you’ve done that, you can then select tags (by ID number) that you’d like to have applied when someone registers, attends, doesn’t attend, leaves earlier, arrives late, watches the replay or buys. Yup, this means that you can design a campaign with very specific follow up based on any of those circumstances. Not bad, eh?

WebinarJam_Infusionsoft_Tags

So, the tool itself it pretty slick. It does pretty much everything that I would want it to do. And it’s pretty intuitive to get set up. So far so good, right? Well, with one little hitch – WebinarJam has its own registration pages, and they’re….okay. They’re not bad, but they’re not great either. And they’re hosted on WebinarJam’s domain. Here’s an example of one registration page:

WebinarJam_RegistrationPage

Not bad, right? Yeah, the pages themselves are actually okay. But the registration box that pops out is kind of ugly. And, if you want to bypass their registration page and use your own you can, but, you still have to use their pop-out box. Which looks like this:

WebinarJam_Reg_Box

So, I didn’t want to use their registration pages. I’ve gotten pretty formidable (if I do say so myself) at creating my own LeadPages pages, so I thought ‘Alright, I’ll just use that”

At first I tried to use LeadPages to pass the info to WebinarJam and then pass the info from WebinarJam to Infusionsoft; but in order to do that I had to embed the WebinarJam box on my LeadPage, and it wasn’t exactly “on brand”, so I decided to go from LeadPages to Infusionsoft, and then post the information from Infusionsoft back to WebinarJam using an HTTP post.

WebinarJam DOES give you one-click registration links that you can you can use for registering people who are already on their list, you know, so they don’t have to type in their information that they’ve likely already given you. And I fancy myself a fairly technical guy, so I figured I could probably deconstruct this auto-registration link and create an HTTP post that would register people.

Well, I’ll save us all some time and let’s just say “It wasn’t as easy as I would have liked.” But in the end, I did figure out a way to configure an HTTP post to register contacts from Infusionsoft to WebinarJam. And this gave me the best of both worlds. I could use the one-click registration link for my existing folks, and new people would come through my sexy LeadPages page and then be registered via HTTP post.

Here’s what you need to know:

(Note: Due to WebinarJam updates, you may have a different version of their software – if your account doesn’t match up with the screenshots below check the update on the bottom of this post for instructions on the newer version)

When you get to step 5 in the WebinarJam wizard, you have to enable the API Custom Integrations setting. This will give you your API Key, WEBICODE, and MEMBERID. You only need the second two:

WebinarJam_API_Key

Once you have those two pieces of information, you can set up your HTTP post in Infusionsoft. You can add it in your campaign in whichever sequence makes sense, but usually it would be following your own registration form. Here’s how you configure the HTTP post:

HTTP_Post

The names in the left hand column of the HTTP post don’t change. The URL that you’re posting to doesn’t change, that always will be this URL: https://app.webinarjam.com/api/v2/register

(EDIT: For EverWebinar, you’ll use a slightly different URL: https://app.webinarjam.com/api/v2/ever/register)

If you want their complete API documentation you can check it out here, I used the information from page 6 for this particular piece. (EverWebinar API documentation here)

You’ll probably want to set up the name and email value pairs just as I’ve done above, using the Infusionsoft merge codes. And the bottom bit, schedule, that designates which webinar you want to register them for (leave it as 0 unless this is a webinar series).

The parts that will change are the API key that you copied from WebinarJam, and the Webinar_id that you copied from WebinarJam – though it is worth pointing out that WebinarJam calls this Webicode on the API integrations tab you’ll be copying from.

So, that’s it. It took me 5+ hours to figure out how to have WebinarJam, LeadPages and Infusionsoft all making sweet music together, and in approximately 7 minutes of reading, you can now benefit from my research and testing.

NOTE: The one drawback to register guests this way is that you have to enable the registration notifications from WebinarJam, because that’s how their registration link is distributed. Because we’re registering them through an HTTP post, the isn’t an easy way to deliver their registration link to them through Infusionsoft. Though I have it on pretty good authority that there is an app being developed that will solve for just such an occasion. Update: Here’s the app, EverJam that I was describing.

Now, executing the live webinar was a whole different story, and one that probably deserves a blog post of its own. For tips on running your own live webinar, check out this blog post. I would love to hear about your own experience with WebinarJam or another tool you like!

Worth noting: Yes, my links to WebinarJam are affiliate links. But hey, they’ve got an awesome product and an affiliate program. If you think you’re going to recommend WebinarJam, I’d recommend signing up too. Sign up here.


Update: August 2017

WebinarJam has had a few updates since this post was originally created, and now some folks are on the new version which doesn’t match up with the screenshots or instructions above. Here’s the updates steps for registering attendees to your WebinarJam webinars via an HTTP post in Infusionsoft.

Step One: First you’ll want to select Advanced Settings from your list of webinars.

Step Two: Then you’ll need to enable API Custom Integations (look for the blue check mark to indicate it’s enabled). This will reveal three fields for you, Member Id, Webicode, and API Key. You won’t need the Member Id, but you will need the other two.

Webinar Jam Advanced Integrations

Step Three: Now use that information to configure an HTTP post in whatever sequence you choose (usually this would be in the Infusionsoft campaign builder, immediately following the registration form your contacts are submitting).

New HTTP Post

Note: The webinar_id is the Webicode from the previous step.

Here is the Post URL for WebinarJam: https://webinarjam.genndi.com/api/register
Here is the Post URL for EverWebinar: https://webinarjam.genndi.com/api/everwebinar/register

(Here is the updated complete API documentation for WebinarJam and EverWebinar, where most of this information is from.)

How to integrate for multiple WebinarJam or Everwebinar Webinars

Contributed by Chad Delaura

Step 1: Login here: https://account.genndi.com/login

Step 2: Once logged into either WebinarJam or Everwebinar go in and click the green button labeled “Your Links” at the top right of the specific webinar you want to setup

Step 3: Do this after following Greg’s instructions above on setting up the initial HTTP post:

You need to find the proper Schedule ID, so after clicking “Your Links” go to the button on the right named “Replay Recording” and in the dropdown select the proper session you’re setting up and look for the ID (NOTE: the ID is the second to last number in the URL in between two slashes(/1/) such as the “1” listed in this example URL (ALSO: See image below for example):
 

So, if you create an Infusionsoft opt in form with Greg’s instructions above you can now create multiple radio button or dropdown options for different times/dates of a webinar to register for…

Then, you can tie the opt in form into a campaign with a decision diamond to fire off specifically configured HTTP post’s sequences (Based on Greg’s instructions) for people to get registered for multiple webinars

(NOTE: The only variable that changes from Greg’s instructions to setup one is the schedule ID everything else stays the same)

Confessions of a Campaign Expert: Compartmentalized Campaigns

Confessions of a Campaign Expert: Compartmentalized Campaigns

Mike Harris, the author of today’s blog post, is someone for whom I have a tremendous amount of respect. Actually, our career paths with Keap haven’t been all that different. We were hired around the same time, we’ve both run Infusionsoft University, and we both have logged the hours to call ourselves campaign experts. Mike has helped a lot of small businesses and I’m pumped that he’s taken the time to share some of his insight.

Confessions of a Campaign Expert: Compartmentalized Campaigns

Throughout my Keap career (going on 4 years) I’ve learned a lot about the campaign builder.  It was a new tool when I was hired so I simultaneously learned the old legacy Follow-Up Sequences as well and the brand new Campaign Builder.  I learned what worked well, and what didn’t, through my own experimentation as well as the experience of other customers.

One thing I noticed was that people seemed to try to cram as much as they could into a single campaign.  I understood the reasoning behind it (to keep everything related in one spot) but what they ended up with was a giant spider web that looked more like a mess than a business process.  Did they work? Sometimes.  Did they break? Yes, quite often, and with a huge campaign it’s harder to find a breaking point.

So the solution: Compartmentalize Your Campaigns

Side note about myself: I have ADD and I get distracted easily. If there’s too much going on all at once, I find it hard to focus.  This actually worked to my advantage when building campaigns or helping customers build theirs.  I tried to keep things in smaller, intuitive chunks or compartments and found that it not only worked for me but for my customers as well.

When processes are separated at natural breaking points a couple things happen.  The first is that things just tend to work better. Fewer moving pieces in a campaign usually leads to a more reliable and efficient campaign. So, try to exercise some restraint when you get a big idea.  I’ll lay out how to break that campaign up a little later.

Another benefit of breaking campaigns up into more manageable chunks is that you start to see multiple uses for certain pieces.  This means you won’t have to keep duplicating your work.  You can just piggy-back off the work you’ve already done which not only saves you time but keeps your messaging and processes consistent.

So, how do you compartmentalize your campaigns, Mike? Well, I’m glad you asked.

  1. Look for natural points of separation.
    • For instance, if you have a web form offering a free report and then guiding them towards a purchase, the purchase is a natural point of separation.  The contact goes from prospect to client at that point.  Our relationship has changed and, with it, communication should change, as well.
    • Another point of separation is where a handoff occurs.  Whether you are handing a task off to another employee or having a third-party plugin run an action, those can be good points to consider a separation of process.
    • Just remember, if it feels like you shouldn’t be starting a new campaign at a certain point, don’t do it. Make sure the separation make sense to you and those you work with.
  2. Link the campaigns together
    • There are only a couple campaign goal types that can link one campaign to another: tags and purchases are the two biggest ones.  If you are not using Infusionsoft’s Ecommerce or integrating another solution, then tags become your primary option.
    • Linking campaigns is easy.  The first campaign will have an end goal of “Tag A” being applied.  This will conclude that first campaign for the contact.  Then, the second campaign will start with a tag applied goal that also looks for “Tag A” to be applied.  So when a contact has “Tag A” applied to their record it will end the first campaign and start them in the second campaign.
  3. Recycle
    • The key with this approach is not just to break everything up but to be able to reuse pieces of different processes.  For instance, if you have a process that captures information then sends out a series of reminders, you may be able to reuse those reminders for another event.  When you start to involve merging in custom fields, it really becomes easy to reuse these smaller campaigns. (Ex. “Don’t forget about your ~Contact.EventName~ on ~Event.Date~ at ~Event.Time~.”) Using a custom field to populate an event name turns it from a single-use campaign to a multi-use campaign.
    • Another example of recycling a campaign is for fulfillment after a purchase. If you have ten lead capture campaigns all driving toward the purchase of a product, you wouldn’t want to build the fulfillment into each one of those campaigns; but if you conclude them all with the purchase of Product A, then you can trigger a single campaign that starts with purchasing Product A and consolidate all those different channels into one, streamlined process.

How about a demo? Here’s a campaign that needs to be broken up into smaller campaigns.

And here’s the plan for breaking that campaign up, using the Purchase Goal (blue) as the natural point of separation. The section highlighted in yellow will be the first campaign, and the orange section will become a second stand-alone campaign.
Once we’ve made the break, here is how our first new campaign looks:
And here’s the second half of that campaign, broken out on its own as well. Notice how the “Register for Event” purchase goal concludes the first campaign AND is the trigger to start this new one.

These steps may not feel particularly groundbreaking but it really helps to consider them when we get lost in the myopia of building the “perfect campaign”. We all tend to roll our eyes when someone mentions the phrase “work smarter not harder” but, in some cases, it really rings true.

Remember, Infusionsoft gets easier each time you log in. And hopefully these tips simplify things even further. Questions, comments, drop them below!

Have your own questions?

If you would benefit from a place to ask automation questions when you get stuck, and get ideas and inspiration from other businesses, you can join us in the Monkeypod Membership.

The Story of a Broken Link

The Story of a Broken Link

Update: As of 2019 this tactic no longer works, it was broken as Infusionsoft updated the way their links redirected – when I (and others) asked them to restore this functionality they indicated that they a) didn’t know it was working that way, and b) had never intended this to be a feature. I still have my fingers crossed that maybe they’ll enable this ability again, but I’m not holding my breath. *sad trombone*

This is the story of how a broken link was able to fight against all odds, and scrape it’s way into becoming a learning lesson, a training video, and ultimately a blog post.

If you send a lot of emails, this story might sound familiar. It starts off embarrassing for me, and then hopefully ends up putting a new ninja trick on your tool belt (Jump to the video if you can’t wait).

You see, I’ve been a little busy lately. The usual work stuff, yes, but also some travel (three national parks in 14 days), and then most recently Sara and I moved. We’re still in San Diego, but we moved from an apartment to a house.IMG_1444

The truth, as you’ve probably noticed, is that between all this commotion I haven’t focused on my blog as much as I usually like to. Yeah, that’s an excuse, but as I’m sure many of you can attest, creating unique content is exhausting.

And sometimes, like when you’re hiking in Death Valley without wifi, it’s just plain impossible.

So, between unpacking boxes and mounting TVs late on Sunday night, I found a few minutes to edit and format a blog post that my good friend Paul Sokol had written for me. I created the tracking links with all my google UTM parameterKatrina_Emails, and I scheduled up an email for Monday morning, and various social posts for the week (this is what I use to create my links).

Then, Monday morning rolls around, and I head off to a Chiropractic appointment, and sure enough, by the time I check into my inbox at 10:00 am I have a dozen people kindly informing me that my email that went out is littered with broken links. (By the way, thanks to everyone who helped point it out, I appreciate you for taking the time!)

Chimp FacepalmSo now I’ve got a predicament. I’ve sent an email to all my blog subscribers and I’m driving them/you to a broken link – a 404 page. That’s a real #facepalm moment. And I certainly didn’t do Paul, or his charity, and favors by making it hard for people to get to his link (sorry Paul).

(Silver lining: At least my 404 page is a lead capture. Proof.)

So, I’ve got a few options.

Option A: I can send a follow-up “oops” email with the right link. You know, they say “oops” style emails have dramatically higher open rates because people wanna see what you messed up…

Option B: Or, I can bust open my bag of ninja tricks and go fix the broken link. Did you know that you can change the URL a link is pointing to, even if it’s already in their inbox?

Being the marketing nerd that I am, I chose option B. I fixed the link. I recorded a video of me doing it. I created a “learning moment”. And now I’ve turned the whole dang thing into a blog post.

Almost like I planned it.

[The video was removed because this tactic was broken by a 2019 Infusionsoft update.]

Keap for Non-Profits: A Monkeypod Case Study

Keap for Non-Profits: A Monkeypod Case Study

Paul Sokol is an automation expert, a close friend, a pretty talented Eminem impersonator (proof), one of Monkeypod’s most popular guest authors, and the former Campaign Builder Mad Scientist over at Keap. In addition to all those things, Paul is also a dedicated musician, and has started a charity to help raise money for local music and arts programs.

Being the marketing automation nerds that we are, we recently got talking about some of the more unorthodox use cases we’d seen, and before long – we were talking about non-profits. Anyhoozle, I asked Paul to tell us a little about his charity, and the role Keap (formerly known as Infusionsoft) plays in it.

Paul Sokol, Data Scientist, Infusionsoft

Keap for Non-Profits: A Monkeypod Case Study

Hello Monkeypodders! It is great to see you again 🙂

I’m Paul Sokol, one of Greg’s good friends, and just happen to work in the same space of automation. We actually met at Keap years ago (back when it was called Infusionsoft).

In any case, Greg was wondering about how I use Keap for my non-profit charity, and I figured why not write a lil guest post about it so everyone can learn?

As you are probably expecting, I’ll do a shameless plug of the charity at the end of this post, but for now the main context for discussion is a non-profit using Keap.

My particular charity is relatively new, less than 2 years old, but I’m still finding ways to leverage automation to save time and build a community.

First off, every year our charity partners with a local promoter for a music festival. I head up the marketing and promotion which means I’m using automated workflows that tell me when to post stuff on social media and automated emails to the bands with content for them to help promote the show. Really simple stuff. The post workflow is just a chain of tasks that say “the show is one MyDaymonth away, copy/paste this status and share it”, “the show is 2 weeks away…” and so on. Task. Complete. Task. Complete. I can live out of MyDay which is really nice.

The emails to the bands are basically the same thing. “The show is in a month, copy/ paste this to your page and here is your trackable band link”. I use hidden lead source fields on most of my capture forms (see an example). This way, I can create a unique lead source for different bands and see who does a good job driving traffic.

Regarding the ticketing checkout, the tickets themselves come through TicketFly so I position it as a two-step check out. First step is name and email which takes you to step 2; as far down the TicketFly funnel as I can get people. This builds a list for presales next year. Unfortunately, we haven’t yet implemented a cart abandon mechanism because getting data out of TicketFly is controlled by the venue we partner with. Just hasn’t happened yet.

Outside of the annual festival, on the charity’s website, the donation process is also positioned as a two-step checkout. Since all payments are going through Keap directly, we have implemented a donation abandon campaign, if you’ve been reading this blog for a while, you’ll know it as “The Nudge“. In addition to some emails, it has a task for me to personally reach out and try to “close the sale”. Like I said earlier, we are a new charity so the traffic to our site is basically nothing so the personal 1:1 calls are manageable. Once we grow that isn’t going to scale and we’ll have to find another way to add that personal non-email touch.

Speaking of donations, while it wasn’t automated, because all donations create an Order record in Keap I was able to easily pull a list of donors and send a hand-written thank you card at the end of 2015. Now that I type it out, that’s a great opportunity for something to automate! :::makes mental note:::

Besides accepting donations, the website also serves as a press release news board. Every press release lives formally on our website. Each press release page has a capture form so people can receive updates as new releases come out.

That’s how I use it right now. In the future as we scale, the plan is to build our list of donors and encourage repeat donations automatically. As we do more events, I plan to use the Opportunity module to track the process of event acquisition and execution. As we become more global, I could even see giving different regions their own affiliate codes to track where donations are coming from the most. I’ll even use it to filter out potential hires early in the recruiting process.

In other words, I’ll be able to use Keap for a good long time as my charity grows 🙂

Lastly, remember, there is a huge problem in the world: school budgets are being slashed which is forcing cornered administrators to cut arts programs, particularly music programs. If this continues, in a few generations there will be no new music and we will have lost a beautiful part of human culture, society and self-expression. I refuse to live into that world which is why I founded Keep Children Rockin. We provide music equipment donations to public schools. In 2015 we were able to help one local school with lots of equipment. In 2016 we tripled that impact and helped three local schools. To make a donation and learn more about the cause, please visit www.keepchildrenrockin.org.