

Love what you are seeing?
We have created several courses where we dive more into the technical aspects. So, if you like what you read here, you'll love our courses!!


By:
Greg Jenkins
|
February 9, 2026
|
Technology
Update 2023: Nathan Householder did a deep dive into WebinarJam's updated features and settings and was kind enough to record this demo showing Keap users how to connect with WebinarJam. Enjoy.
Note: The article below was last updated in August of 2018 with a contribution from Chad DeLaura covering how to integrate when you're doing a webinar series. (See Update)
I no longer use WebinarJam and so have not kept up with the various changes and updates they've made - the instructions and suggestions below may work just fine, but it's also possible that they are no longer current.
For a complete list of tools that I use and recommend check out the Monkeypod Toolbox Ebook.
So, in case you haven't heard, WebinarJam is a tool that allows you to run a Google Hangout like a full scale webinar. It's basically a plugin, or an overlay, that gives you a suite of tools to use during your Hangout. And, it's pretty darn solid.
I have done my share of webinars in the past, but I hadn't done any since starting Monkeypod, and that was bothering me. I mean, webinars are a proven way for to disseminate information, provide value, and engage with your audience. So, I decided to get back into it, and I started researching Webinar platforms and I kept coming back to WebinarJam as the best mixture of tools that I need while still being affordable. (It's about $2000 less per year than GoToWebinar, I think.)
If you're new to webinars, WebinarJam is great because it has a step-by-step wizard that allows you to easily create your webinar (see the wizard steps highlighted in yellow).
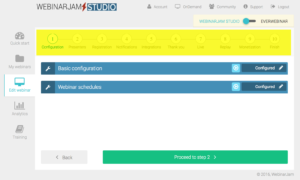
This wizard walks you through the normal steps you'd nee to set up to host your webinar (like presenter details, webinar schedule, the registration page design, etc), but because this tool was designed by marketers, they also included steps in the wizard that are a little more advanced (like integrating with your email marketing platform, and prompting you to create polls and offers ahead of time that you can deploy during your webinar).
The integration with Infusionsoft is really pretty straightforward, in fact, there are two. The simple integration simply passes their information back to your Infusionsoft account, and the deep integration is a little more robust. The deep integration requires that you add your Infusionsoft account name, and API key to authenticate.
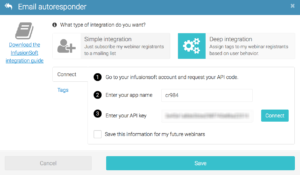
And once you've done that, you can then select tags (by ID number) that you'd like to have applied when someone registers, attends, doesn't attend, leaves earlier, arrives late, watches the replay or buys. Yup, this means that you can design a campaign with very specific follow up based on any of those circumstances. Not bad, eh?

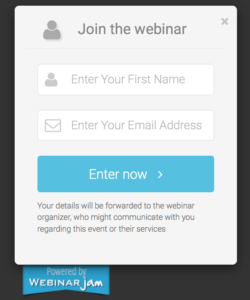
So, the tool itself it pretty slick. It does pretty much everything that I would want it to do. And it's pretty intuitive to get set up. So far so good, right? Well, with one little hitch - WebinarJam has its own registration pages, and they're....okay. They're not bad, but they're not great either. And they're hosted on WebinarJam's domain. Here's an example of one registration page:

Not bad, right? Yeah, the pages themselves are actually okay. But the registration box that pops out is kind of ugly. And, if you want to bypass their registration page and use your own you can, but, you still have to use their pop-out box. Which looks like this:
So, I didn't want to use their registration pages. I've gotten pretty formidable (if I do say so myself) at creating my own LeadPages pages, so I thought 'Alright, I'll just use that"
At first I tried to use LeadPages to pass the info to WebinarJam and then pass the info from WebinarJam to Infusionsoft; but in order to do that I had to embed the WebinarJam box on my LeadPage, and it wasn't exactly "on brand", so I decided to go from LeadPages to Infusionsoft, and then post the information from Infusionsoft back to WebinarJam using an HTTP post.
WebinarJam DOES give you one-click registration links that you can you can use for registering people who are already on their list, you know, so they don't have to type in their information that they've likely already given you. And I fancy myself a fairly technical guy, so I figured I could probably deconstruct this auto-registration link and create an HTTP post that would register people.
Well, I'll save us all some time and let's just say "It wasn't as easy as I would have liked." But in the end, I did figure out a way to configure an HTTP post to register contacts from Infusionsoft to WebinarJam. And this gave me the best of both worlds. I could use the one-click registration link for my existing folks, and new people would come through my sexy LeadPages page and then be registered via HTTP post.
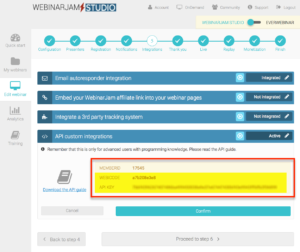
(Note: Due to WebinarJam updates, you may have a different version of their software - if your account doesn't match up with the screenshots below check the update on the bottom of this post for instructions on the newer version)
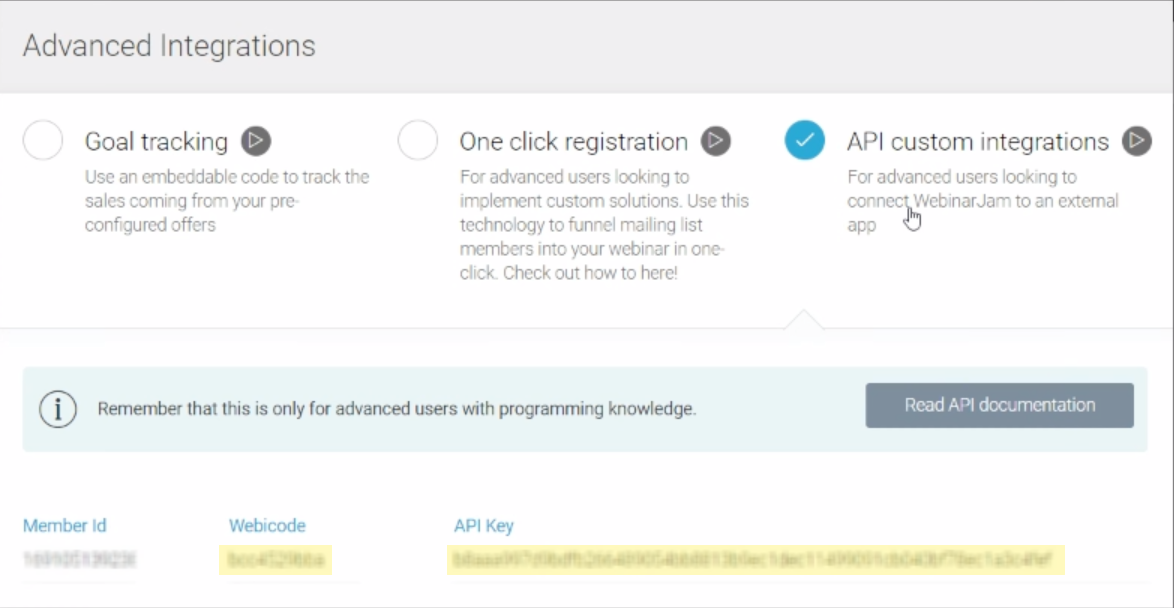
When you get to step 5 in the WebinarJam wizard, you have to enable the API Custom Integrations setting. This will give you your API Key, WEBICODE, and MEMBERID. You only need the second two:
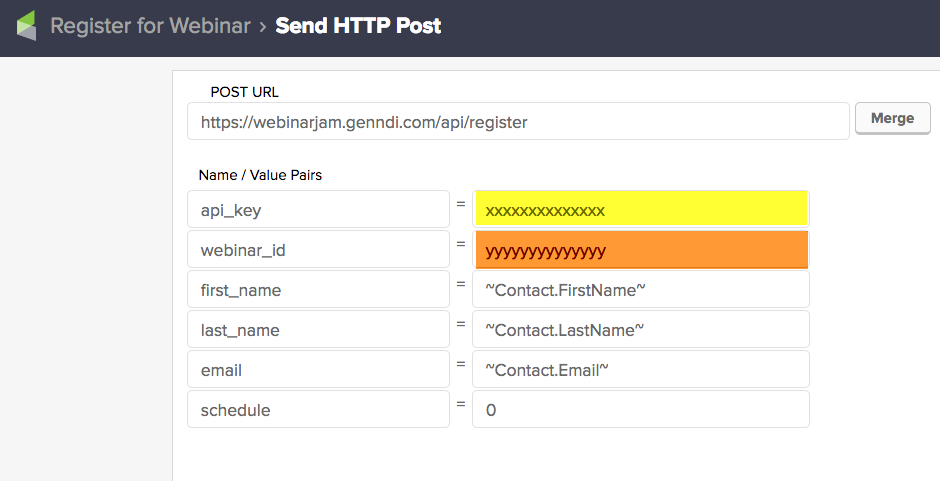
Once you have those two pieces of information, you can set up your HTTP post in Infusionsoft. You can add it in your campaign in whichever sequence makes sense, but usually it would be following your own registration form. Here's how you configure the HTTP post:
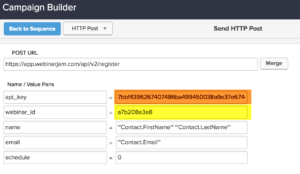
The names in the left hand column of the HTTP post don't change. The URL that you're posting to doesn't change, that always will be this URL: https://app.webinarjam.com/api/v2/register
(EDIT: For EverWebinar, you'll use a slightly different URL: https://app.webinarjam.com/api/v2/ever/register)
If you want their complete API documentation you can check it out here, I used the information from page 6 for this particular piece. (EverWebinar API documentation here)
You'll probably want to set up the name and email value pairs just as I've done above, using the Infusionsoft merge codes. And the bottom bit, schedule, that designates which webinar you want to register them for (leave it as 0 unless this is a webinar series).
The parts that will change are the API key that you copied from WebinarJam, and the Webinar_id that you copied from WebinarJam - though it is worth pointing out that WebinarJam calls this Webicode on the API integrations tab you'll be copying from.
So, that's it. It took me 5+ hours to figure out how to have WebinarJam, LeadPages and Infusionsoft all making sweet music together, and in approximately 7 minutes of reading, you can now benefit from my research and testing.
NOTE: The one drawback to register guests this way is that you have to enable the registration notifications from WebinarJam, because that's how their registration link is distributed. Because we're registering them through an HTTP post, the isn't an easy way to deliver their registration link to them through Infusionsoft. Though I have it on pretty good authority that there is an app being developed that will solve for just such an occasion. Update: Here's the app, EverJam that I was describing.
Now, executing the live webinar was a whole different story, and one that probably deserves a blog post of its own. For tips on running your own live webinar, check out this blog post. I would love to hear about your own experience with WebinarJam or another tool you like!
Worth noting: Yes, my links to WebinarJam are affiliate links. But hey, they've got an awesome product and an affiliate program. If you think you're going to recommend WebinarJam, I'd recommend signing up too. Sign up here.
WebinarJam has had a few updates since this post was originally created, and now some folks are on the new version which doesn't match up with the screenshots or instructions above. Here's the updates steps for registering attendees to your WebinarJam webinars via an HTTP post in Infusionsoft.
Step One: First you'll want to select Advanced Settings from your list of webinars.
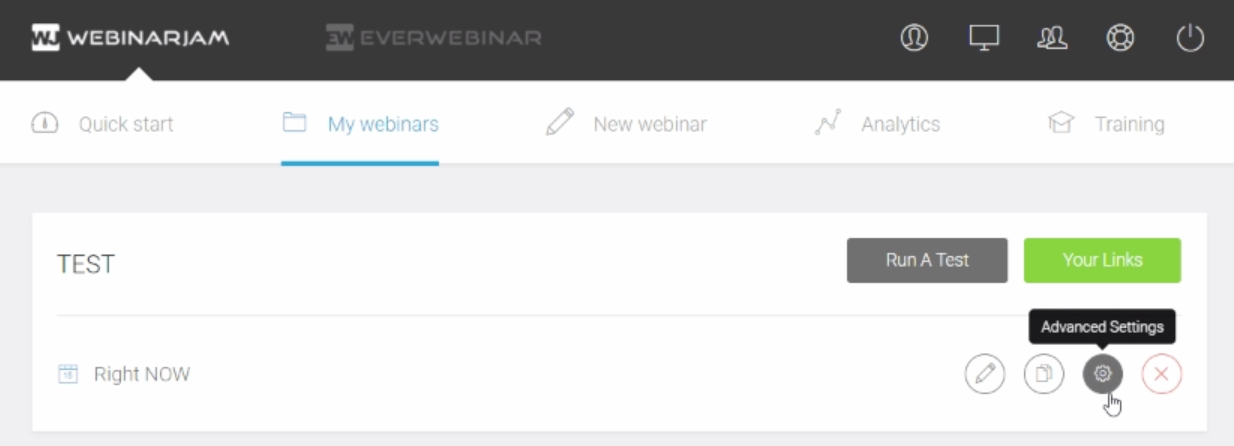
Step Two: Then you'll need to enable API Custom Integations (look for the blue check mark to indicate it's enabled). This will reveal three fields for you, Member Id, Webicode, and API Key. You won't need the Member Id, but you will need the other two.
Step Three: Now use that information to configure an HTTP post in whatever sequence you choose (usually this would be in the Infusionsoft campaign builder, immediately following the registration form your contacts are submitting).
Note: The webinar_id is the Webicode from the previous step.
Here is the Post URL for WebinarJam: https://webinarjam.genndi.com/api/register
Here is the Post URL for EverWebinar: https://webinarjam.genndi.com/api/everwebinar/register
(Here is the updated complete API documentation for WebinarJam and EverWebinar, where most of this information is from.)
Contributed by Chad Delaura
Step 1: Login here: https://account.genndi.com/login
Step 2: Once logged into either WebinarJam or Everwebinar go in and click the green button labeled "Your Links" at the top right of the specific webinar you want to setup
Step 3: Do this after following Greg's instructions above on setting up the initial HTTP post:
You need to find the proper Schedule ID, so after clicking "Your Links" go to the button on the right named "Replay Recording" and in the dropdown select the proper session you're setting up and look for the ID (NOTE: the ID is the second to last number in the URL in between two slashes(/1/) such as the "1" listed in this example URL (ALSO: See image below for example):
https://events.genndi.com/replay/169105139238461122/491b72ef89/1/0
We have created several courses where we dive more into the technical aspects. So, if you like what you read here, you'll love our courses!!