Get More Done (with this Planning Framework)

Get More Done (with this Planning Framework)

If you run a small busniess, or work with small businesses, or are a human – then odds are you probably have seen a good idea that for one reason or another struggled to reach it’s potential.

And if you’ve ever found yourself unpacking that scenario, trying to figure out where a project went off the rails, then you’re a) in good company and b) reading the right blog post.

Allow me to introduce you to a planning framework designed for exactly this purpose:

planning framework template

If you have designs and ambitions for your business, great – but those plans are only as impactful as our ability to bring them to life.

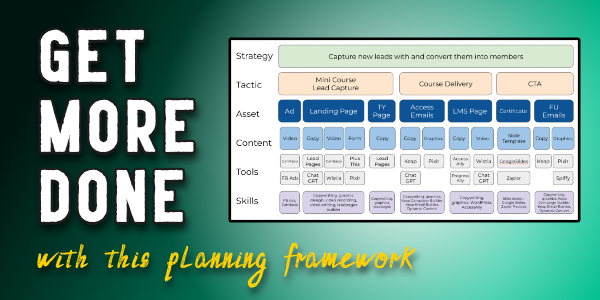
This framework takes an amorphous idea and helps give it structure. As you walk through the levels of detail, ranging from strategy to assets, content, tools, and skills; it prompts us to think through the detailed path we’ll take in order to launch this idea.

Here’s an example where we used this framework to launch a free online mini course:

One key takeaway I want to make sure you hear is that knowing exactly what needs to happen does not mean that you need to be the person who does everything.

Not everything that needs to be done needs to be done by you.

That’s actually one of my favorite reminders to give myself, so I’m happy to share it with you here.

It’s entirely possible that you will walk through this process and identify aspects of it where you are not equipped with the knowledge or skills (or appetite) to handle one of the requirements. That’s fine.

The goal of this planning tool isn’t to bury us with to-do tasks, it’s to illuminate the things that may have otherwise become stumbling blocks; so that we can make a plan (or find a connection) that helps them get done.

If you’re launching a project soon then give this framework a try and let us know how it goes.

And if you’d like a place to ask questions as you build, automate, and grow your business – then join us in the Monkeypod Membership community here.

The planning framework example in this video was drawn from a show-and-tell livestream we did where we broke down the detailed process we followed to launch the mini course – you can watch the full replay of that conversation here.

Avoid Email Jail: Expert Tips to Keep Your Messages Out of Spam

Avoid Email Jail: Expert Tips to Keep Your Messages Out of Spam

As business owners, we invest a lot of time and effort into crafting email copy that we hope will resonate with our audience, but it’s all moot if our messages never even make it to their inboxes.

Whether they’re rerouted to the dreaded spam folder or blocked entirely, landing in “Email Jail” can cause even the best campaigns to fizzle.

That’s why we were excited to sit down with Scott Hartley, author of Hit the Inbox: How to Avoid the Spam Folder and Grow Your Business with Email Marketing.

Scott joined us for a special guest interview to explain what’s really happening behind the scenes with your email deliverability—and what you can do to stay out of trouble with the big email providers like Google, Microsoft, and Yahoo.

What Exactly is “Email Jail”?

The major mailbox providers are cracking down on email marketers who don’t play by the rules. While most of us are familiar with the spam folder, you should also know that there’s a more severe penalty: emails being outright rejected without ever being delivered. Landing in “Email Jail” means your messages aren’t just going to junk—they’re being blocked completely.

How Do You End Up in Email Jail?

The top causes? High numbers of spam complaints and email bounces. The key is regular and diligent monitoring of your email performance, and audience engagement.

Even if people once opted in that doesn’t guarantee they still want to receive your emails, and sadly hitting “spam” is often easier than scrolling down to unsubscribe.

Email Jail Icon

Mailbox providers have a low threshhold for acceptable spam complaints—just one complaint for every 1,000 emails sent. Go beyond that, and you’re on their radar. If you hit three complaints per 1,000, you could be looking at serious trouble with your domain’s reputation.

The Power of List Hygiene

Okay, so we want to avoid spam complaints, right? How do we do that? Proper list hygiene.

In other words, stop sending emails to your entire list and get laser focused on those who are engaged. Regularly reviewing and cleaning up your list is essential to keeping your email campaigns healthy and your domain reputation intact.

This is a hard pill for most business owners to follow – we have invested time and money into building our list, so the idea of not taking full advantage of it seems counterintuitive (borderline offensive, even). But time and time again the data shows that the risks of emailing everyone just aren’t worth it.

A good rule is to only email people who have opened, clicked, or interacted with your messages in the last 90 days. And if someone hasn’t engaged in a while take steps to re-engage at 60 days or so, before they pass the 90-day mark.

Google Postmaster Tools: Your Best Friend

For those looking to stay proactive, we (and Scott) recommend using Google Postmaster Tools.

It’s a free service that gives you insight into your domain reputation, spam rates, and delivery errors—all of which help you spot potential problems before they escalate.

Google Postmaster Screenshot

By keeping an eye on the metrics and monitoring key indicators like open rates and bounce rates, you can make informed decisions that keep your email marketing efforts on track.

Final Thoughts

Email marketing is still one of the most powerful tools in our arsenal, but it’s only effective if our emails are actually reaching the inbox.

It may not be sexy, but taking the time to manage your list, watch your metrics, and follow best practices can help you avoid email jail, get more emails delivered and read, and maximize your ROI from your email efforts.

For more in-depth strategies on improving email deliverability and safeguarding from the risks of poor email list management check out Scott’s “Hit the Inbox” book:

Where do I learn more?

If you want a place to ask questions as you work on this, or any aspect of your business - join us in our private community. The OG Membership is a group of experts and DIYers who collaborate as we solve problems and tackle marketing automation opportunities every day.

Keap’s New Email Update Tool

Keap’s New Email Update Tool

Depending on how long you’ve been using Keap, and what edition you have, you might have a variety of email builder options when you are building automations.

And if you’re a long time user, chances are you have older campaigns using some of the older email builders.

keap email builder options

The newest email builder, which is also known as the “Unlayer” builder has been around for a little bit, and Keap has been making regular improvements to it. If you haven’t checked it out in a while, it may be time.

What do I do with my older emails?

The idea of rebuilding all your emails from scratch is…unappealing. To say the least.

And so to help Keap users transition their existing emails into the new builder, Keap has released a tool that does the conversion for us automatically.

email update tool process

Now, if you’re like me, you very well might have questions about this process. Like “Does it work?” and “What should I watch out for?”

So to help with that, here’s a video demo of the conversion process in action.

All things considered, I think this conversion tool works pretty well. Overall I’m impressed with how fluidly it helps convert our legacy content to the new email builder.

Do I need to update my emails right away?

Short answer – No. I don’t think there are any plans to stop supporting the emails built in the prior email builders Keap has offered.

But, I do think this is the builder they’ll be investing in moving forward. So, the sooner you can start adopting it, the more quickly you’ll develop comfort and familiarity with it.

For me, I’ve started using the new builder for all new emails I set up, and I’m using the converter tool anytime I go back to make changes or updates in older automations of mine. I invite you to do the same.

New AI Features in Keap

New AI Features in Keap

So as you likely have noticed, artificial intelligence (AI) has had a bit of buzz lately.

In less than a year it went from being a technical and esoteric topic to being a household term for small businesses.

And naturally, Keap is getting in on the party by introducing features that take use AI to simplify the process of producing the assets we need for automations.

There have been multiple iterations of the AI features in Keap, so if you checked them out at one point but haven’t been back lately, you may be missing out on some serious upgrades.

You’ll need to be a Keap user to take advantage of these features – if you aren’t using Keap yet you can start a 14 day free trial here.

The first thing to know is there are basically two different AI tools that Keap has been developing – there is some overlap (which I’ll expand on later), but they solve different problems, and are used differently.

The two tools are:

1. AI Automation Assistant
2. AI Content Assistant

I’ll do my best to explain both in this post – but if you’d like to see them in action, check out this free mini course.

AI Automation Assistant

The first one, the AI Automation Assistant is a tool that Keap has had in one way or another for over a year now, and effectively it lets you launch “plays” that can support your business in varying ways – by helping you collect new leads, convert more sales, or better serve your customers.

To start, you choose a “play” you want to build. Then the Automation Assistant will walk you through a series of prompts it needs to collect information from you (your company info, target customer details, offer specifics, etc).

AI Features in Keap

Once you’ve answered the questions, you click “Generate” and the AI will use your information to automatically produce tailored copywriting for the various assets the play you selected requires.

Then, you can review or edit the copy and once you feel good about it then you can use it to set up an automation.

For Keap Pro and Max users, you can launch an Easy Automation right from the interface.

Create Easy Automation

Ultimate (or Max Classic) users, and anyone who prefers advanced automations, can simply copy and paste the copy into the various components you need in order to set-up the play in the Automation Builder.

So, if the Automation Assistant helps you craft copy that you’ll use to communicate to groups of people, then the other AI tool is more about crafting personal communications.

AI Content Assistant

Rather than helping you produce copy to use in one of your automations, this one helps you write messages to individuals. (Available in Keap Pro and Max for now)

To start, you’ll open a contact record and then start to write a message. But instead of starting from scratch you’ll look for the little “wand” icon to get started.

AI Content Assistant

There are a variety of prompts you can use depending on the nature of the message you want to send, or if you have a unique scenario you can just ask it to create custom copy.

The AI will use information about your business, as well as details drawn directly from the contact record in order to draft email copy for you.

Once the first draft of a message is produced, you can use it as is or modify it by changing the tone, length, or translating to another language.

For now, this tool is only available in Keap Pro and Max, but my understanding is that they’re exploring ways to have this wand show up in more places throughout all versions of Keap.

And if you’re not yet a Keap user, but you’d like to try it out you can start a 14 day free trial here.

Where do I learn more?

If you want to see these features in action, and long with a step-by-step walkthrough of how you can use them for your own business, check out this free mini course.

Keap is Sunsetting the Legacy API Key (what to know)

Keap is Sunsetting the Legacy API Key (what to know)

Recently you may have received an email from Keap, notifying you that they are “sunsetting the legacy API key”.

It’s true – and I know this is a somewhat technical conversation, so in this post we’ll explain what that means (here’s their overview), what you need to know, and what actions to take next (if any).

So, let’s start with the email that Keap sent out recently – it would have looked something like this:

Legacy API Email

There are a few important things to note in this email. First, there’s the deadline of October 31st.

Keap is giving users several months of notice about this planned change. But, don’t let that runway fool you – you don’t want to put this off until the last minute.

The second thing to note is that the email specifically calls out the number of API calls your Keap application has using the Legacy API key.

What is the API?

So, to be abundantly clear – API stands for Application Programming Interface. The API is effectively a method that Keap supports whereby other tools and applications can communicate with Keap, and vice versa.

If you have another piece of software that your business uses, and you want to be able to use it to pass information to Keap or receive information from Keap, then the API is generally how this would be achieved.

The API itself is not going away – at all. It is critical for Keap – in fact, it’s part of what makes Keap so powerful.

But there are several ways to use the API, and one specific access type (the Legacy API Key) is what is being removed.

Why is this changing?

Simply put, for security.

The Legacy API Key doesn’t have as much nuance as the newer connection methodologies, and therefore it was generally less secure.

What are the different API connection types?

There are a few – third-party authorized apps (OAUTH), personal access tokens, service account keys, and the legacy API key.

This video will help explain those different methods, how they differ, and why it matters:

Okay, so I think that gives a pretty solid high level overview – but if you’d like more detail, check out this 20-minute video from John Borelli, friend of Monkeypod and a Keap Certified Developer, where he digs into some more nuance regarding the different connection methods.

What do I need to do?

The Legacy API Key is going away.

If you aren’t using it – then this likely won’t affect you at all, and there’s no action required.

But if you have connections depending on this method, then it’s time to start looking into how those can be updated to use one of the other connection methods.

If you’re working with the integration offered by another tool you use but didn’t create, then you may need to contact them to make sure they’re aware of this change, and are taking measure to update how their plug-in communicates with Keap.

Now, if you have a custom built process that depends on the legacy API connection, then it may be a matter of connecting with a developer to evolve things so it doesn’t break in October when Keap stops supporting the Legacy API connection.

And, if you aren’t sure what tools you have that might be using this, then that’s where things get a little murky.

If you have some volume of legacy API calls, there isn’t currently an easy way to see which tools are using it. Everyone I’ve talked to indicates that it can take a little detective work to track down the different integrations.

Special shout out to Mark Penney, from Meppy, for generously sharing his expertise in the video above.


How to Create a Social Springboard

How to Create a Social Springboard

We had a good question pop up in the private Monkeypod community the other day. Marjorie asked “How can I automatically notify my social channels when we publish a new podcast recording to our website?”

And the solution we designed is a ‘springboard’ that uses Google Forms to capture information, and then Zapier to distribute it across the various social channels (multiple times, if you want).

This process requires a manual trigger, but then automation takes over and posts for you to whichever pages/feeds you have designated, as many times as you like

There are a handful of ways you could further customize this process, if you needed additional flexibility.

For example, you could add additional fields to the intake form and then use those to customize the post that goes with the URL you’re sharing (the name of the podcast guest, or host, or subject, etc).

Or, if you wanted to mix up the timing of the repeat posts you could use Zapier’s formatter step to randomly generate a number that you then use as the delay – that way it’s not the exact same formula and cadence each time.

If you adopt this, or a version of it, for your business please let me know how it goes. Good luck.

And, if you’d like a place to ask questions like these when they pop up for you, check out the OG Membership pricing and details here.