Keap One-Click Upsell

Keap One-Click Upsell

In the marketing world there are certain terms that are tossed around so casually that sometimes we forget just how valuable they can really be.

One such phrase is “One-Click Upsell”.

What I’m talking about here is giving someone who has just purchased from you the opportunity to add another product to their order with just one click.

It’s a marketing tactic that has been around for a long time, in large part because of how successful it can be.

This is because you’re interacting with someone who has literally just made a purchase from you.

If the last thing they did was click “buy”, then you’ve already done the job of convincing them that what you have to offer is valuable, and you’ve already built the trust needed for them to pull out their credit card and decide to become a customer.

So this offer is positioned at the absolute optimal time for them to say “Sure, why not” to one more item.

Now, a lot of the success of the one-click upsell is dependent on what you’re offering, the positioning, the price point, etc; but we wanted to use this post to document the steps involved in executing it with Keap.

Note: There are several third party tools that allow you to run one-click upsells in their own ways (like PlusThis), this blog post talks through how to do it natively – but if you read the following steps and are looking for something a little more flexible – then take a look the third party solutions for this.

Here’s a demo of the PlusThis tactic.

Step 1:

Create a payment plan. Payment plans are a way for you to allow your customers to divide an order total into multiple payments, but in this case we’re going to need the payment plan later in this process.
Finance Charge: $0
Number Payments: 1
Days Between Payments: 30 (doesn’t matter)
Days until start: 0
Merchant Account: Select your preferred merchant account

Step 2:

Create an action set. This is where the order will be created, and is one of the few reasons that action sets aren’t totally obsolete. Choose “Create an order” as the action for this action set. Title the action set “Create Order – ABC” where ABC is the name of the product you’re upselling. Then click the blue link that says “Save this Action”, which is highlighted below.

Snapshot of an Action Set within Infusionsoft

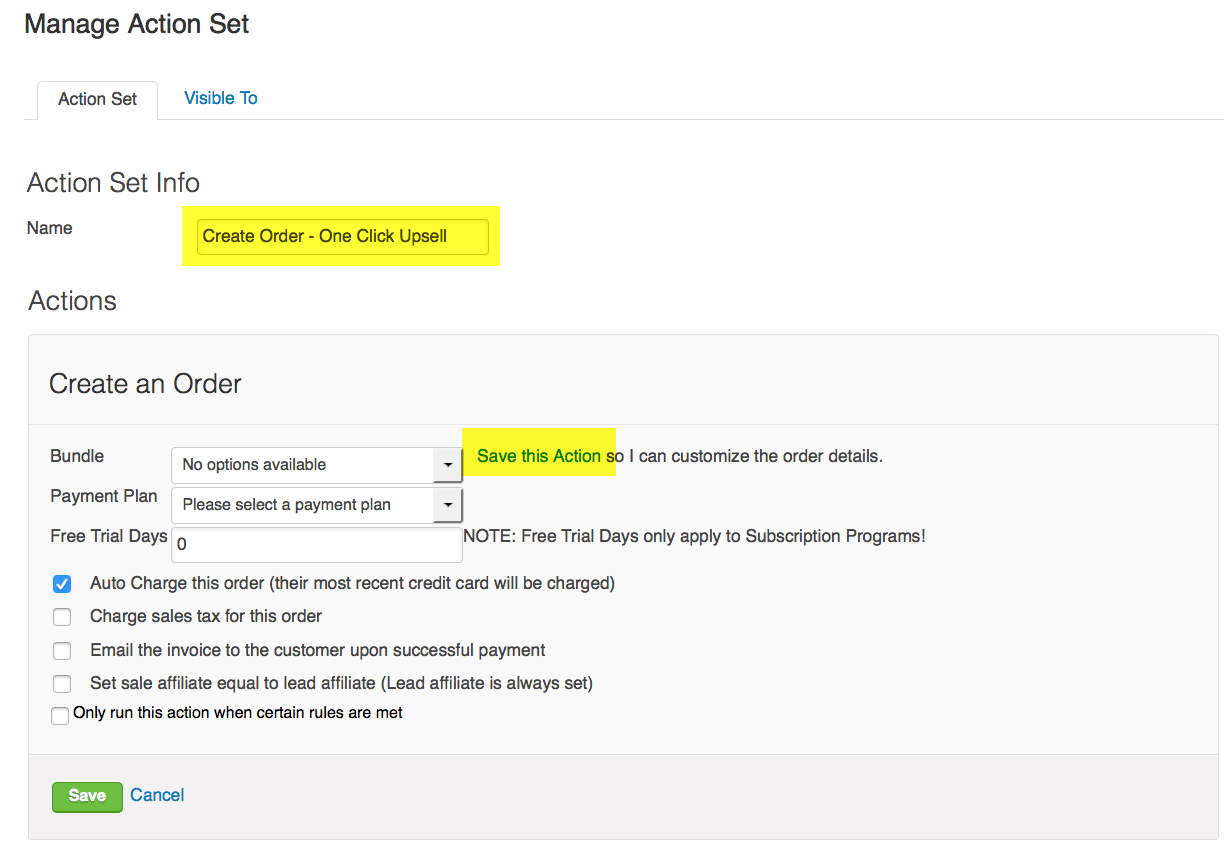
This should reveal some new options. Add the product you’re upselling, and select the payment plan you created in Step 1. Check the appropriate boxes, but ensure that “autocharge this order” is selected. Save the action set.

Upsell CampaignStep 3:

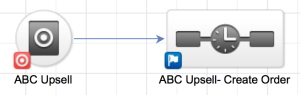
Open the campaign builder. Add a goal, it should be either a web form, or preferably a landing page. This is going to be the page presenting the upsell after the customer has made their initial purchase. Title the goal “ABC Upsell”. Then add a sequence after the goal. You can title this sequence “ABC Upsell – create order”

Step 4:

Configure the landing page to thank them for their first purchase, and to present and position the upsell offer. The only requirement is that this page needs to have a hidden field for email address. You should lay out the benefits of the upsell, not only why it is valuable, but why it is valuable right now. Feel free to reference the product that they have just purchased. Before you finish, change the submit button to say “Buy Now”, and make sure that it is abundantly clear that by clicking the “Buy Now” button, their credit card will be charged, again. You may want to also include a link somewhere on this page that says “No Thanks” or “Return to Website”.

Configure the thank you page of the landing page. Remember that if they make it to that page, they’ve purchased your original offer, as well as your upsell offer.

Switch over to the code tab for the landing page, and copy the hosted URL.

Step 5:

Configure the sequence following the landing page. The only requirement for configuring this sequence is that you include the action set you created in step 2. Here’s a brief article on adding action sets to sequences. But you may also choose to tag them, or send a follow up email.

Step 6:

Ensure that all elements are marked as ready, then publish the campaign.

One Click Upsell module screenshotStep 7:

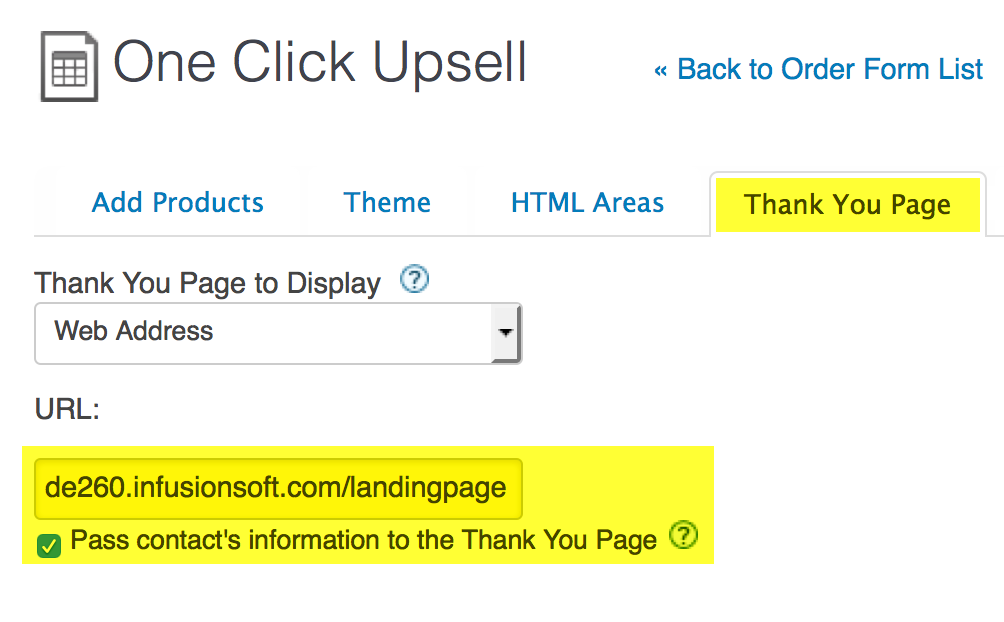
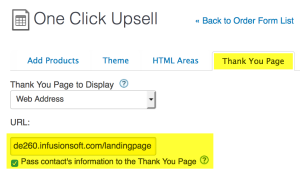
Head to the ecommerce section, and create an order form. Add the original product you’d like to sell to the order form, and then set the thank you page to the URL of the landing page you copied in step 4. Make sure you check the box that says “Pass contact’s information to the Thank You Page”. Once you’ve done this, grab the order form URL from the links tab and you’re ready to start promoting.


So that’s it. Seven steps later you’ve got yourself an upsell. That wasn’t so bad, right?

There are a few things worth noting about this process:
A. The action set may not create the order immediately. I believe they run in batches every 6 hours or so, so the order might not process right away.
B. Right now the landing pages aren’t natively mobile responsive. So, if they place their original order on their phone, the landing page presenting the upsell may not be optimized for their mobile device.
C. This process is best for order forms, because you know what they are buying, and therefore can present an upsell that makes sense based on their first purchase.
EDITED: D. This requires a Credit Card on file in order to process the charge. So, if the initial order is created via PayPal, their billing info won’t be stored in Infusionsoft and therefore can’t be used to process the order.

One-click upsells can be a great way to capitalize on an important interaction, provide extra value, and drive additional sales. If you have questions about this process or success stories of your own to share, please feel free to comment below.

Or, if you want to see the whole set-up process in less than 13 minutes, check it out here:

PlusThis Method for One-Click Upsells

I mentioned above that PlusThis offers some additional flexibility for your upsells, so I wanted to demo how their tool handles this process. It’s intuitive and much more elegant when it comes to the actual set-up and implementation.

Roadtrip Launch Recap

Roadtrip Launch Recap

This is my first Infusionsoft launch story.

It’s not the typical success story – I don’t have a mansion, or a handful of sports cars in a six car garage.

But it is a success story.

I have a business that is largely powered by automation – which frees me up to do what I love, create content, support my members, and travel.

Sara and I (and Gatsby) took a road trip in July. We covered 3000 miles in 24 days – 19 of which we slept in a tent.

I simply couldn’t have taken that amount of time away from the business without knowing automation would have my back.

But during that road trip I also used Infusionsoft to (re)launch my CB Trilogy course (it’s bigger and better than ever, baby).

It was the first time I’ve done a concentrated “launch” like this.

And the launch went well – it actually exceeded my expectations.

I’m certain I didn’t do everything right, but I thought I’d recap my experience in case it helps you.

I sent promotional emails to 5 segments of my database (and also my OG members).

The groups were segmented by what I knew about them (blog and nurture subscribers, IS Starter Kit customers, etc) and also how recently they’d engaged with content of mine.

Infusionsoft Launch Campaign

This was the campaign structure I used – you can see the different groups each have their own start trigger, and their own sequences.

Then, all the way on the right – the entire campaign stops if they buy the Trilogy, the All Access Pass (which includes the trilogy), or if they unsubscribe (more on that in a sec).

The reason I broke these groups out into individual sequences was so that I could speak to them based on our relationship (novel idea, right?).

Pro Tip: Once Infusionsoft rolls out Liquid Content you’ll be able to offer personalized messaging based on tags or contact fields within a single email.

I changed some of the copy – emphasized different parts of the course – and included a sentence telling them exactly why I thought this course would be a fit for them.

The emails progressed through the different aspects of the course – highlighting what was new, and why it was valuable.

Lesson: Giving subscribers choices gives them more control over the messages they receive – resulting in higher engagement, and fewer global unsubscribes. In the screen shots above you can see the option to opt-out of just this campaign if anyone wasn’t interested.

And lo and behold – it worked.

Launch Results

The campaign had open rates averaging 34% across the different segments, with colder groups at 27-29%.

Everyone received three emails – but I also structured the campaign to include an additional nudge for the folks who opened and clicked in the first two emails. As you might guess, this extra email the highest overall open rate (51%).

Lesson: Engagement snowballs – structure your campaigns to bubble up the most engaged contacts, and avoid overwhelm by pacing emails appropriately for those who aren’t engaging.

Open rates and engagement are nice – but this was all a sales play.

I had 18 orders come in during the launch (and 24 total during the trip). Here are the order totals broken down by list segment:

Here’s the breakdown of orders by day during the launch – the “pre-launch” started on the 12th, and the actual launch was the week of the 15-19th (highlighted in yellow).

These numbers on their own aren’t staggering, but when you think about the fact that this happened while we were hiking, canoeing, disc golfing, and generally sleeping on the ground – it’s pretty powerful.

The reality is that the income from this launch didn’t change my life – I haven’t cracked some magic code that’s going to allow me to retire and summon sales by waving a wand (accio sales!).

I love what I do – but I also love what it lets me do. And that’s a testament to Infusionsoft, and to automation.

Launch Lessons

Here are my take-aways from this process:

1. Automation doesn’t mean impersonal
This is one you may have heard me say before – but automation doesn’t have to be a compromise. It’s only cold and robotic if it’s done poorly. The timing of this launch wasn’t ideal – but the trip had been planned months in advance, and with the campaign builder update coming out in June I didn’t have too many options. I care a lot about how I show up for my audience – and I take a lot of pride in being myself, and weaving my personality into Monkeypod. And it was comforting to know that the experience people were having was something I had designed – the copy was my language, and that they had agency in deciding whether or not the emails were useful to them.

2. Turn adversity into opportunity
This whole launch process started because Infusionsoft updated their campaign builder interface. Initially I was annoyed – because overnight they had made my CB Trilogy course “feel” outdated. So I begrudgingly began the process of updating my course – and I’m glad I did, because this gave my the opportunity to re-imagine it completely, and ultimately relaunch it.

3. Success is relative, and personal
Like I said, I know I didn’t do everything right here. And if I were to compare my Infusionsoft launch numbers to some of the heavy hitters out there they’d be laughable, but in relaunching this course I set new records for my all-time best day and week with regards to course sales. You can’t measure how much you’ve grown by tracking how tall someone else is. Growth is measured by progress over time, and progress is personal.

The final point I’ll make is that not all “successes” are going to be financial. This final day of this launch was the first time I’ve seen my inbox filled with order receipts – and don’t get me wrong, that was cool. But as important was acknowledging the fact that I was able to engineer and oversee this entire process without compromising the trip Sara and I had planned.

Sometimes the dividend automation pays is in time savings, peace of mind, or freedom and flexibility.

Action Planning Framework

Action Planning Framework

This Action Planning Framework is the distillation of lessons learned from a handful of consultants across countless projects, in a variety of industries and business models.

Suffice to say, this works – time and time again.

If you have a strategy you’d like to implement, this framework will help increase the odds (and efficiency) with which it happens.

So, here’s how this works…

It starts by identifying the strategy you are trying to execute.

The strategy is the high level objective – like, book more demos, or drive new consultation appointments, increase membership free trials.

Then, you use the action planning framework to help think through the specifics for what it will take to achieve that objective.

It starts with individual tactics (launching a new ebook, hosting a webinar, deploying a JV partnership promo), and then from there it drills down into the assets required, the content needed to support those assets, the tools required to create the content, and finally the skillset(s) it wiil take to operate those tools.

This is the framework:

One important thing to note is that a particular strategy may require more than one tactic – and a particular tactic will very likely require multiple assets (a landing page, the thank you page, the follow up campaign, etc), and the same is true for content, the tools, etc.

But this framework illuminates the things that we humans tend to skip over – it forces us to ask add context and detail that could otherwise derail a project.

The Scope Creep Killer?

We’re all familiar with scope creep, right?

Ambiguity breeds scope creep – clarity crushes it.

We’ve all been there – when you think you’re almost done and realize some important element wasn’t connected – or you forgot the video for the thank you page (or the thank you page entirely).

Not anymore.

Action Planning Framework Example

Let’s look at an example: Say you want to drive new leads to your demo

Start by defining the tactic – then the assets required to support that tactic.

But then work down from each asset working through the granular details for what it will take to bring that particular element to life.

I know, that’s kind of a rushed example – but hopefully you’re seeing how this process works.

By using a systematized framework to flesh out your approach to any strategy, you’ll increase the likelihood that you get it across the finish line.

Launching things feels good, right?

And, by methodically working through the different steps required to launch something you’ll reduce the risk that something you overlooked derails things.

Lemme hand it over to my good friend Justin MacDonald to bring this one home for ya:

Pro Tip: Not everything needs to be done by you – if you’re a one-man-band it might be exhausting to work through this and realize all of the things you need to do to launch something, but the silver lining is that by organizing a project like this it makes it easier to recognize exactly what needs to be done, and the assign out the various responsibilities to the best resource for the job (which might be you, or it might be a team member, or a contractor).

Hope you found this post valuable, if you did then please give a shout out to Justin MacDonald here.

The truth is that I’ve seen far too many good ideas stall out because the details weren’t clear. This framework actively combats that and helps you get more done swiftly and confidently.

Please leave any comments or questions you have below.

Why Queued Contacts Matter

Why Queued Contacts Matter

When it comes to Infusionsoft campaigns your contacts can have one of three statuses, they are either Active, Queued, or Done.

Active and Done are fairly straightforward, but understanding queued contacts isn’t quite as straightforward.

(More on those status types here)

When you’re looking at the reporting tab of the campaign, queued contacts are represented by the orange number you see in each sequence – in the image below there are 1.3.k queued contacts (and 360 active ones).

Okay, Queued Contacts are contacts that are in a sequence, but they haven’t moved on – right?

So they’re just kinda hanging out – which on its surface seems pretty straight forward, but there are two reasons why I think getting super clear on this concept matters.

Why do Queued Contacts matter?

Two main reasons – they represent risk, and also opportunity.

Why are they risky?

If you don’t understand what queued contacts are and how they behave, then you could inadvertently trigger automation to someone for whom it isn’t appropriate, or that they aren’t expecting.

Beyond just being embarrassing, this can also adversely affect your relationship with that contact, and your email reputation in general.

What about that opportunity?

If you understand that goals act as milestones in your campaigns, and they’re designed to help people progress along the journey you’ve built for them, then you can think of queued contacts as the people who for one reason or another stalled out before they hit the next milestone.

There are plenty of reasons why this might happen, but when I see queued contacts in my campaigns I think of it as a place where contacts are getting stuck and treat it as an opportunity to add another touch point.

Pro Tip: Unless they move on or you remove them, contacts can stay queued indefinitely – so, if you’re adding new steps to a sequence which contains queued contacts make sure you’re clear on which contacts could be affected, and whether or not that’s what you would like to have happen.

Here’s an article from the Infusionsoft help center that digs into making changes to sequences with queued contacts.

Hope you found this post valuable – please leave any comments or questions you have below.

If you want a deeper dive on this – or anything to do with the campaign builder, check out the CB Trilogy Course, or grab the free trial below.

Conditional Content for Infusionsoft

Conditional Content for Infusionsoft

Update: If you have questions about using Dynamic Content then check out this Facebook group that started specifically as a place to share ideas and use cases for this feature.

Say what? Conditional content for Infusionsoft?

Yup. Big news sport fans. BIG news.

For a long time, dynamic email content has been one of the most requested features – and it’s finally happening.

If you’ve ever wanted the ability to send an email to a group of people, and have different sections display based on what tags someone had, or what value was in a custom field – well, it’s coming.

Introducing Conditional Content for Infusionsoft

Conditional content, aka dynamic content, aka liquid content is on the horizon (like, coming this year).

They’re still ironing out the details for how it’ll be accessed in the app, but I’ve been playing with a version of it and it’s slick. The potential behind this fuctionality is massive.

Here’s how it works:

It’s basically shortcodes for emails.

So if you’ve ever used shortcodes, like maybe inside a membership area – then this might feel familiar.

They’ve created a short code buider that allows you to set up the syntax you want – then you can copy and paste it into whatever email you want.

The process for generating the shortcodes is a little clunky at the moment – and I could definitely see that being a barrier for folks who want to adopt this.

But I suspect they’ll smooth that out over time, so for now – just focus on the potential behind this feature.

The ways it can be used seems to be divided into two main categories.

Conditionals and Modifiers

Conditionals decide what content to show to which recipients.

For years the only way to get different messages to segments of your audience was by building an email, in a sequence – the cloning that sequence, tweaking the new version of the email, and using a decision diamond to route contacts into whichever one made sense for them.

But now, with liquid content, you can build one email and use shortcodes to control which pieces of content are displayed for which recipients.

You can hide a call-to-action from anyone who has already bought that product, or deliver an update knowing only your active members will see it – the possibilities are vast.

Brilliant, right?

Lemme show you how this works:

And that’s just the conditional display portion, there’s more…

Introducing Modifiers

Modifiers allow you to tweak or adjust the copy – so, if you wanna merge in someone’s name but you want to switch it to all upper case, YOU CAN.

(…or lower case, Or Proper Case)

If you want to merge in a multiple of someone’s reported revenue – yup, ya can.

You wanna merge in a date, but automatically dial it forward a week, month, or a year – yup, yup, yup.

Exciting stuff, right?

Fun fact: When this feature is released it’ll check off another item from this old blog post wishlist I wrote.

When will this be available?

Obviously I’m not an official spokesperson for the company, but everything I’m hearing indicates conditional content for Infusionsoft emails should be available in the next month or two. Update: Release of this feature was pushed back until Q1 of 2020.

What are the drawbacks?

Honestly, I’m stoked for this – so I don’t wanna take anything away from that.

That said, it will definitely need to be easier to use – I imagine I’ll get used to building the shortcodes, but the copy/paste over into an actual email process feels…clunky.

And the other primary drawback I noticed was that it only seems to work with text – which is a great start, but longer term it’d be great if we could use this same concept to hide/display the other email elements (like buttons, images, etc). Though, worth noting that this syntax DOES appear to work with the HTML section, so that opens up some flexibility for images.

It CAN be used to hide/reveal images, buttons, or other email assets, check it out:

Real World Use Case

He’s a real world use case from my buddy Jordan Hatch – in this scenario he’s using Liquid to reformat a date he wants to insert into an email so that it’s easier to read – using this method instead of the previous one allows him to achieve the same result more quickly, and without requiring a second custom field.

Here are the links he mentioned in the video:

Now, I won’t pretend that I’ve got this whole thing figured out, my brain is still running through scenarios for how and where conditional content for Infusionsoft can be used, but the exciting part for me is two-fold; first – I’m stoked about this specific feature, it’s going to make a lot of things possible that previously weren’t.

Second, and perhaps even more importantly, I’m excited about what this represents – it’s a significant release that represents commitment to the long term development of Infusionsoft, and I know that should go without saying – but my relationship with Infusionsoft has been a little strained lately and features like this are exciting to see.

Anyway, would love to hear your thoughts and ideas in the comments below!

No Decision Diamond Needed

No Decision Diamond Needed

I’ve said it before and I’ll say it again, the Keap Decision Diamond is my Achilles heel.

(Heck, it’s why I wrote this blog post about simplifying them using cascading logic.)

But this blog post isn’t about decision diamonds, in fact, it’s about scenarios where you should avoid them.

No Decision Diamond Needed

Keap decision diamonds are great when you either want one scenario to happen, or another.

(as a reminder, Keap is the platform formerly known as Infusionsoft)

They’re perfect for segmenting people so you can speak to them differently, based on what you know about them.

Decision Diamond Spotlight

In fact, here’s a robust blog post answering seven of the most important questions about Keap decision diamonds.

But there are scenarios in the campaign builder where I see people try to branch campaigns into different sections based on whether or not someone has taken an action, and that’s where things start to get complicated – because what if they take that action after you’ve already segmented them.

Have a look at this video where we run through a few examples and how to simplify these campaigns:

The key take away here is that because we know that goals advance people in a Keap campaign, we also know that someone who has not advanced must not have achieved that goal – and we can build our automation accordingly.

Let’s take a closer look at a few examples.

Example 1:

In this scenario we’ve got a campaign designed to trigger an SMS message (through a third party add-on tool), and then we have two possible outcomes.

We want one thing to happen if the message is sent successfully, and something else to happen if it isn’t sent successfully (like, say, attempt to resend it).

Now, if you take out the SMS bit this a bit it’s actually a really common scenario.

But remember, campaign goals not only start the automation that comes after them – but they also stop what comes before them.

So rather than building the second attempt in as it’s own outcome, we can actually bake any second or third attempts right into that original sequence because we know as soon as the SMS message is successfully sent, the contact will jump right to that point in the campaign.

This next example is variation of the first – but instead of working with SMS, we’re now talking about Email.

Example 2

The situation is this – we’ve got an email going out, but it’s an important one, so we want to make sure everyone sees it.

The question becomes how can we automatically resend it to people who haven’t opened the email?

The answer is probably less complicated than people think.

Rather than use an Infusionsoft decision diamond to branch contacts into those who have or haven’t opened the email, you can actually just build your second (and third, fourth, etc) email attempts right into that original sequence – because the minute the contact achieves the goal downstream any automation preceding the goal would stop.

Caveat: I should also point out that you should use this particular tactic (and the Email Open Goal in general) with caution.

Email opens are kinda a sketchy metric, they’re dependent on how the recipient’s email client reports information back to Infusionsoft, so it is possible to report an open when the contact didn’t read the email, and possible for the email to be read without reporting an open.

K decision diamonds are incredibly powerful, and I hope you found this post valuable – please leave any comments or questions you have below.

And if you want to get to know the campaign builder better, check out the Advanced Automations Course in the Keap Academy Platform.