Last week I wrote a post about a gotcha that can trip people up as they’re building campaigns in Keap. Well, this week I want to tackle another common misunderstanding I see.
By default, what happens when a goal is achieved?
The sequence before it is stopped.
The sequence after the goal is started.
This brings us to gotcha number two.
NOTE: To cover this gotcha in with the level of detail it deserves, this blog got a little longer than I anticipated. So, I recorded a quick video overview as well, if that’s more your speed, scroll to the bottom for the TL;DR version.
Gotcha #2:
The key part of that question above is “by default”.
And the reason I’m emphasizing that phrase is because that isn’t always the case.
Keap has specific sequence settings, and goal settings that can affect the expected behavior, and can make number one or number two above untrue.
If you don’t thoroughly understand the different settings, then it’s really easy to think you have things figured out, and be totally caught off guard when something doesn’t work the way you expected.
First, let’s talk about sequence settings.
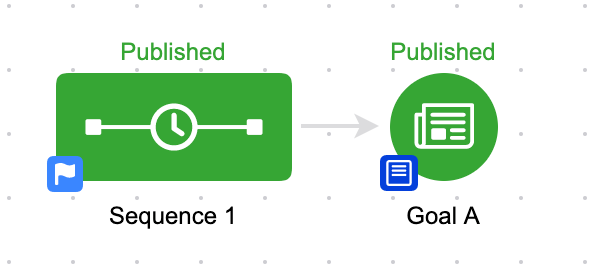
Have you ever noticed how each sequence in your campaign has a little badge in the lower left hand corner?
By default, it looks like a white flag on a blue background. This little graphic is the indicator as to whether or not this sequence will stop when a goal downstream is achieved, or whether it will keep going.
If you ever went to the dentist as a kid, you probably remember paging through Highlights magazine while in the waiting room – and if you were like me, you took great pride in your ability to dominate the “Spot the Differences” game.
You know, they’d show you two similar images, and your job was to identify that in one picture the kid had an extra freckle, or an untied shoelace.
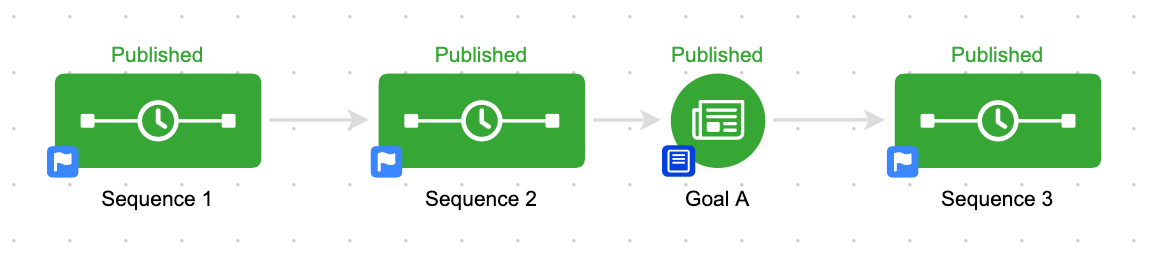
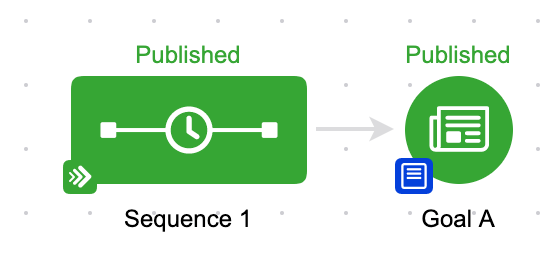
Anyway, this is kind of like that. The campaign is identical, with the exception of the little colored badge on the lower left hand corner of the sequence.
In the first image the sequence WILL stop when Goal A is achieved, in the second sequence it WON’T stop when Goal A is achieved.
The reason this confuses people isn’t because it happens frequently. Most people have never clicked on that flag, and have never changed this setting:
I’m covering this here because it breaks the commonly accepted rule “sequences stop when goals are achieved”. When things break the rules we’re used to, it can get confusing.
Now, the natural question at this point is “Why wouldn’t I want my sequence to stop?” – and the best answer to that is that sometimes you’ve set certain expectations, and you need to deliver on what you said you’d do.
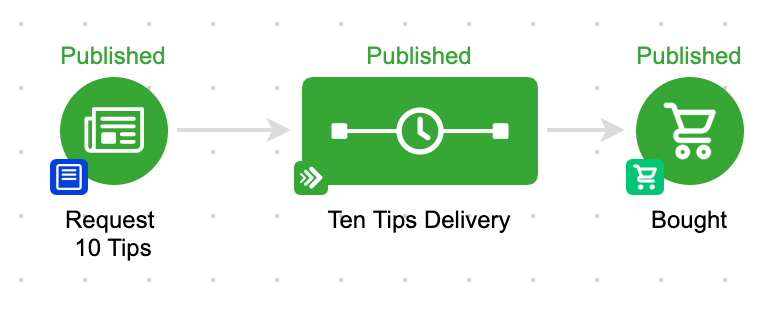
Like in this campaign here:
If we’ve set the expectation that we were going to send someone ten tips, well, even if they buy the upsell we’re offering, we still want to deliver the ten tips we’ve promised. (Yes, there are dozens of other ways to handle this specific scenario, but I’m illustrating a point here guys…)
If you find this type of stuff valuable, or you want a place to ask questions – then you might get a lot of value from our private community. Check out the OG Membership details here >>
Okay, let’s move on to the second half of this Gotcha. Goal Settings.
When a goal is achieved, a contact starts the sequence following the goal, right?
Well, yes. Normally. But again, there is a setting that controls this. You see, goals work either globally, or locally. By that I mean they can either be configured for all contacts anywhere, or only for contacts who are already in that campaign.
What this means is that you can build goals that are listening for anyone anywhere, but you can also build goals that are only listening for contacts already in that campaign to take an action. The global goals are commonly referred to as “entry points”.
Trust me, this sounds a lot more complicated than it actually is.
Let’s look at a few examples:
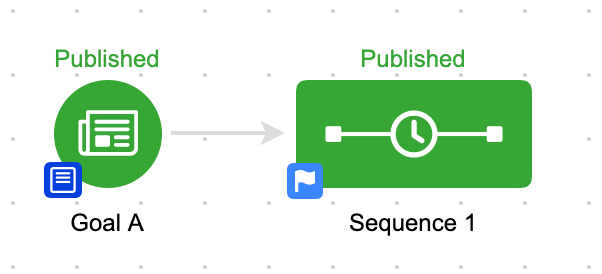
We’ll start with a really easy one. In the above scenario, if any contact achieves Goal A, they will be added to Sequence 1. In this scenario, this goal is considered an entry point to the campaign because there isn’t anything prior to it. So, if a goal doesn’t have a sequence before it, then it is automatically an entry point, and is fair game for any contact.
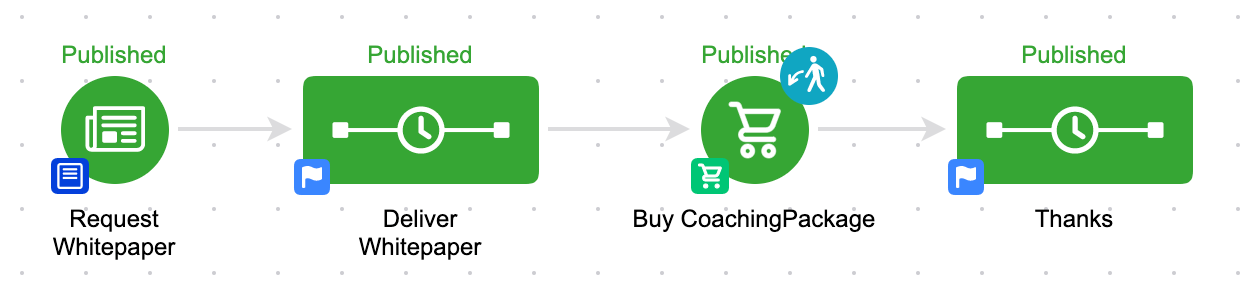
But for goals that are “landlocked”, they are not naturally entry points. Check this one out:
In this scenario, if someone requests my whitepaper, they’ll get the whitepaper delivered in the next sequence, and then they’re driven to purchase, and after the purchase they’ll get some sort of thank you.
But, if someone buys my coaching package who is not in this campaign, then they will not be added to the thank you sequence. The purchase goal is landlocked, and is not currently an entry point. So that means that the goal is only listening for purchases from the group that is already in this campaign.
Again, the natural question is: “Wouldn’t I want the thank you sequence to go to all people who buy, even if they skip the whitepaper part?” And the answer is that “Yeah, you probably would”.
But what if you wanted to have some sort of specific follow up, and you wanted to craft your thank you message to be really specific. Something like:
“Hey, thanks for buying my coaching package. As you probably saw in the whitepaper, I’m really focused on three things, X, Y and Z. And this coaching package is the perfect way to take the methodologies I talked about in the whitepaper and translate them into results for your business.”
Well, the way it’s currently configured, you could be that specific because you know the only people who can get into the “Thanks” sequence, are those who also came through the whitepaper sequence.
But, let’s say for a moment that you didn’t want that. Well, if you click on the colored badge in the lower left hand corner of any goal, you can denote whether or not you want that goal to be an entry point. It’s called Goal Settings.
This one little setting is often overlooked, but it can be really useful for your more complex campaigns; where you may need to have multiple entry points throughout the campaign.
One thing to note, is that some goal types don’t permit you to make the goal an entry point.
For example, link click goals, and task completion goals don’t allow you to configure them as entry points, because in order for someone to achieve one of those goals they would have to have been in the sequence prior to the goal.
Additionally, if there isn’t a sequence prior to the goal, it also won’t let you set it as an entry point. It’s an entry point by default.
So, now that we’ve changed the goal setting, let’s take a look at that same campaign.
You should notice that the Purchase goal now has a visual indicator letting us know that it’s now an entry point. The little icon in the top right, a dude with a green arrow, shows us that contacts can achieve that goal, and be added to the campaign at that point.
Okay, so, here’s the last twist to all this.
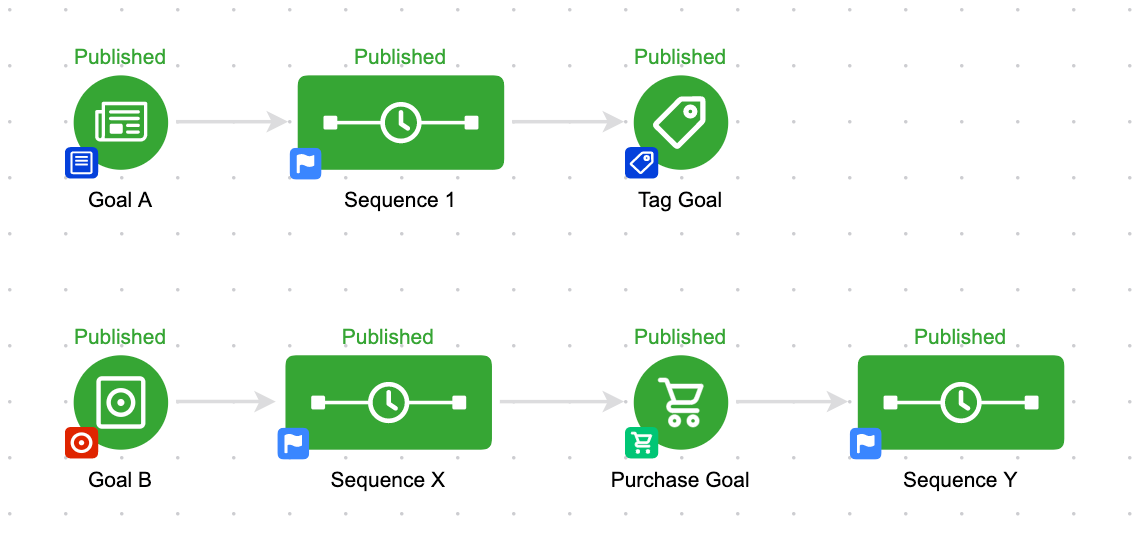
When we talk about a “Campaign” – we’re talking about EVERYTHING that is on the same canvas. So that means if they are anywhere in the campaign, that all goals in that campaign are considered entry points. Even if they are seemingly unrelated, and there’s no connecting lines between them at all.
Here’s an example:
This is one campaign. Even though there are separate and parallel processes, because they’re built on the same campaign builder canvas, the system thinks of them as being the same campaign. So, if someone is in Sequence 1, and they achieve the Purchase Goal, they’ll not only stay in sequence 1, but they’ll also start Sequence Y.
Okay. Like I said originally, this sounds more complex that it actually is.
What I’ve found with things like this, is that it can be hard to understand these concepts before you actually need them because the information seems rather abstract.
So, that’s why I’ve included so many examples, with the hopes that if you come across one of these you’ll have an idea of what the expected behavior looks like.
But please, ask questions if you’re unclear on any of this. I’m happy to elaborate.
If you love this stuff, and you want to dive deeper, I strongly recommend checking out the Advanced Automations Complete Collection course from Keap Academy, covering the fundamental basics and bells and whistles – everything you need to know about the campaign builder.
Oh, and if you’re the type of person who prefers a video tutorial, here’s an overview:
Where do I learn more?
The Keap Academy platform features a robust course, The Advanced Automations Complete Collection, covering the fundamentals for building campaigns, from basic to advanced features and settings.
The Campaign Builder is the single most powerful marketing tool I have ever seen. For me, there’s no question about it.
It can solve so many problems, and can work for so many different businesses. But the very nature of having a tool that is this robust, is that there is a level of complexity associated with learning it.
I want to highlight three of the most common “Gotchas” that I see with the Keap campaign builder. I chose the to use the term “Gotcha” carefully- these aren’t bugs.
They aren’t myths. They’re just intricacies for using the campaign builder, and once you understand them, things will work a lot more smoothly for you.
Gotcha #1:
Goals start and stop sequences. Most people know that, right? But their impact can extend beyond the sequences to their immediate left and right.
Let me show you what I’m talking about.
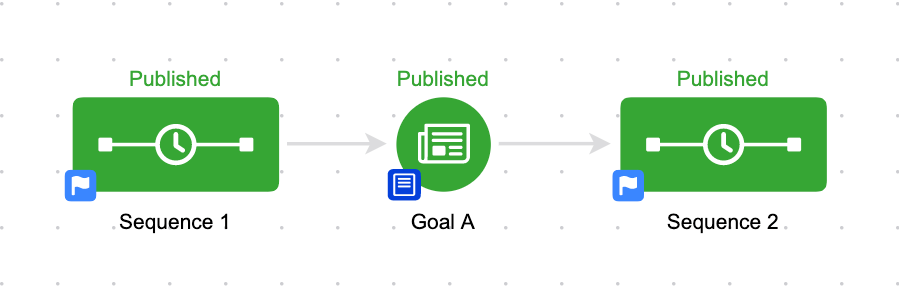
This is a pretty basic scenario here. If you have contacts in Sequence 1, and they achieve Goal A, they’ll go into Sequence 2. No brainer.
Now let’s step our game up just a little bit. Have a look at this one:
This is effectively the same scenario, with just one twist. Sequence 1 is not directly connected to Goal A.
It doesn’t matter.
If someone is in Sequence 1, and they achieve Goal A, they’ll jump over Sequence 2 entirely, and they’ll be added to Sequence 3.
This is because, by default, goals stop everything “upstream” from them. So, if the contact is in this campaign, and the sequence connects to the goal (directly or indirectly), then by achieving that goal, the contact is extracted from their current sequence and added to the appropriate new place downstream from the goal.
Let’s try this one more time. Check this one out:
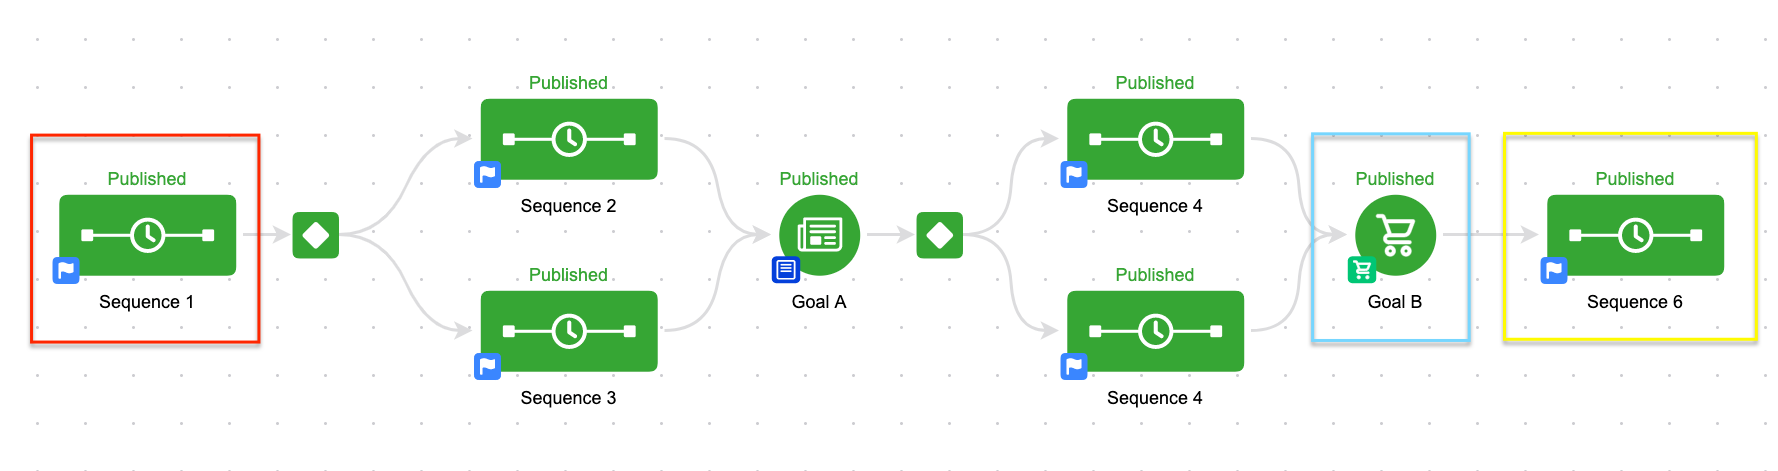
So, now things have gotten a little more complex. But the logic doesn’t change one bit. If you’re in Sequence 1 (red) and you achieve Goal B (blue) you’ll be removed from Sequence 1 and added immediately to Sequence 6 (yellow).
The reason this works is because these two icons are connected. I know there isn’t a line connecting them directly, but they’re indirectly connected. Sequence 1 connects to Sequence 2, which connects to Goal A which connects to Sequence 4 which IS connected to Goal B. Right, kind of a round-about way, isn’t it?
Think of it this way. Goals are things we want our prospect to do. And sequences are the things we do in order to encourage them to achieve those goals. So, if someone is in Sequence 1, and they achieve Goal B, the campaign builder just says “Oh, okay, great. We don’t need sequence 1, 2, 3, 4 or 5. We can just skip all that jazz and push them into Sequence 6.”
In the above campaign, they could be in any of the first 5 sequences, and if they achieve Goal B, the outcome will be identical. It’ll stop them where they are, and will add them to sequence 6. If it helps, you could draw lines connecting Sequences 1, 2 and 3 to Goal B, but functionally the campaign won’t work any differently, and aesthetically it’ll be…um, painful.
I’ve been mentally preparing this post for a while now, but this facebook post, and an awesome conversation with Christopher Sutton this morning was just the impetus I needed to finally write it.
Here’s the reality: The campaign builder has quirks. Nuances. Intricacies. Call them whatever you like. If you’re going to use it, you’re bound to come across them from time to time. The only solution I know to prevent frustration is to arm yourself with education. Once you know how it works, even if you don’t agree with it, you can at least plan for it.
If you don’t educate yourself, then there’s a higher likelihood that you’ll think something is a bug, simply because you don’t understand it. Or you’ll hire someone to build something for you, but not be able to use it because you don’t understand how it was built. If you’re looking to understand the campaign builder from the very basic fundamentals, to the more advanced features and nuances, there are a number of ways to do it – start with the Advanced Automations complete collection from Keap Academy.
The Keap Academy platform features a robust course, The Advanced Automations Complete Collection, covering the fundamentals for building campaigns, from basic to advanced features and settings.
“The more I learn, the more I realize I don’t know.”
-Albert Einstein …. or someone
Atop Angels Landing, Zion National Park
Every time I learn something new, or uncover a new tool, it’s a motivating mixture of excitement and frustration.
Yes, I now know something new, which is good. But it’s almost always accompanied by a new perspective, through which I can also see a brand new lineup of things I don’t know.
So, it’s double edged, right? Because yes the destination (functionality) is exciting, but sometimes the journey (learning curve) is intimidating. And often times that’s the process for learning Infusionsoft as well. Just when you reach the next crest you can see another one towering over you. In hiking they call these false summits – and as with in business, they can be equal parts demoralizing and inspiring. (more…)
Reyna Bovee, Certified Partner Trainer, Infusionsoft
I’ve got a blog post this week from Reyna Bovee, another friend of mine from inside the walls over at Infusionsoft. Reyna Bovee is a Trainer for Infusionsoft’s Certified Partners. She trains on advanced Infusionsoft elements and some fun ninja tricks. It’s safe to say that, like many of us, she totally geeks out on Infusionsoft.
Outside of the software, she’s pretty cool as well. She’s a sucker for inspirational Pinterest quotes and festivals (mostly because of the funnel cake). And she loves traveling, too. She boasts that she’ll take you up on a travel offer anywhere (I say challenge her).
Reyna uses Infusionsoft in her everyday life as she supports her husband and family with their entrepreneurial dream – a blooming home remodeling company. She handles the Infusionsoft end of things, and any other marketing pieces, which keeps her Infusionsoft and Marketing chops polished so that her trainings always shine.
Ladder vs Linear Sales Pipelines
A sales pipeline is a way to organize opportunities through a sales process. So, if you have a process that your prospects go through before they buy, and if it involves manual interaction, you might be well suited to build a pipeline to help support this. And Infusionsoft’s sales opportunity module is just the tool to make it happen.
This is different than regular ole’ campaign builder automation.
Ladder Pipeline
Sale Pipeline Opportunities require manual work to move from stage to stage. In other words, sales pipeline is best used with sales reps who have to physically touch their customers (maybe not literally).
These two images are the same exact pipelines, we just rearranged them inside of campaign builder.
They look like they operate the same, but there is one missing link that you need to know.
Linear Pipeline
Cutting to the chase, ladder style is going to slay linear style every time.
If you’re shocked and feeling like you have been misled this whole time, dry your eyes, dear.
Let’s get down to the logic to ease your tears.
Here’s a super basic, ideal sales pipeline:
New Opportunity > Contacting > Working > Won > Lost.
Ideally, our customers hit each stage in order, according to plan.
Ha. Yeah, right. This is what actually happens.
We get request for a Free Consultation. (Prospect Stage)
After a few rounds of phone tag, we finally get in touch with that customer. (Contacting Stage)
We start working the opportunity like no one’s business. (Working Stage)
But then! Gasp! They fall off the map. What to do…
Rewind. We start phone tag again. Dang it! (Contacting Stage)
See what happened there?
The customer went backwards.
Does this happen in real life? Oh, heck yeah.
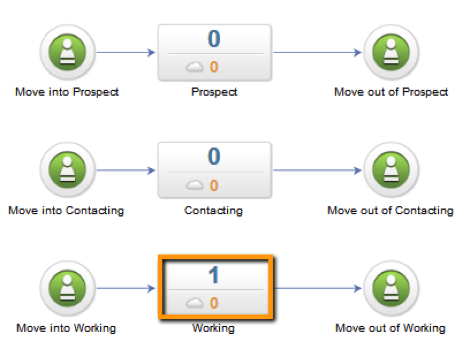
Let’s see how Campaign Builder performance view handles such interference.
Step 3: We start working the opportunity like no one’s business. (Working)
Ladder: So far so good…
Linear: All good over here too..
The two above images are saying the same thing. You’re right – no difference.
But wait – oh, just wait.
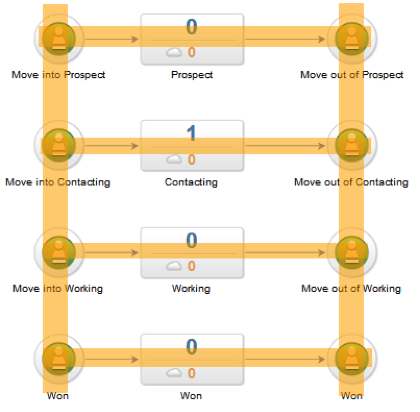
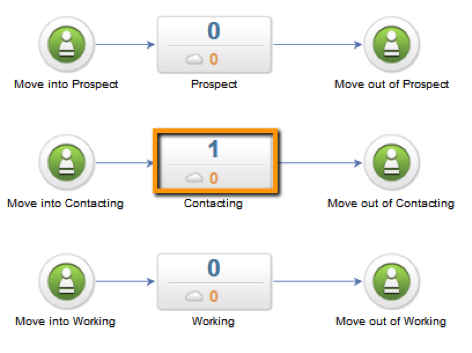
Step 4: Rewind. We start phone tag again. Dang it! (Contacting Stage)
The ladder stage handles it just fine. Because in moving them back a stage, we move them out of working (which stops that sequence) and into contacting (which starts that one).
Ladder: Rewind, no problem.
But life’s not quite as easy over in linear land.
If you move them back into a previous stage, they’ll go back to that stage, but they also stay in their current stage. So now that contact is in the same pipeline in multiple stages. This can cause serious confusion and mixed up reporting.
Linear: Oops…
Yikes. Problem.
If we move a prospect backwards in a sales pipeline using the linear model, the opportunity record gets stuck in two different sequences.
This gives you entirely inaccurate reporting. It makes life harder for the sales rep. And it can certainly create some confusion for the prospect too.
However, when you build in ladder format, you don’t end up with any of those issues.
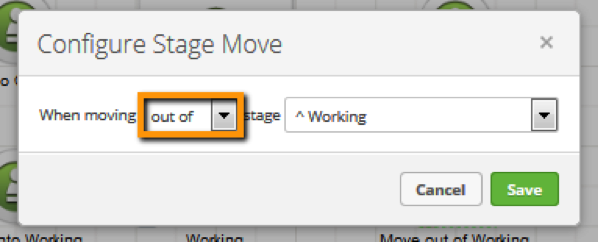
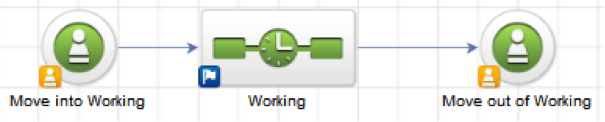
The key difference here: Using the “Move Out Of” Opportunity Goal setting.
Each stage of the ladder style pipeline has a “Move Into” and a “Move Out Of” Goal at either end.
Easy-peasy lemon breezy. You just learned a new party trick. The key to configuring your sales pipeline is to remember that the pipeline is an accountability tool for an otherwise manual process. Any automation you introduce should be there to supplement what your reps should already be doing. (Tweet that!) And, if you build your stages with bookend goals (into and out of) then you’ll have a nicely contained, easy to manage, reporting friendly, sales process.
Oh, and if you want to save yourself a little time getting things set up, start with the Sales Pipeline Starter Kit from the Infusionsoft campaign marketplace.
And now you’re smarter than the gent down the block. I’d love to hear your thoughts in the comments below!
Hey all, my good friend Paul Sokol or PLS consulting is back with another post this week, and predictably, it’s a good one.
When I was first hired at Infusionsoft I remember being impressed by Paul’s knowledge and professionalism as he helped small business owners get started with the software, then I remember being even more impressed as I learned that he’d only been hired a few months before me. As I did then, I continue to learn from him every chance I get.
3 Things (Most) Infusionsoft Users Get Wrong
Ahoy hoy everyone! Its your favorite mad scientist guest back with another post 🙂
Greg and I were chatting on the interwebs and he tossed out the idea for a post on the 3 things most Infusionsoft users get wrong. Now, wrong is a strong judgement because REALLY, even if you commit the automation sins below, its not so bad. Rather these are simple adjustments we can make to get better results.
Thing the First: Brick Wall Thank You Pages
Submitting a web form is exhilarating. Think about it, you are interacting with someone or some company digitally. After you hit “Submit” it gets exciting…
…what’s on the other side?
And then BOOM!
A static page with nowhere to go.
This is one of the leakiest, yet simple to fix, things I see. The thank you page someone sees upon submitting should further guide the relationship. Here are a couple things you can do:
* Drive people to your Facebook page
* Give them a ‘click to tweet’ link (Use this tool)
* Drive them to a sales page or order form
* Drive them back to your blog
The whole idea is you don’t want to waste the momentum achieved from a form submission. Guide them to the next logical place.
Strategically, you could drive them to their inbox too if they were opting in for some lead magnet. This is a great example of guiding the person. This one trick alone can boost lead magnet redemption rates.
For an example of this tactic in action, check out the “Free Resource” campaign in the Marketplace.
Thing the Second: Misusing Opportunities
I probably sound like a broken record to all my friends, but seriously, Opportunities in Infusionsoft are one of the most powerful tools in the whole program. The reason why most people don’t use it more is because the configuration and workflow isn’t the most intuitive. And so, Opportunities are misused all over the place 🙁
Here is the general idea. An Opportunity is merely a manual accountability tool that hooks into a User’s calendar. Opportunities exist to track a process. An end-user simply has to indicate what they did, what they plan to do, and by when. The User’s calendar will have an event based on that “by when”. Everything else is designed to support those functions.
Once someone understands this general workflow, they can begin to use Opportunities to manage a pipeline. If it is a sales pipeline, there is an extra layer of functionality that makes selling a breeze.
Usually, people are using Opportunities to track a sales process. To make this as easy as possible, Infusionsoft created the “Sales Pipeline Starter Kit”. This provides you with the basic process stages, training on how to setup your dashboard and how to work an opportunity.
Back in the dark days, before Campaign Builder, there was this thing called “legacy”. Its functionality was still very powerful, but not as easy to setup. As a result, the community adopted the habit of using Tags for tracking basically anything.
However, there is a downside to this tactic: it can legitimately slow down your app’s performance. Too many tags on too many people simply takes longer for the database to query.
A great example of this is link click tracking. In legacy, the notion of a Link Click goal didn’t exist, so you had to tag any links you wanted to track. This habit is often brought over into the Campaign Builder.
Realize that you can use Link Click goals to track activity and then use Campaign Goal reporting to see the behaviors. Yes, you could do the same thing by tagging a link and then just searching for people with that tag, but its not necessary.
I also realize that there are certain circumstances that require applying a tag to control a campaign. These functional tags should be removed once they have done their job. Again, this is to keep the database fast and lean. The good news is we don’t lose any reporting 🙂
So there you have it. Three things you can do today to boost your use of Infusionsoft. Let me know what you think in the comments!
A while back I wrote a post about how most people think about email permission the wrong way, and they see it as a barrier, instead of as a tool that they can leverage. I made the recommendation that you could start gathering interest as your audience expresses it by clicking links, or opting in for certain things. Well, today I want to take it one step further, and make our lives even easier.
Let’s Build an Infusionsoft Email Preferences Center.
You can design a pretty accurate customer profile based on what you infer about your customers from their behavior; but, you’ll get a much better picture if you just let the customer tell you what they want. Right now, if a customer receives an email from you that they don’t love, and they decide they want less of that particular type of email, their options are to reply to the email, and tell you. Or, they can unsubscribe. And honestly, most people will simply unsubscribe (Wouldn’t you?).
And unsubscribing in Infusionsoft means that they are considered opted-out across the board. So they won’t receive any more emails like that one, but it also means they won’t receive any other automated emails from your system at all. It’s an all or nothing kind of thing.
So, you can see how this might present some problems. What if your prospect decided they don’t want your newsletters any longer, but they do want your promotions. Or, they don’t want your products, but they do want to know about your services. There are countless scenarios where someone might want some communication, but not all, and there’s no native way to let your subscribers manage their preferences.
But wait, I said “no native way”.
Fortunately, the solution is pretty easy. You simply build a webform, or landing page, and create your own email preferences center, and allow your customers to manage what type of communication they receive.
Then you add the link to the footer of your emails so that they see the option of opting out, and the option of adjusting their preferences.
I built one for my own business, and I decided to record the process so that if you’d like, you can follow along.
Also, I need to give a shout out to Paul Sokol, he did a training on this a few years back which was the inspiration behind implementing this for my own business.
Enjoy! And if you have questions about anything in this process please let me know in the comments below! Oh, and please note that the landing page builder has changed since this video was initially recorded, but the process and concept will still be nearly identical with the new tool.
Update: I’ve recorded a new video outlining the steps to build an Infusionsoft Email Preferences Center with the new landing page builder.

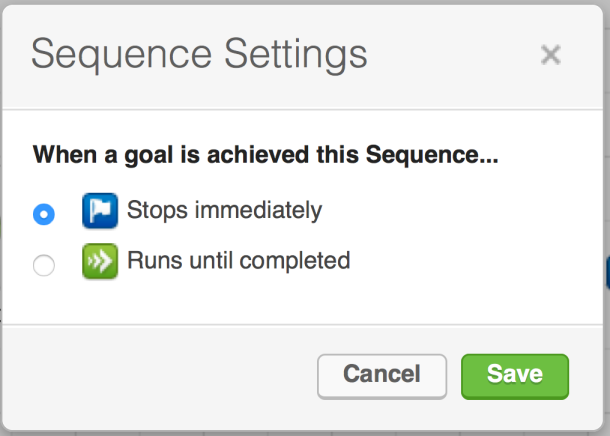

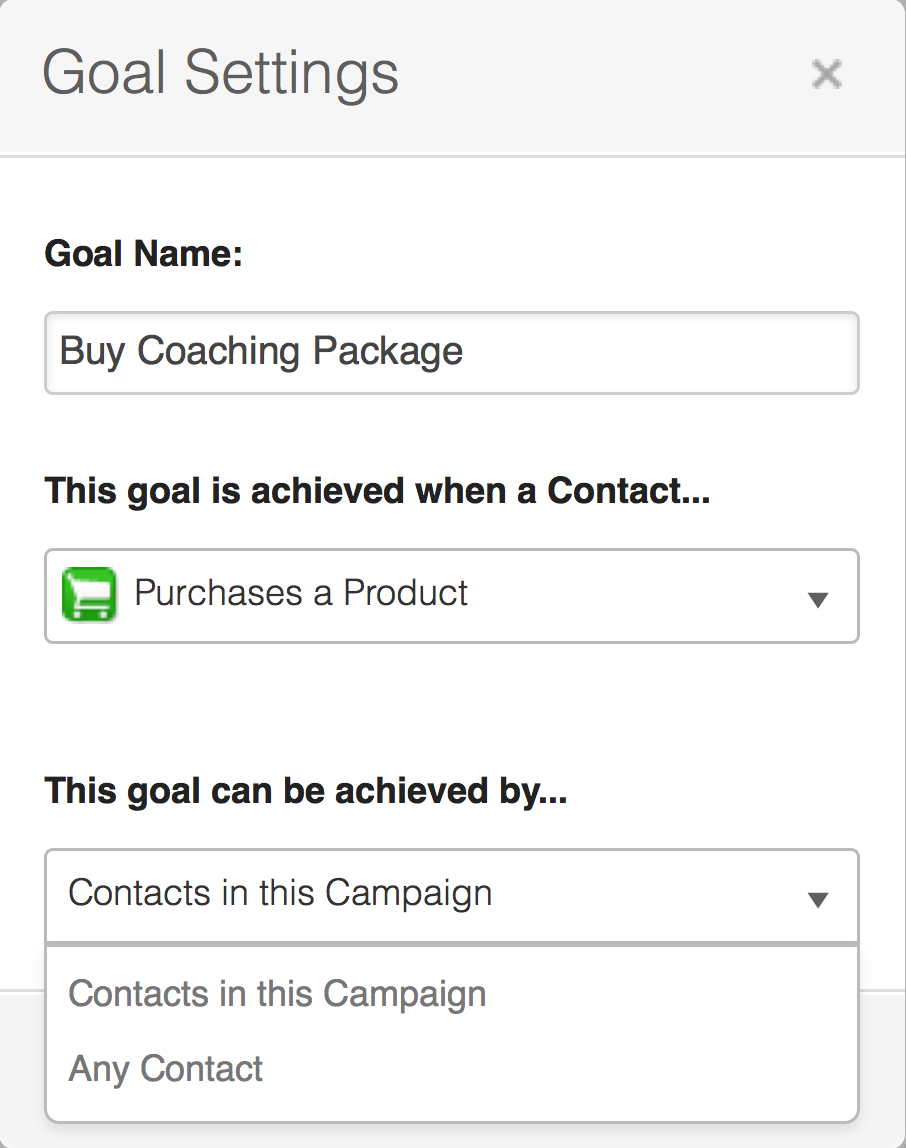 But, let’s say for a moment that you didn’t want that. Well, if you click on the colored badge in the lower left hand corner of any goal, you can denote whether or not you want that goal to be an entry point. It’s called Goal Settings.