How to sleuth which Infusionsoft app sent an Email using Gmail’s Show Original

How to sleuth which Infusionsoft app sent an Email using Gmail’s Show Original

This post is for anyone who works in more than one Infusionsoft account, or anyone who just likes technical tricks, or digital snooping.

K, so, if you work with a lot of different Infusionsoft applications, you may get a random notification in your email sometimes, for whatever reason.

For example, a saved search/report doing its automated reporting to you as the User.

These system notifications don’t always leave a clear paper trail as to which app the notification originated. And if that notification needs some action, this can be particularly problematic.

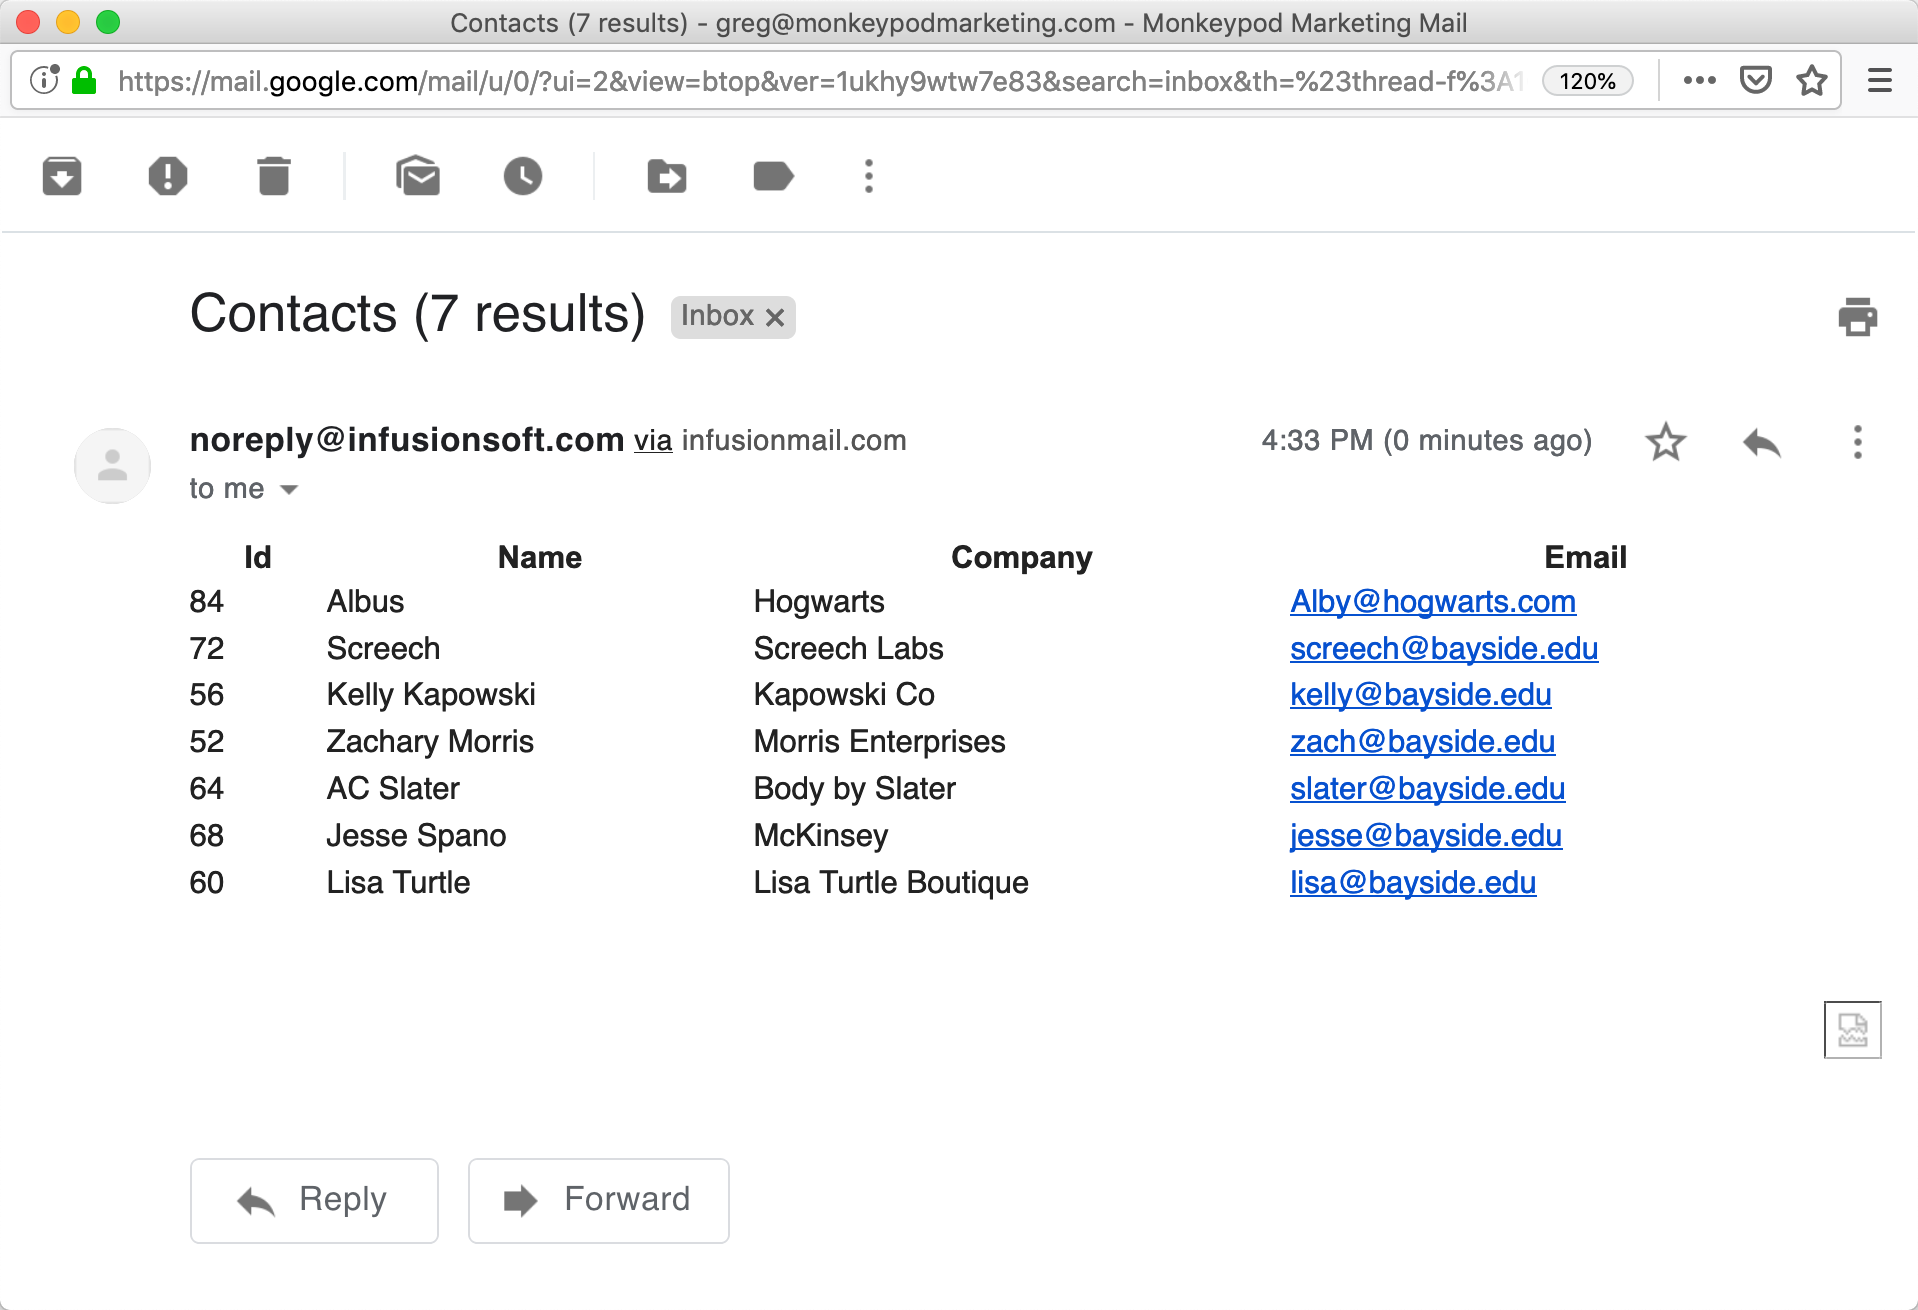
The good news is that with Infusionsoft, the source app name can be uncovered with a little technical know how. Which is of course the whole point of today’s post 🙂

Introducing “Show Original”

If you use Gmail (read below if you don’t) there is an esoteric function known as ‘Show Original’. This allows you to view the raw HTML of the email.

As you’ve probably guessed, the app name from a mystery notification can be found in the raw HTML of any Infusionsoft-sent email and this can easily be extracted if you know what to look for.

Which means that, even if you don’t use Gmail, you can still use this general tactic of looking at the HTML. All you need to do is figure out how to view the raw HTML for a particular email in your system.

First, let explore how the HTML of an email is structured, and I’ll try to make it exciting 🙂

Emails are similar to those websites we all know and love. There is the header information that the machines care about, and the body of the page that we see.

See, its thrilling!

Emails are the same way. You have the header information and the email body. Think of it like the envelope and the letter inside.

To see the raw HTML of an email, in gmail, click the ellipsis and ‘Show Original’

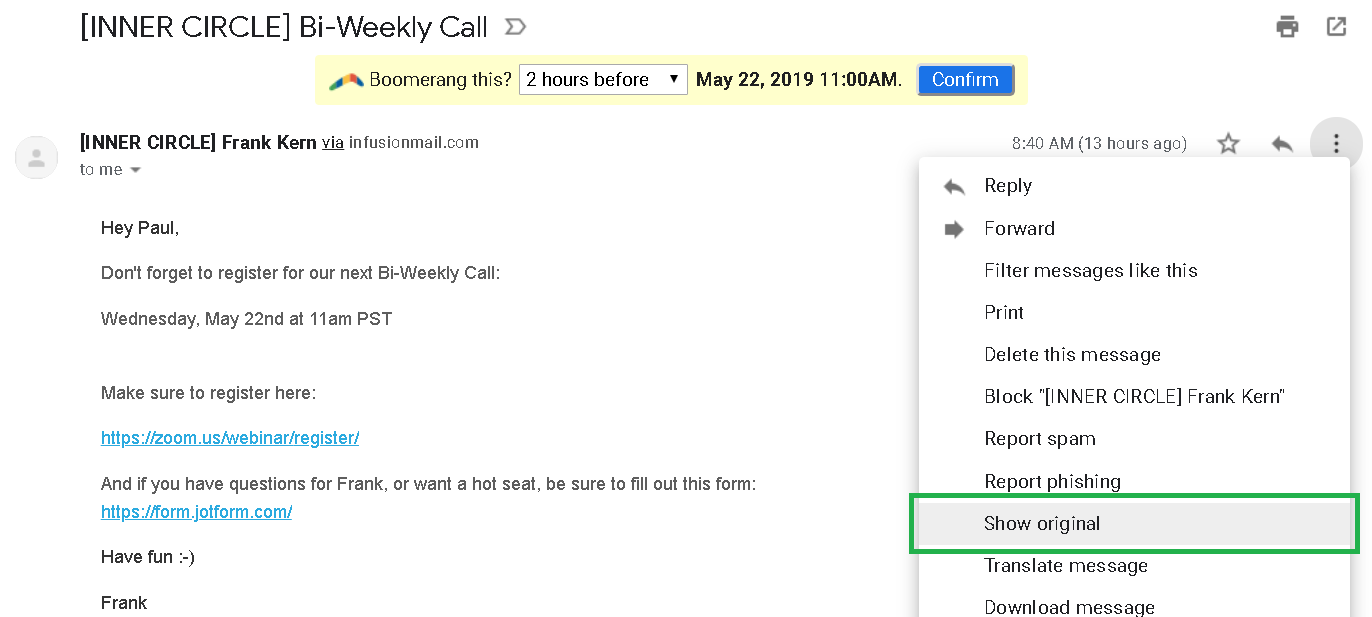
Boom! The HTML of your email.

Infusionsoft packs app data in your email headers. It’s pretty easy to spot.

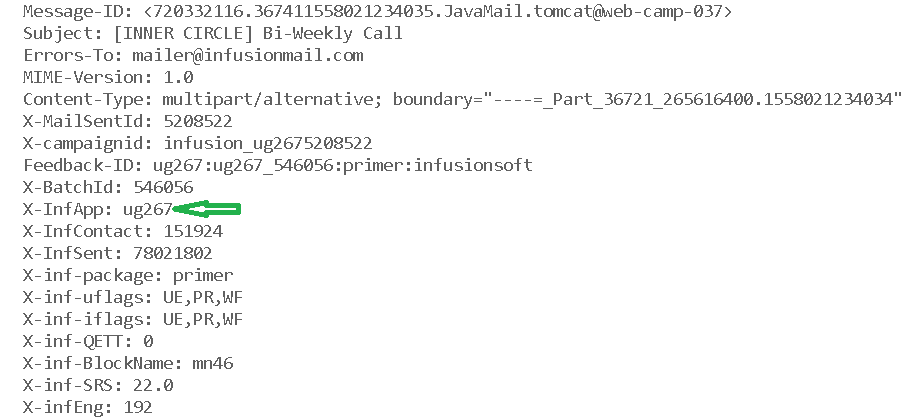
There is a bunch of neat info here. My favorite is the batch ID.

(Pro-tip: Which can be particularly helpful when debugging campaign emails.)

So there you have it. Nice and simple. Show original opens up new worlds.

And if you want to have a little fun, show original on spam emails. It gets pretty wacky!

Happy Sleuthing!

Contact Update Links

Contact Update Links

So, if you want to let a contact update their phone number, their address, or nearly any other detail about themselves you can do it by sending them a link to a landing page or a web form, right?

And if you use a hidden field for Email address then they won’t even see their email address and the system will automatically know which contact to update with the new info.

A common example of this is building an email preferences center for your subscribers (here’s a demo on how that one works).

But this method has one glaring restriction: It doesn’t allow your subscribers to update their email.

You could expose the email address and let them change it, but because Email acts as the unique identifier in Infusionsoft this means when they click “Submit” Infusionsoft would notice the new email and would create a new contact record – giving you the original contact with the original email, and a second contact with the new email address.

Not ideal, right?

So, the solution – well, if you have a membership site you can normally create a profile or “my account” page and let them update it there.

But Infusionsoft also offers a built-in option for handling this – it’s under the Marketing >> Settings section.

Because this section is largely considered legacy it seems to remain undiscovered to most people.

This handy feature also includes options for triggering automation, and giving the subscriber access to a few extra fields to update (Billing Address and Phone Number).

Check it out:

One caveat to this feature is that you can’t really edit/adjust which fields they are able to update – you can choose “email only” or “contact info”, and if you select contact info it will let them update their First and Last Name, Billing Address (Street, City, State, and Post Code), Phone Number, Email and Language.

The reason I point that out is because I don’t see a way to adjust these options, or to add custom fields, or even add an option for Country.

That’s it folks – tuck this little trick in your bag of tri – er, I didn’t plan that sentence very well.

Anyway, if you use this in your business (or plan to) leave a comment below and let me know.

Looping Campaigns in Keap (formerly Infusionsoft)

Looping Campaigns in Keap (formerly Infusionsoft)

Update: Keap released a new sequence step item that has opened up some additional flexibility for looping structures. Check it out here.

Looping campaigns in Keap (formerly Infusionsoft) is a request that I see pop up at least once a month – it’s one of those things that isn’t exactly straightforward, but may be less complicated than you think.

Before we dig into this I should say that if you are just looking for the basics of how to build a simple campaign, then you probably want to check out my Campaign Builder 101 blog post.

When would you want a campaign to loop?

From time-to-time you may recognize that you need a campaign process to repeat itself, and in those situations it makes a lot of sense for that campaign to loop (looping just means that when the contact reaches the “end” they are automatically restarted).

Some of the most common use cases for this are scenarios where you have reminders for repeating calls or events that happen at the same interval each week, each month, or each year.

For example, let’s say you have a repeating call that always happens on the second Wednesday of the month. And the morning of that call you have an email go out 6 hours in advance, and then a 15-minute sms reminder. It’d look something like this:

You could build that process out each month, but if you know it’s going to be the same structure then it makes a lot of sense to set it up as a loop.

Another situation where looping campaigns might be valuable is when you want to issue a quarterly survey to your subscribers, or to your members – you don’t necessarily need to do this manually, but if you know that once a quarter you want to send them an invite to take the survey then you could build this process out so that it loops four times a year (once each quarter).

Technically speaking, how do I do it?

We know Goals as the “triggers” of campaigns; and largely they serve to start and stop automation.

So to loop a campaign we need to use the exact same goal at the end, and also at the beginning. That way, when the goal is completed it stops the campaign and also restarts the campaign.

The whole reason that this works ties back to a very specific intricacy in how the campaign builder processes these events, and it’s perhaps the most important part of this blog post:

When a goal is achieved, it performs the “stop” functions before it performs the “start” functions.

Now, the lag is imperceptable to humans, so it appears they’re happening simultaneously but it’s important to know that the contact is drawn out of the campaign before they’re readded; if it happened in the opposite order then the loop would immediately stop and we wouldn’t be able to depend on this methodology.

Can I have another example?

Sure, check out the example at 4:09 in the video above – it’s a perpetual resource loop to stay in touch with my referral partners and make sure they have easy access to their links and the resources I’ve created for them.

Do I have to use Tag goals?

Tag goals are by far the most common goal method used to build loops, but technically you could use any goal method that can be configured to be simultaneously achieved.

Another example might be using purchase goals – and if X amount of time elapses between purchases you could create a task to call that contact, or trigger automated outreach from their point of contact.

Here’s an example of what that campaign might look like:

I think the take-away from all this is that looping is possible, and it’s not just a novelty.

It’s a legitimate campaign builder tactic that can save you time and help maximize the mileage you get out of your Keap automations.

If you found this valuable leave a comment below – or, if you’ve got your own scenario where looping saves the day, share that.

Looping Campaigns without using Goals

Infusionsoft released a new sequence widget that permits users to add and remove contacts from campaign sequences without requiring that they achieve a goal – and Kevin Mogavero recorded this short tutorial on how you can use it to create a looping campaign structure without the use of tags (or purchase goals, etc).

Extra Campaign Builder tactics and training…for free?

If you like tactics like this, then you’re gonna love Campaign Builder Finishing School.

It’s a quick video series covering a selection of tactics you can use to level up your existing Keap campaigns.

Integrating Divi with Infusionsoft

Integrating Divi with Infusionsoft

This post is about integrating Divi and Keap.

Divi is a theme for WordPress websites.

Keap (formerly known as Infusionsoft) is a CRM and marketing automation platform (obvi).

The ability to easily capture leads on your website and reliably add them to your database is paramount; and for Divi users I recently discovered that there is a way to do this without needing any third party tools.

(Update: Apparently I’m a liiiiiittle late to the game and this feature has been available since Sept 2017. Oops.)

First, you select the “Email Optin” Module:

You’ll set up the settings for that module, like the opt-in description, the call-to-action button, and design the look and feel.

If this is your first time using this feature you’ll want to connect it to your Keap Account(s).

Then you choose Keap (or Infusionsoft) from the list of 20 different email service providers, and select which tag you’d like it to apply to contacts who submit this form (the tag is important because it’s how you’ll segment these contacts, or trigger automation).

That’s pretty much it.

Once you’ve got it connected to your Keap account you can drop these opt-in forms all over your web site.

Check it out:

It’s worth noting that this opt-in doesn’t have much flexibility in terms of what information you collect. Your options are First Name, Last Name, and Email address.

But for simple lead capture this will work just fine.

Edit: So, apparently you can add custom fields to your opt-in forms this way. For some reason this feature appears to only be available using the visual editor; so I didn’t notice it at first.

Big thanks to Ben for bringing this to my attention in the comments below!

Direct connections like this are important because it reduces your/my/our dependency on integrations.

Integrations are inevitable, but the more you have the complicated it can be to keep them all current; and the more risk you have that things will break when one of them updates and suddenly doesn’t play so nicely with the others.

Not only does it make it easier to maintain, but it also simplifies troubleshooting as well.

I know there are an infinite number of themes out there to choose from, but if you (or your clients) use Divi, I wanted to make sure you knew about the methods for integrating Divi and Keap.

How to talk to Infusionsoft Support

How to talk to Infusionsoft Support

Keap support doesn’t have the best reputation.

Some might say it’s terrible even.

And personally, I’m not proud of the role I’ve played in that reputation, because I honestly think it’s unfounded and based on presumptuous assumptions (consonance alliteration ftw). More on that in a second.

I always get what I need when I connect with Keap support. Always.

I always walk away from the experience satisfied with the outcome. Always.

And now I’m going to tell you how I manage that. But first, some obligatory exposition. 🙂

In my decade+ of dealing with Keap, I’ve only been disappointed in support when I expected them to be something that they aren’t (and let’s be honest, never have been) – experts in everything having to do with everything.

Keap support don’t know everything about everything. In fact, some interactions may make us feel like they don’t even know very much about Keap. As frustrating as that may seem, that is not the reason why we have trouble getting what we need from them.

The real reason is that we already know they don’t know everything, but we go ahead and act like they do (or at least should) when we call them. No wonder we’re always mad at them.

How to Work with Keap Support

Step 1 – Don’t

We all know that Keap is not the best resource for simple how-to questions. That’s not to disrespect Keap – quite the contrary; it’s virtually impossible for an entry level employee of any company to have enough context from enough industries and businesses to be capable of giving advice on specific setup questions.

Instead of calling Keap with a question that we know they probably can’t answer, why not turn to one of the plenty of other (free) resources available to get questions about implementation, strategy, or functionality answered? There are plenty of Facebook communities teeming with business owners and seasoned experts that can provide more applicable answers in realtime.

Step 2 – Prepare

Online communities can help with just about everything when it comes to Keap, but still there is the occasional situation where the issue you’re running into can only be explained as a “bug in the software”. Most of the time, frustrated business owners will call Infusionsoft support and the first thing they say is, “There’s a bug in the software.”

That is not an effective technique. A support rep can’t do anything with that. And the minute they start to feel you getting upset or angry or frustrated, it will put them on the defensive. And a defensive support rep is an unhelpful support rep. Get ready for disappointment if that’s the route you choose.

Here is a list of things that you should have prepared before you call or join chat support:

  1. Your appname
  2. Your security details (they can’t help you if you don’t have this)
  3. The name and id of the affected feature (e.g. Marketing Campaign, id 123)
  4. The exact steps that you took that caused the issue
  5. The exact steps that you took trying to replicate the issue
  6. Whether you were able to replicate the issue
  7. Screenshots (of everything)

I like to do all of this in one shot by recording a screencapture video of me duplicating the error.

Step 3 – Empathize

As difficult as it can be to swallow your pride, empathizing with the support rep will always result in a better experience. Going into the call with the understanding that the individual on the other end is not responsible for causing or fixing your issue will keep you from taking your frustration out on the rep, which, again, is simply ineffective.

But if you take that one step further, and type these exact words while the support rep is looking into the issue, that rep will go above and beyond for you:

“Thank you so much for your help. I understand this is in no way your fault, and I appreciate you taking the time to help me. If you sense any impatience or frustration, please don’t take that as frustration with you personally.”

Think about it – support reps only deal with 1 type of person – a frustrated person.

If you set yourself apart from that and recognize them as an individual, a human, and not just a cog in a bigger machine, they will make it their personal mission to help you.

Keap support aren’t perfect, but if you approach the interaction correctly, you never have to walk away from the interaction feeling like the end of the world is nigh. With a little bit of preparation and a slight mindset shift, you can get so much more out of it and end up actually satisfied with the result.

Imagine that.

Editor’s note: If you liked this, tell the world (and Bret) on twitter.

Editor’s other note: If you’re looking for more suggestions for getting the most out of your support channels, check out the tips from this article written by another former Infusionite.

What’s the deal with hidden fields?

What’s the deal with hidden fields?

Alright, what’s the deal with Infusionsoft hidden fields? (please read that while doing a Jerry Seinfeld impression)

They (hidden fields) are available as an option when you’re building old school landing pages or web forms in Infusionsoft.

Note: This post was written when Keap was called Infusionsoft, and is focused on using hidden fields in the campaign builder – which is available in the Pro, Max, and Max classic versions of Keap.

Check it out:

They’re available in Keap’s landing page builder too, but it’s a little different there. For that one, you add the form and fields, then you can toggle yes/no for hidden on a field-by-field basis.

But what ARE Hidden Fields in Keap?

They are just fields – hidden fields are like regular fields. They still collect information, right?

…but, they’re hidden, which means the person filling out the form can’t see that they’re there.

Er, say what?

Yeah, it can be a little tricky for people to wrap their heads around.

Here’s the deal – they’re most useful for receiving info that is passed to the page, normally this happens in the link that leads somewhere there.

Lemme show you three common use cases for hidden fields:

Real World Example

Here’s a real world example of how you can use a hidden field on a web form (or landing page) to capture new information or clean up your list: