Online Scheduling Made Easy

Online Scheduling Made Easy

Update: Unfortuantely Lidiane has closed down the SchedulerLink part of her business.The preferred integration she and I both recommend now is this one, from Plusthis. You can start a PlusThis free trial here >>

Keap and Infusionsoft users already know how valuable it is to help them engage new customers and keep up with existing subscribers, and as a Small Business CRM Coach, I’ll attest it’s a wise choice.

Today, I want to share ways you can integrate appointment scheduling with Keap using complementary software.

First, let’s take a look at Acuity Scheduling, then I’ll show you options for connecting it back to Infusionsoft.

Acuity was born in 2006 when Gavin Zuchlinski developed a software to help his mom have fewer headaches booking appointments for her massage business.

Gavin was interviewed by business productivity expert Nancy Gaines in 2018 – for a little more on his story check out that episode of her podcast here.

Anyway, over the past 12 years Gavin’s cloud-based booking system has evolved. It works well for anyone who wants to allow their clients to book appointments online.

We’ve seen it work for a variety of business types, but a few common use cases are those who have regular client appointments – lawyers, consultants, or any type of coaches (business, health, etc).

Acuity boasts a lengthy feature list. Here are a few of the highlights:

  • Set up recurring appointments. One of our business coach clients uses it for this all the time
  • Collect payment from clients at the time they schedule their appointments, through integration with Paypal and Stripe.
  • Configure group classes. We use it when we schedule meetings with client teams that include several persons. This way, all team members get the meeting reminders. Others use it to book classes. (A yoga studio we work with uses it this way.)
  • Sell gift certificates and packages of appointments or classes.
  • Apply labels within each appointment. This is a brand new feature in Acuity and  it comes in handy if you want to flag when someone confirmed the appointment, checked-in or completed the appointment.
  • Configure text message reminders in addition to emails. (This feature is available at the Growing Business subscription level.)
  • Integrate it with Zoom and send a Zoom link with your appointment reminders.

Honestly, I don’t have much to criticize – it’s a really solid product. I attribute that to the fact that Acuity team members really listen to their clients and they update their product based on feedback they receive.

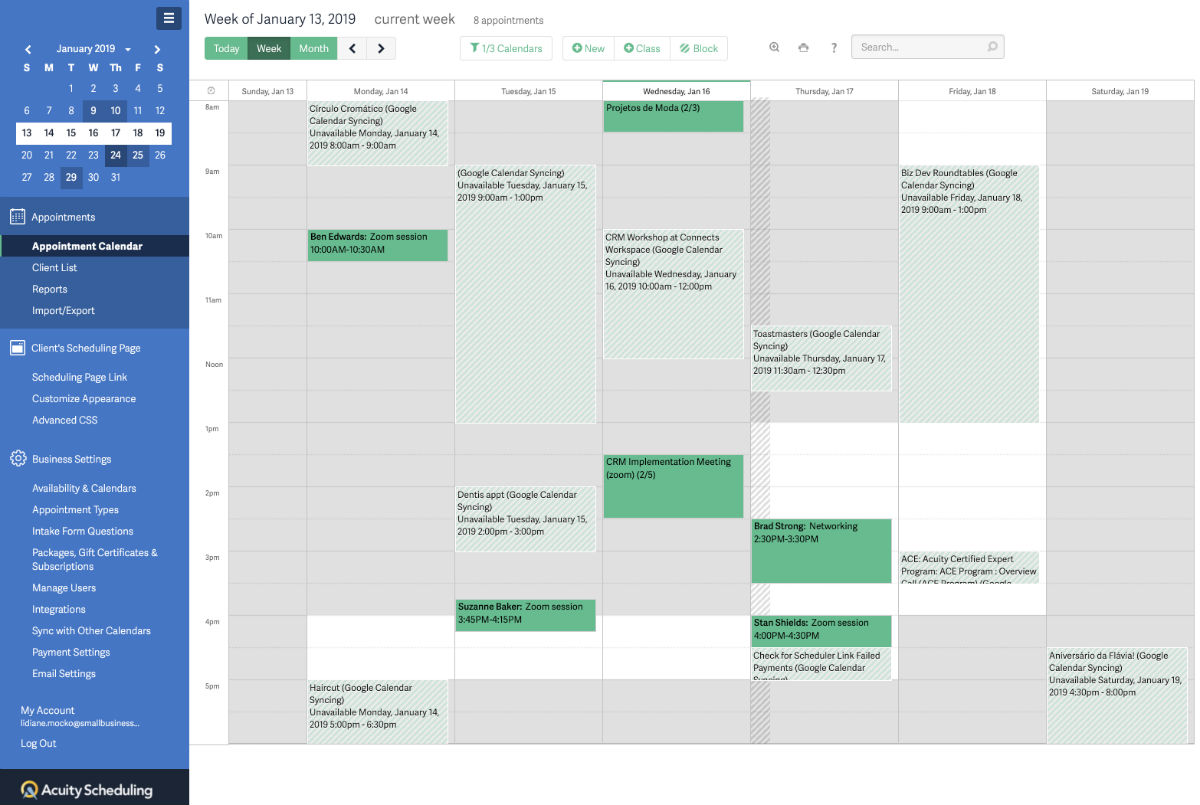
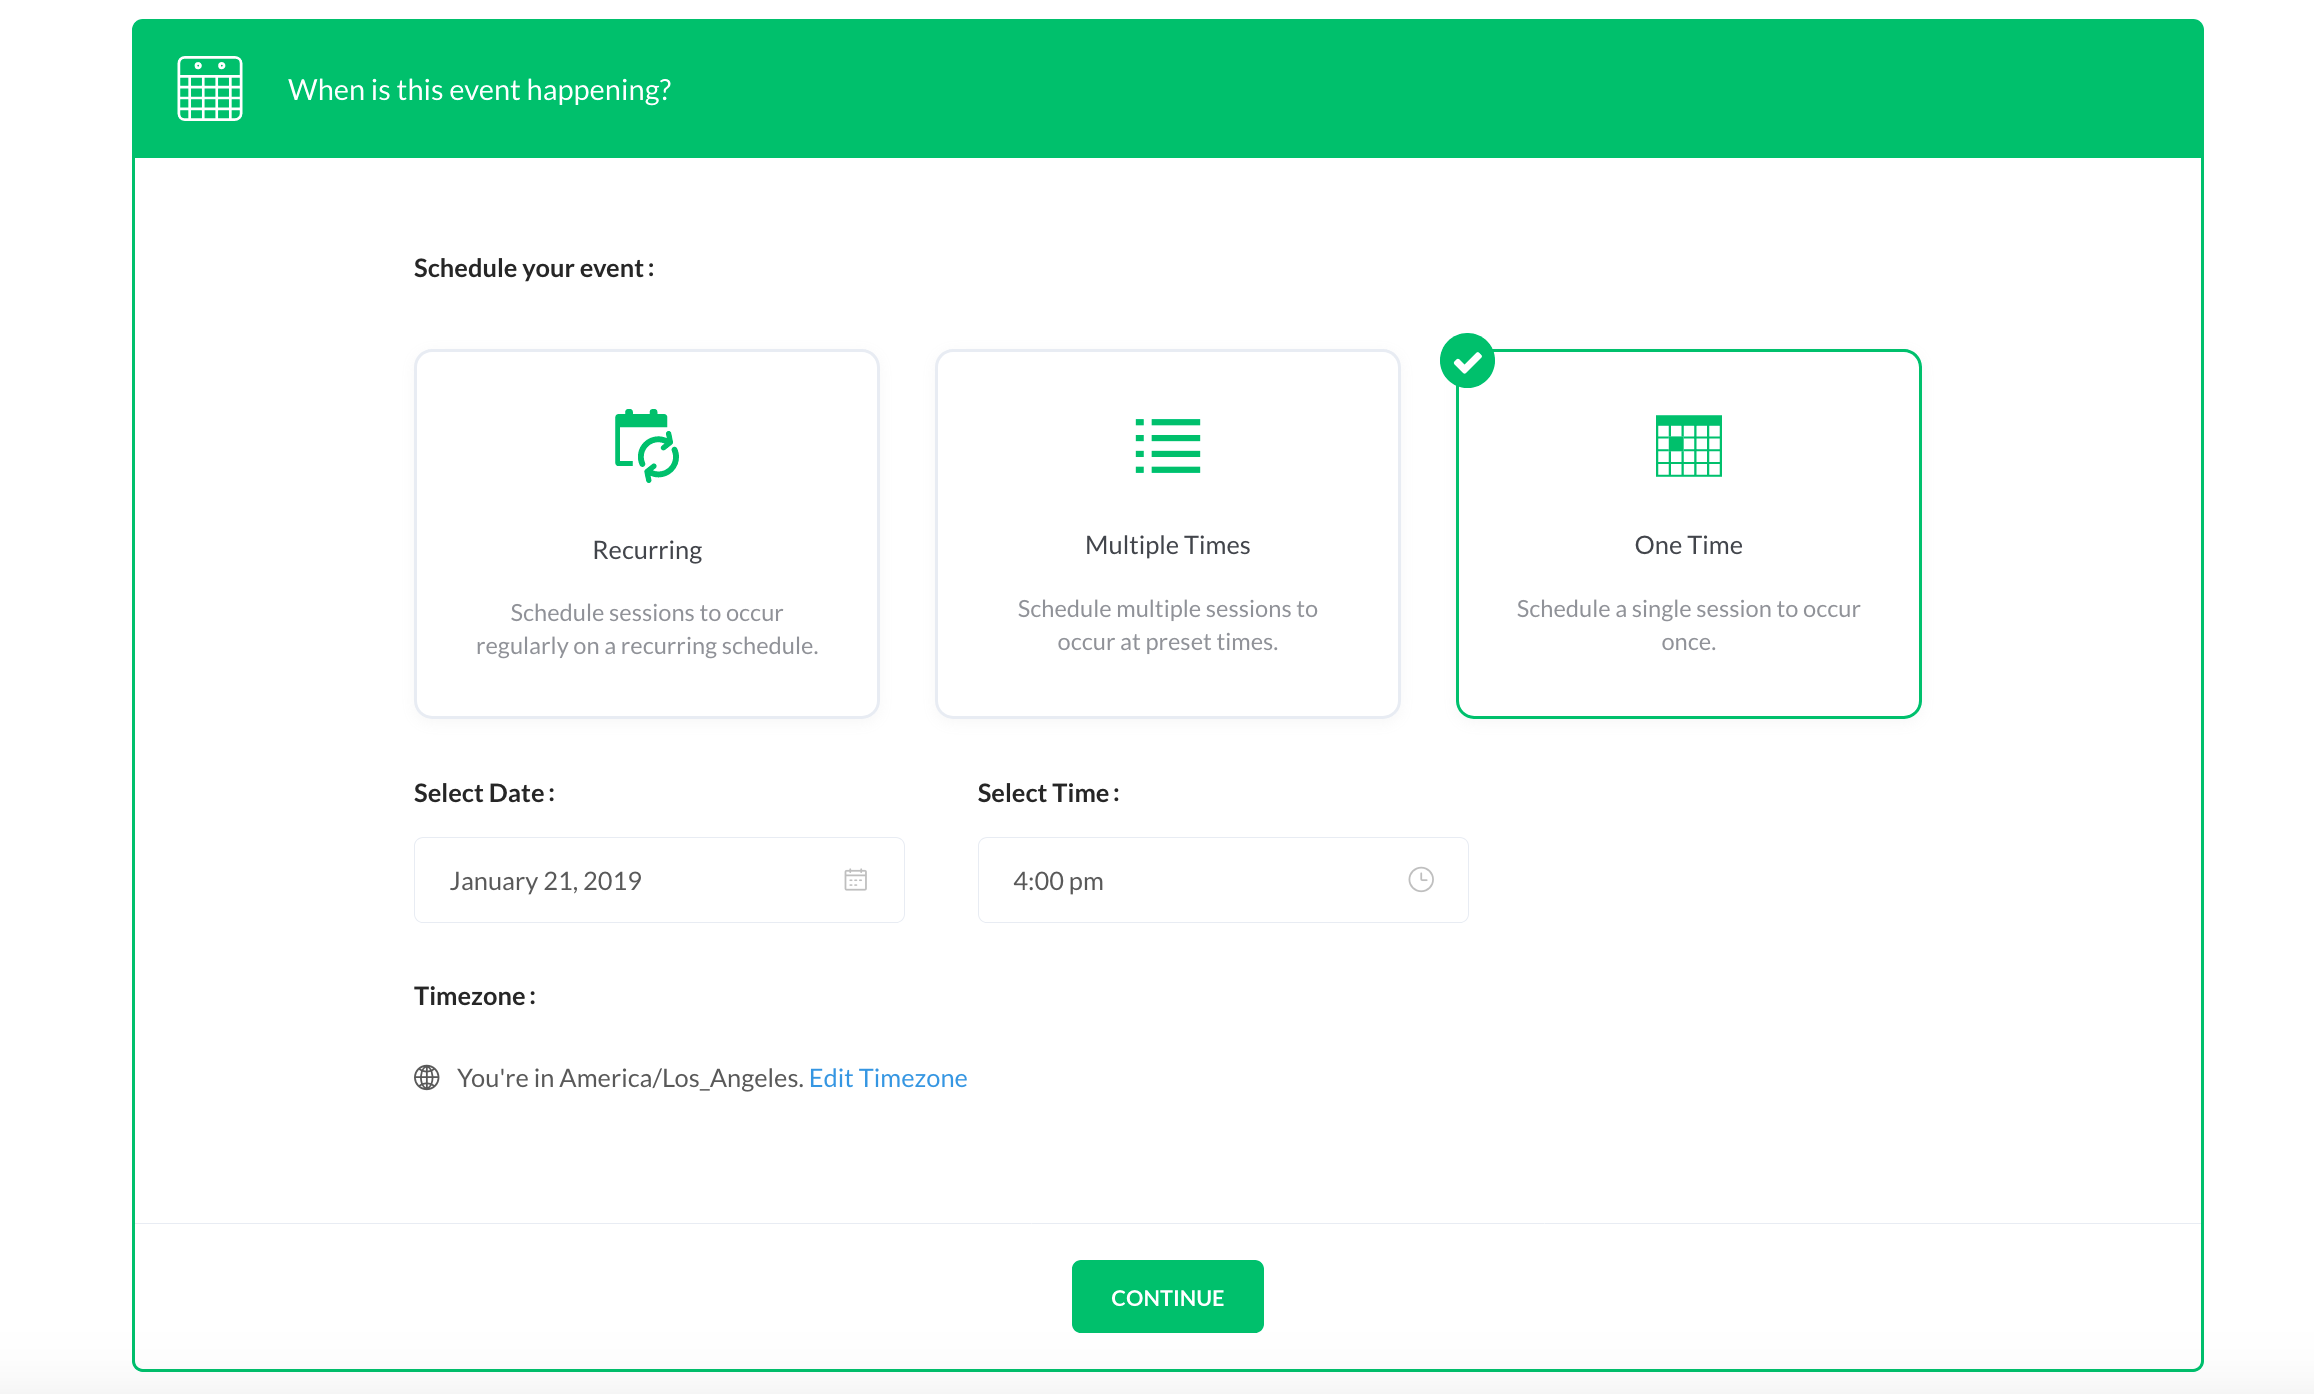
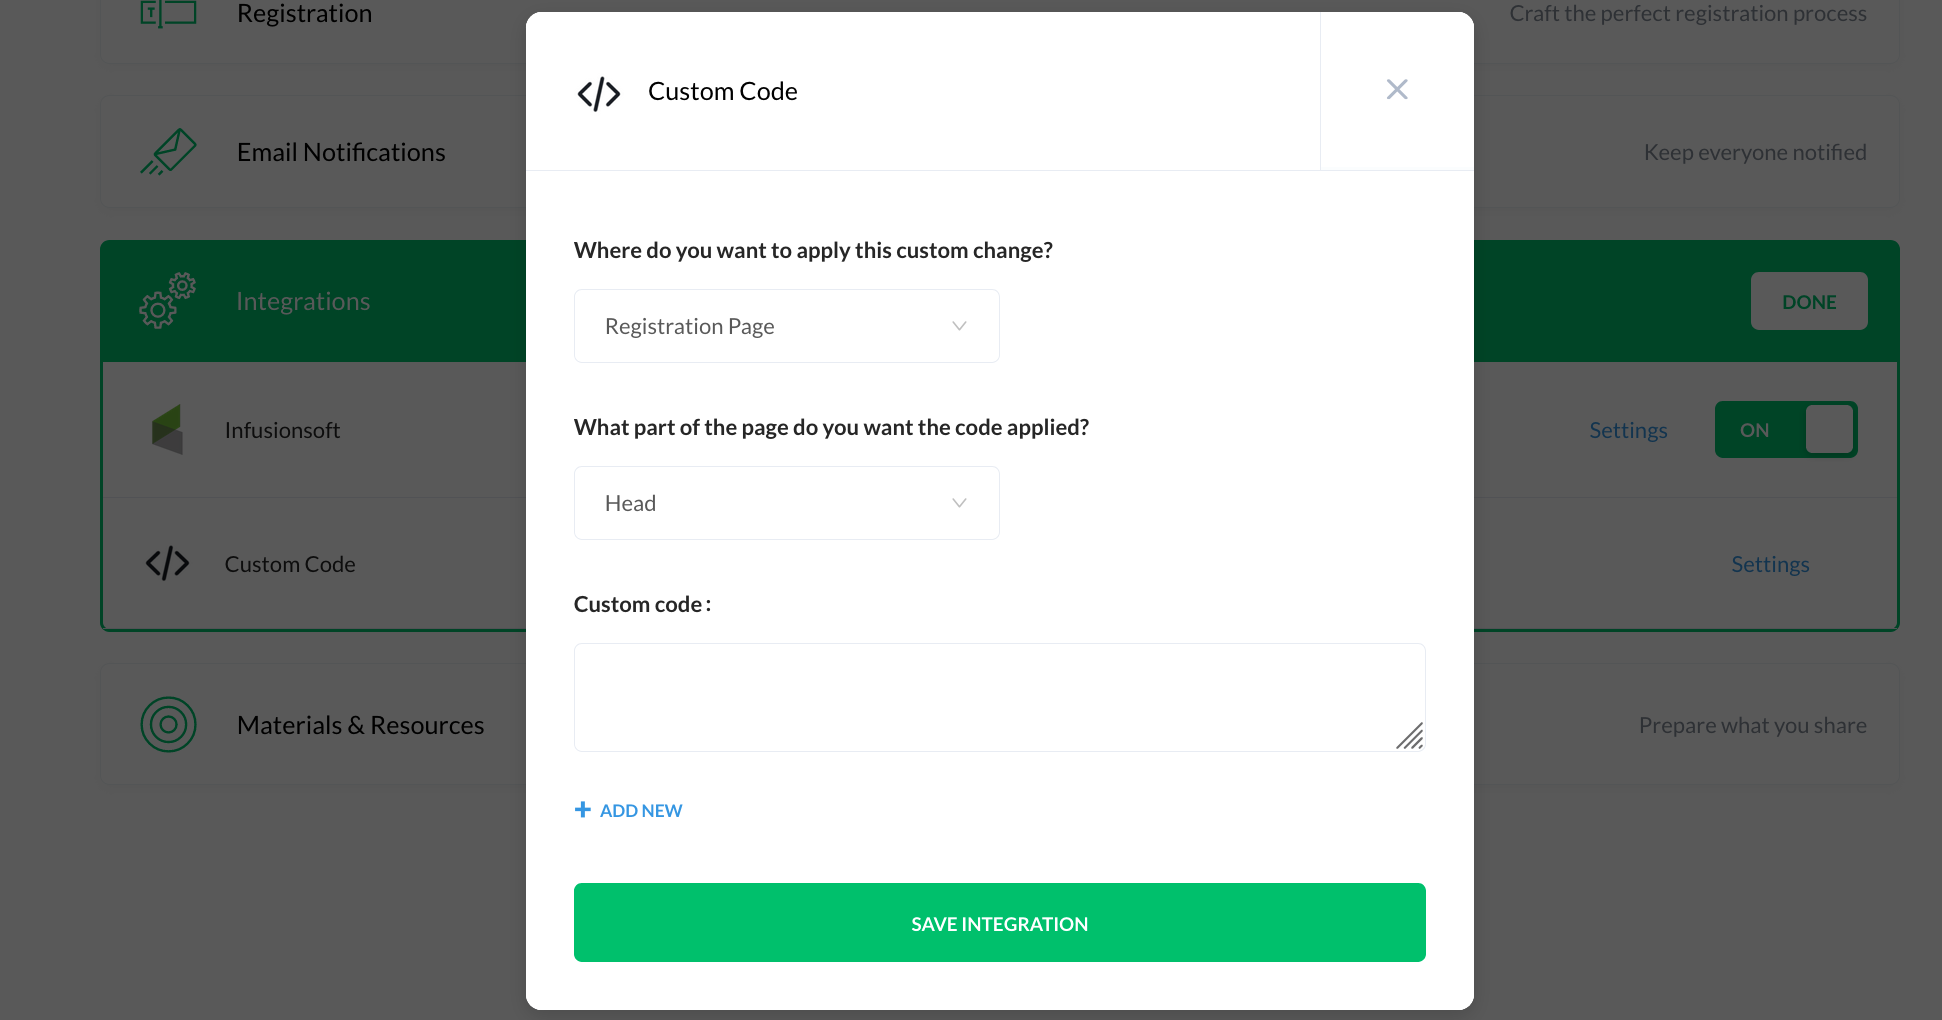
The screenshot above is Acuity. The light green areas are appointments synced from my Google Calendar and the dark green ones have been booked directly with Acuity.

Acuity pricing is based on the number of calendars, not the number of users.

The “Freebie version” gets you started and it’s, um, free.

  1. An Emerging subscription includes one calendar for $15/month.
  2. A Growing Business subscription includes two to six calendars for $25/month.
  3. The Powerhouse subscription supports businesses that need more than six calendars, up to 36. It costs $50/month.

At each level, you have the option of adding features. For all the details, check out Acuity’s pricing page.

Linking Keap and Acuity

Now for the magic: You can make Acuity Scheduling and your Keap App work together by using either Zapier or Mocknick Apps connector app called Scheduler Link.  Let’s look at each.

Connecting Infusionsoft and Acuity with Zapier

Zapier features include the ability to configure an action in Infusionsoft that corresponds with particular action happening in Acuity. Unfortunately there are drawbacks:

  • Zapier doesn’t allow you to add the appointment information to your Infusionsoft app.
  • Zapier will create an order in Infusionsoft, but not a paid one.
  • Configuring these corresponding actions is challenging because you must create a “zap” for each scenario you want to handle.

Infusionsoft is a premium connection for Zapier, so it would require a paid subscription – their starter plans start at $20/month.

Connecting Keap and Acuity

Back in 2016, one of our Small Business CRM Coach clients wanted to use Acuity and Keap (formerly Infusionsoft), so we created Scheduler Link. It uses Acuity API to talk to Keap API in its own language.

Scheduler Link includes these cool features:

  • When an appointment is scheduled in Acuity, Scheduler Link creates a corresponding appointment in Infusionsoft.
  • Appointments made with payments in Acuity generate a paid order in Infusionsoft.
  • With Scheduler Link, you can map appointment data to your contact record. For example, we have clients who map the appointment date to custom fields to trigger campaign events a few hours before or after the appointment.
  • Scheduler Link can use Acuity forms to collect additional information and map it to corresponding fields in Keap.
  • You can apply tags based on appointment types. The tags can be used to trigger campaigns and automations in Keap.

At this point Scheduler Link only handles one-way appointments; what’s scheduled in Acuity will also get set up in Keap.

Price points for Scheduler Link correspond to Acuity’s pricing structure:

  • One calendar for $10/month
  • Two to six calendars for $15/month
  • More than six calendars for $20/month

Acuity Scheduling is loaded with features. From my own experience, I know the Acuity team is very customer-focused. They’ve been a great partner to work with as we developed our Scheduler Link connector.

The bottom line is that if you’re going to use a scheduling tool – Acuity is a good one.

And if you’re going to use Acuity, then a connector between Infusionsoft and Acuity will multiply your efficiency (and help keep you sane).

This type of organization is critical for not only your business but also the experience you’re creating for your customers.

Scheduler Link was designed specifically to bridge the two systems. Once you’ve created an account with Acuity Scheduling, then check out Scheduler Link; or reach out to our team with any questions.

Update: Since SchedulerLink is no longer a suppported solution, the option we recommend now is from PlusThis.

We appreciate the opportunity to contribute to Monkeypod Blog!

Lidiane Mocko, with Small Business CRM Coach, is an ICC, an Infusionsoft Development Partner, and a proud Monkeypod OG Member. She lives in Denver, CO with her husband where they enjoy skiing in the winter and hiking during the summer.
Launching a Webinar with Demio (and Infusionsoft)

Launching a Webinar with Demio (and Infusionsoft)

Even with as rapidly as marketing technology seems to evolve, webinars have held onto their relevance.

Good on ya, webinars.

From time to time I get asked about my preferred software for running webinars, and over the last few years my answer has varied – but lately, I’ve been using (and recommending) Demio.

There are a lot of options out there, but I use Demio because it’s an intuitive platform that allows you to quickly and easily (like, really easily) host live webinars – and just a few months ago they introduced an option for automated webinars as well (more on that here).

This blog post is a step-by-step guide to launching a live webinar with Demio – and integrating it with Infusionsoft for automated follow-up.

Live Webinar Set Up

Step 1: Log into Demio – from the events page you can see any live (or automated) webinars you currently have scheduled.

Step 2: Click the “Add New Event Option” and select the type of event you want to create (for this example, we’re creating a live webinar)

Step 3: Give the webinar a name – this needs to be at least 5 characters and will be visible to customers.

Step 4: Select whether this is a recurring webinar, a webinar series, or a one-time event.

Recurring: A recurring webinar happens regularly at the same schedule, and you can allow registrants to register for a single event, or for the entire series. For this option you can also choose how many of the upcoming sessions you want to be available at a time.

Webinar Series: For a webinar series you’ll choose the specific calendar dates you plan to deliver the webinar, and again, registrants can either register for the entire series, or for a individual session. For this option you can also choose how many of the upcoming sessions you want to be available at a time.

One Time: For a one time event you’ll choose the date and time you want to host the webinar. (For this blog post we’ll set up a one-time event.)

Once you click “Continue” you’ve defined all the mandatory settings – you can click “Save and Finish” and your webinar is technically ready to go.

At this point Demio gives you a registration link to a bare bones registration page – and you’re ready to start signing folks up.

There are more settings I want to cover, but to Demio’s credit, their default registration pages are actually pretty clean and simple. That’s one of the things that I liked about Demio early on – most of their features are pretty usable straight out of the box.

Like what you see? If you’re planning to use Demio for your own biz then by all means, use my affiliate link and score me a free month.

Additional Options

Okay, like I said, if what you need is a quick and dirty webinar then you’re pretty much done, but let’s take a look at the additional options Demio offers for further customizing your webinar.

Registration: The registration section allows you to either customize the default registration page (when you go live with your webinar you also will have options for embedding a registration widget on your own page).

As I said earlier, the registration pages by default are pretty clean and elegant – but there are a handful of settings you can use to add a description or a video, change the background image, showcase presenter details, and generally customize this page.

Or, if you don’t like the demio pages (or want to host the registration on your own URL) then you can use the Demio embed options.

I’ve used this a handful of times and found it to be really straightforward – basically you select whether you want an inline embed (which is the form directly on the page) or, a popover embed (which is a button that pops up a little registration window) – then copy the code and add it to the page of your choosing (works with Infusionsoft Landing Pages, LeadPages, WordPress, etc).

Update: The option for embedding the registration form on your own page has been moved, it’s now available on the “Share” tab where you’d find the stand-alone registration link.

Email Notifications: Demio has four built in email notifications that you can individually toggle on or off. There is an option to edit portions of each email, but some of the registration details are fixed. As of right now there aren’t options for modifying the schedule of these emails.

Room: This section allows you to define whether you want chat to be public (attendees can see one another’s comments) or private (they, uh, can’t).

The second setting is where you define the URL you’d like people to be directed to once they complete the webinar – this is ideal if you’ve created a dedicated page for this event with a relevant call-to-action, summary of the content presented, or next action steps.

Currently Demio supports Firefox, Chrome, and Internet Explorer – the final setting in this section (currently in beta) allows for attendees to join in Safari and Microsoft Edge browsers (with a 15-second streaming delay). More on this feature here.

On the left hand side you’ll see tabs for “Resources” and “Presentation Materials”, this is where you can upload resources you intend to give away during your presentation (worksheets, downloads, etc) and slide decks or videos you will use during your webinar.

Presenters and Moderators: This is where you can add additional presenters and moderators to your webinar. If you’re adding admins to a webinar with more than one session you’ll be able to designate which session you want to invite them to. Finally, I don’t foresee this being an issue, but there is a limit of 15 total admins on your webinar.

From your settings tab you should see an Integrations section – this is where you have the option to connect Demio with a number of third party services. I use Zapier and Infusionsoft, but Aweber, Ontraport, MailChimp, GetResponse, ActiveCampaign, ConvertKit, Drip and Market Hero are all available as well.

Integrations: On the integrations tab you should see any third-party options you’ve enabled, and then you’ll be able to toggle them on or off. For the Infusionsoft integration it allows you to select what Tag you’d like it to apply when someone registers, and then tags it should apply or remove when someone attends, or does not attend the webinar.

You may have also noticed the Save Join link feature – this allows you to add the registrants unique Join Link to one of your Infusionsoft Custom Fields. So, if you don’t like the Demio email reminders this would allow you to send your own using Infusionsoft’s campaign builder.

Oh snap, almost forgot: Demio also offers a one-click registration link that you can use to invite your existing subscribers to the webinar – this allows them to easily register without having to reenter their information.

Once they click they’ll automatically be taken to the default thank you page, or the custom URL you defined instead.

Custom Code – if you need to add tracking code, or a pixel of any sort, the integrations section also has an option for custom code. You can add multiple code snippets and select the page for each (registration, thank you page, webinar room, or replay page).

So, that’s demio in a nutshell.

It’s clean, it’s simple, and it does pretty much everything I’d want from a webinar platform.

If you’re looking for a webinar tool then for the time being this one has my vote – check it out, and use my referral link so I get that sweet, sweet commish.

What about Automated Webinars?

Demio recently launched automated webinars – they’re pretty slick, but it is a relatively new feature, so it doesn’t have all the same options and settings as the live webinars.

If you’re interested in launching an evergreen webinar then you’re gonna want this 10-step launch list.

The easiest way to learn about automated webinars is probably by experiencing one, and what do ya know I’ve gone ahead and created an automated webinar about automated webinars where I walk you through the whole dang process. Check it out:


Update: In December 2020 Demio released an update that allows you you to easily swap the video you’re using for your automated webinar. That means your content can be updated without having to rebuild the entire automated webinar experience.

Customer Journey Mapping

Customer Journey Mapping

The moment that is perhaps the lowest common denominator for every business is the purchase.

It’s practically the one thing that every business has in common, regardless of size, model, or industry.

The thing that I think differentiates the memorable brands from the ones we forget is everything that comes before and after the purchase.

At the end of the day the purchase, a defining milestone to be sure, is still just a singular moment in the customer’s journey.

The trick is to train yourself to see that exchange in the context of Lifecycle Marketing.

Lifecycle marketing, if you aren’t familiar, is a framework that helps you visualize and plan the customer’s journey. At a super high level, it can be broken down three high level stages.

Keap calls them Attract, Sell, and Wow.

I have them labeled below as Opt-In. Purchase. Wow.

In a perfect world a contact would go straight from signing up to purchasing.

But the truth is it’s rarely that simple, right?

So I like to dig in a little deeper, and break down the journey into more granular stages.

Now, we know where the purchase is – my recommended best practice is to start from there and work out in either direction.

(Check out a video demo of this conversation)

For example, we know that AFTER they buy, they’re going to get the thing they asked for – or, they should. If you buy a course from Monkeypod, within moments you’re going to get an email with instructions for how to access that thing.

I’m not saying that fulfillment needs to happen in the blink of an eye, but it should be a process that you’ve planned, analyzed, and refined.

Now, it’d be great if customers just appeared with their credit card in hand and they were ready to buy, but often times they start by opting in for something free – a lead magnet of some sort.

And once they sign up, obviously we need to give them the thing they asked for – deliver the ebook, or schedule their consultation, etc.

And here’s a step that plenty of people skip – what happens if you deliver that thing and they’re still not ready to sign up?

Too many businesses give up on those folks, or let them accidentally slip between the cracks.

Designing a nurture process is, in my opinion, the single most important thing that businesses can to improve conversion without spending an additional penny.

(Grab my nurture Ebook here)

Now, the next stage we’re going to dig into is part of the post purchase journey – ask yourself “what happens AFTER someone becomes a client?”

I feel like fulfilling on their purchase is the bare minimum – what can you add to this post purchase section that sets your business apart? How can you create an experience that actually wows the customer?

They say that it’s somewhere between six and a billion times easier to sell to someone who has already bought from you, but for some reason marketers seem to have a disproportionate focus on generating new leads – when they could focusing on finding ways to further serve the customers whose trust they’ve already earned.

Yes, this could be a series of upsells, or crosssells – or some strategic product ascension path; but it doesn’t have to be.

It could also be an automated process that recruits satisfied customers to join your partner program, where can become advocates for your brand.

The point here is to have something planned for them.

You don’t want to swipe someone’s credit card and then just let them drift off into cyberspace silence.

Now, the final stage I focus on is actually the first chronologically – traffic.

Yes, traffic is important – there’s no doubt about that.

But the reason I save it for last is because you won’t be maximizing your advertising budget until you have ironed out and optimized the rest of the journey.

Think of it this way – if the goal is to fill your leaky bucket, it doesn’t make sense to turn up the faucet until you’ve plugged the holes.

Here, check it out – I’ll model this conversation using an automated webinar of mine:

If you’re like me then it might feel a little weird to be scripting out all of these things for your customer – like, there are a lot of assumptions in there, right?

When I feel that way I try and remind myself that this isn’t about forcing our prospects to do anything, after all – they’re in the drivers seat.

It’s more about anticipating what they might do, and helping create a path that makes their experience as seamless as possible.

Your customers are going to have a journey either way – so we may as well plan for it.

Lifecycle Marketing is a framework that helps you think through every stage of the customer’s journey.

It gives you the opportunity to plan for what you want each customer to experience at each milestone, and what the transitions from one stage to the next will look like.

Great, so now what?

All this is great, but theory will only take you so far – that’s fair.

So after you’ve mapped out what you want to have happen in each of the stages – then you need to figure the path to turn that plan into reality.

This Action Planning Framework will help with that.

For example – if your Opt-In is a live webinar, that’s fine – but to launch a webinar you need:

A Registration Page (with copy and graphics), Webinar Software/Platform, Content for the Webinar

If you’re going to send traffic to that webinar then you need:

Graphic/Video Assets for Ads, Advertise Platform (Facebook, Twitter, YouTube)

And if the webinar is going to encourage people to Purchase something, then you need:

Sales Page, Merchant Gateway

The conversation on and on – and what you end up with is a recipe for the experience you’ve designed.

Finally. That’s it, right?

Not quite.

In the video above I’ve mapped out the experience surrounding an Automated Webinar I’ve launched, but the truth is that this is just one of a number of journeys I’ve created for my customers.

There are customer journeys all throughout our businesses, and they range from the very simple to the most sophisticated – the trick is to get clear on what that customer journey looks like today, and then use the Lifecycle Marketing framework to identify areas that have been overlooked, or where it could be improved.

Customer Journey Mapping Resources

Here’s a great case study showcasing how we used Keap at every step of the customer journey for the African Leadership University.

If you’d like to see how Keap’s campaign builder can support a Lifecycle Marketing strategy, then check out the LCM: Real Life course – it walks through the high level concepts of Lifecycle Marketing and then shows you how to support them using the automation in the campaign builder (for Keap Pro, Keap Max, or Max Classic – which was formerly Infusionsoft).

And if you want unpack more of the principles of Customer Journey Mapping, here’s a great blog post from my friends over at the Automation Ninjas agency.

Free Lifecycle Marketing Course

If you are interested in learning more about Lifecycle Marketing, and how to use it to create calm, organized, and predictable growth for your business - then spend some time with the free Lifecycle Marketing video series from FUEL.

3 Marketing Lessons Water Polo Taught Me

3 Marketing Lessons Water Polo Taught Me

You may not know this about me, but in high school I started playing water polo – and for the next fifteen years it was a primary part of my identity.

I played in high school, then at Michigan State, and more casually for nearly another decade.

Somewhere along the way I started coaching co-ed middle school water polo, then women’s high school, and eventually the MSU men’s team.

Water polo players in the water

It shaped not only my network and my daily schedule – but it also my personal values.

Water polo was a game that made sense to me, and to this day it still helps me make sense of the world.

3 Marketing Lessons Water Polo Taught Me

1. Adjust your Message to fit your Audience

Having coached boys and girls, ranging from middle school to college age, I can tell you with complete confidence that your ability to create results is directly tied to your ability to communicate a message.

And here’s the thing that most people miss – it’s not just about how you deliver that message, it’s also about how that message is received.

I quickly learned that the things I did to motivate middle schoolers didn’t work to motivate high school age kids.

People playing water polo

The marketers among us know this as segmentation 101 – know your audience, and frame your message accordingly.

How you say something can be just as important as what you say.

2. The Whole is Greater than the Sum of its Parts

One of my philosophies for coaching was to break the season into chunks – and use each chunk to focus on an aspect of the game.

People standing next to a pool

Every game features defense and offense, obviously, but it also features the transition FROM defense to offense, and the transition from offense to defense; and that’s just when both teams are at full strength.

There are also power plays, where a player from one team has been excluded for a major foul, and since that can happen to either team there is power play defense and power play offense.

So when approaching a season – we’d always start with conditioning, because in order to execute any of the strategies we draw up, the athletes need to be in shape.

Then, we’d focus on defense, offense, transition defense, transition offense, and finally power plays (defense and offense).

There are certainly more niche parts of the game, and mid-season adjustments to be made, but at a high level – it’s just those 6 segments.

I think of it this way – it’s like throughout the season we are collecting puzzle pieces.

Every week or two we collect another piece of the puzzle.

And then at the end of the season we’d have all six pieces, and then it’s just a matter of putting them together.

Building a marketing strategy works this way too.

Except the pieces of the puzzle are the stages of lifecycle marketing: Traffic, Lead Capture, Nurture, Conversion, Fulfillment, etc

Life cycle of marketing infographic

You can focus on each of those pieces independently, but the results are multiplied once you start to put the pieces together and it forms your cohesive customer journey.

Watch the Video
Video more your speed? No sweat – I wound up recording a conversation about this particular lesson as a Facebook Live video as well..

3. Create a System

During my last two seasons as the women’s head coach at Okemos High School we won back-to-back state championships and had a record of 69 wins and 1 loss.

There is no question that I coached some very talented and capable athletes.

I was fortunate to have great support from my assistant coaches, and from the parents of the athletes, and from the athletic department at our school.

But more than any of those things I attribute our success to the system we built.

Yes, I’m referring to the system that we applied each season to collect, refine, and ultimately assemble those six parts of the game; but I’m also talking about the systems that supported that.

Remember, before coaching high school I spent four years leading the area’s middle school program – so when I started coaching high school a number of the kids had played for me previously.

This meant I not only knew them, but they knew what I expected from them.

They knew when I was joking, or when I was serious, how we structured practice, and how we got ready for games.

But as importantly, I knew what they were coming into high school having already done – I knew the drills they had been running, and the fundamentals they had been taught.

We didn’t start winning overnight, in fact we didn’t even make the state tournament in my first season coaching high school.

But as kids graduated and new players joined the team – our system began to work, our focus crystallized, and we started to win.

The next year we finished 4th in the state.

And then in season three, we swept the table going a perfect 35-0 with five All-State players, two All-Americans, and the state MVP.

Don’t get me wrong, I’m very proud of all that – but what happens next is why I’m telling this story.

The victor holding a trophy

After that state championship we graduated 4 of our 7 starting players, as it happened – they were our our 4 leading scorers (combining for 80% of our offense).

But the next season we won again, this time with a record of 34-1.

Like I said, I think these results can be attributed to lots of things – great athletes, terrific assistant coaches, and supportive parents, etc; but the marketer in me looks back on what we did and what I see was a well-oiled machine.

I see a productive middle school program that created kids who loved the sport, and knew the rules, and were ready to compete.

I see an organized high school program with athletes who knew what was expected of them, and showed up every day ready to work.

Without a system losing our top four scorers could have crippled us.

The same is true for your business, for my business, or for any business.

Whether it’s your top performing sales reps, or your highest converting ads, they’re only as good as their last performance; and if they disappear, their results do too – but the system that created these is your safety net.

Systems are by nature predictable, and predictability is what allows businesses to scale, or in our case – teams to thrive.

Design a system that consistently creates the customers you serve best.

You can win individual games on the backs of talented athletes, but long term success comes when you take the time to create the environment that fosters success.

The truth is that I struggled a little writing this post – and I nearly decided not to publish it, because it felt a little too much like me just reliving some glory days.

I chose to share it because the lessons are real; and have only become clearer over time.

I guess what I’m saying is that these lessons happened long before I recognized their marketing relevance, and that periodically revisiting experiences (and accomplishments) of ours can not only be cathartic, but for me it’s revealing angles I hadn’t previously noticed.

If you found this valuable, or you’ve had hidden lessens emerge while you wax nostalgic on something – let me know in the comments below.

A Tale of Two Fiverr Videos

A Tale of Two Fiverr Videos

So, if you’re like me, you’ve probably heard all about Fiverr, and maybe you’ve used it for a few things with modest results.

Back in April, I spent $100 creating an animation I wasn’t all that thrilled with.

So in October, I did it again again, but with a $500 budget, and got a video that I liked.

I know I can get a little verbose at times, so if you want the backstory behind this project, click on the explanation tab, otherwise, jump straight to the final videos.

Longer Explanation

I’ve probably used Fiverr a total of 10 times, and mostly for $10-20 projects (quick graphics, product badges, etc).

So to be clear, I’m definitely no expert, but I wanna share my experience in case it resonates with you, or makes things easier for you the next time you’re hiring out a freelancer.

But about a year ago I got this idea for an animated video that describes Monkeypod using a park ranger analogy, and after a few months of procrastinating, I finally decided to do something about it.

I wrote out a script, storyboarded my vision, and recorded the audio.

Feeling pretty good about myself I hopped in Fiverr and started looking at animation options (there are lots of them), and I quickly realized that you can spend as much as you’d like on custom animation projects.

I wasn’t sure where to start, so I picked a number that I’d be comfortable with in case things didn’t turn out as I hoped.

That number was $100.

I found an animator who fit my budget (it was more like $125), and described the project, my vision, and gave her the audio file I’d already prepared with text prompts for what I envisioned in each “scene”.

That’s when things went south.

Days turned into weeks while I waited, and when I finally did see the first “version” my heart sank.

It was nothing like my vision.

I worked with the animator for well over a month giving detailed notes of the changes I wanted, but after a handful of iterations and minimal progress; I decided it was better to just pull the plug rather than waste any more of her or my time.

The Park Ranger project went back on the shelf.

(I am certain that some of this first disappointing experience was due to my own misaligned expectations – I had no idea what was or wasn’t possible for a $100 video.)

Then, September rolled around and I decided to revisit this idea.

People use Fiverr successfully all the time, so I knew it wasn’t fair to color the entire platform with my one sour experience.

I still felt good about the concept, and I wanted to see what was possible with a little more budget.

So I headed back to Fiverr, this time giving myself a budget of $300.

I found a designer I liked, but the length of my project was longer than the listed “gig” on his profile.

I submitted my concept and asked for a custom quote. (This time I used the $100 video to help illustrate the ‘concept’ I was after.)

His bid was $900.

I told him flat out that I wasn’t ready to spend that kind of money on a 90-second video.

After some negotiating (and me quietly realizing that I clearly had no idea what it takes to make a quality animation) we ended up agreeing to move forward with the project quoted at $550.

I was initially a little nervous, $550 isn’t a ton of money, but it was more than I’d ever spent on a project like this, and so it gave me a little bit of apprehension as I clicked “Purchase”.

But after the project kicked off, my decision was validated every step of the way.

Sanjay was easy to work with, and his first draft exceeded my expectations and after two rounds of revisions, the video was ready to share.

$100 Video

$500 Video

So, I think it’s safe to say that the video I spent more on is better – but what impressed me most wasn’t just how the quality was better; it was how the experience of working with the animator (shout out to Sanjay) was better.

On the $100 project, I felt like I was leading the project, nudging the animator to work on it, prioritizing and packaging up my feedback as delicately as possible, and then crossing my fingers that the next version would be better.

But on the $500 project, I felt like I was collaborating with an animator who actively wanted my vision.

I still provided notes, but Sanjay offered professional guidance as to how he thought my ideas would work best. He iterated quickly and communicated regularly.

(Worth mentioning that Sanjay did have a little headstart because I was able to share the $100 video with him as a concept.)

I wanted to document my experience in creating these two videos because this is a process that was foreign to me; and kinda intimidating – and I imagine that if I felt that way, others might too.

It would have been easy to give up after the first experience, and for a few months I did, but I’m really pleased I circled back to try it again – not just because of the final product, but because it restored my confidence in using Fiverr; and helped me get comfortable in investing to get the results that I’m after.

Btw, I’ve gotta give Wistia a big fat shout out – the idea to share the $100 version of this video didn’t really hit home until I watched their One, Ten, One Hundred docuseries (which is awesome, and definitely worth watching).

Integrating Divi with Infusionsoft

Integrating Divi with Infusionsoft

This post is about integrating Divi and Keap.

Divi is a theme for WordPress websites.

Keap (formerly known as Infusionsoft) is a CRM and marketing automation platform (obvi).

The ability to easily capture leads on your website and reliably add them to your database is paramount; and for Divi users I recently discovered that there is a way to do this without needing any third party tools.

(Update: Apparently I’m a liiiiiittle late to the game and this feature has been available since Sept 2017. Oops.)

First, you select the “Email Optin” Module:

You’ll set up the settings for that module, like the opt-in description, the call-to-action button, and design the look and feel.

If this is your first time using this feature you’ll want to connect it to your Keap Account(s).

Then you choose Keap (or Infusionsoft) from the list of 20 different email service providers, and select which tag you’d like it to apply to contacts who submit this form (the tag is important because it’s how you’ll segment these contacts, or trigger automation).

That’s pretty much it.

Once you’ve got it connected to your Keap account you can drop these opt-in forms all over your web site.

Check it out:

It’s worth noting that this opt-in doesn’t have much flexibility in terms of what information you collect. Your options are First Name, Last Name, and Email address.

But for simple lead capture this will work just fine.

Edit: So, apparently you can add custom fields to your opt-in forms this way. For some reason this feature appears to only be available using the visual editor; so I didn’t notice it at first.

Big thanks to Ben for bringing this to my attention in the comments below!

Direct connections like this are important because it reduces your/my/our dependency on integrations.

Integrations are inevitable, but the more you have the complicated it can be to keep them all current; and the more risk you have that things will break when one of them updates and suddenly doesn’t play so nicely with the others.

Not only does it make it easier to maintain, but it also simplifies troubleshooting as well.

I know there are an infinite number of themes out there to choose from, but if you (or your clients) use Divi, I wanted to make sure you knew about the methods for integrating Divi and Keap.