Can I configure multiple pipelines in Infusionsoft?

Can I configure multiple pipelines in Infusionsoft?

The opportunity module in Keap (formerly Infusionsoft) kind of flies under the radar for most businesses – if they know it’s there, they often don’t know what it’s for, or how to use it in their business. (And if that sounds like you, that’s okay!)

In a nutshell, the Opportunity Pipeline is a tool designed to help you and your team track prospects through a process. Normally this is a sales process, and most often, I see people use this tool when their sales process is largely over the phone, offline, or heavily manual.

As much as I love automation, some things just can’t (or shouldn’t) be automated. And if you’ve got a process in your business that is heavily manual, but you’re looking to improve tracking and instill accountability into that process; then the Opportunity Module might just be a good fit.

But once you start using (and inevitably loving) the Opportunity Module, one of the first questions you might find yourself asking is “Can I set up multiple pipelines?”

The answer is Yes, and it’s easier than most people think.

First, Some Context

Let’s start with some definitions:

Opportunity: In Keap, an opportunity is a record type. Just like you have contact records or order records, an opportunity record has its own ID, and it’s own fields, and it’s own data. You can think of an opportunity as a vehicle for tracking someone through a process. Not every contact will have an opportunity tied to it, but every opportunity will be connected to a contact. (Learn More)

Pipeline: The pipeline is the set of stages through which you’ll progress your opportunities. It’s a tracking tool to help you see where your contacts are in your process (sales process, or otherwise). You’ll define the stages for your business, and as you move opportunities from stage to stage, Keap will offer reports to help you identify bottlenecks or areas where you might be able to optimize.

Okay, so opportunities are the vehicle. They move from stage to stage. And are connected to a contact. And the stages they’re moving through, that’s your pipeline. Ya with me?

And Now The Problem

Cool. So once you start setting this up, and defining your stages, you might recognize that your business has more than one process you hope to track. And if that’s the case, then you might want more than one pipeline.

There are a handful of scenarios where you might be reaching for more than one pipeline, but here are two examples:

Example 1: If you have dramatically different sales processes for your different products. Like if you sell an elite mentoring package, and also a done-for-you implementation style service. Well, the process for selling those two things might involve guiding your prospects through very different journeys, right?

And…

Example 2: If you’re tracking processes in multiple stages of your customer journey, like maybe you’re tracking your sales process, but you also want to use the pipeline to track your fulfillment process (remember, opportunities are used to track a process, not just a sales process.

I’m sure there are plenty of examples, but the basic premise is that you may need more than one pipeline. And, by default, Infusionsoft only has one pipeline. You can’t clone, and create a separate pipeline with its own settings, or anything like that. Bummer, right?

And Finally the Solution

So, technically the Max Classic version of Keap only allows you to set up one pipeline. All of your stages WILL be part of the same pipeline. But don’t let that phase you, we just have to shift our thinking a little bit.

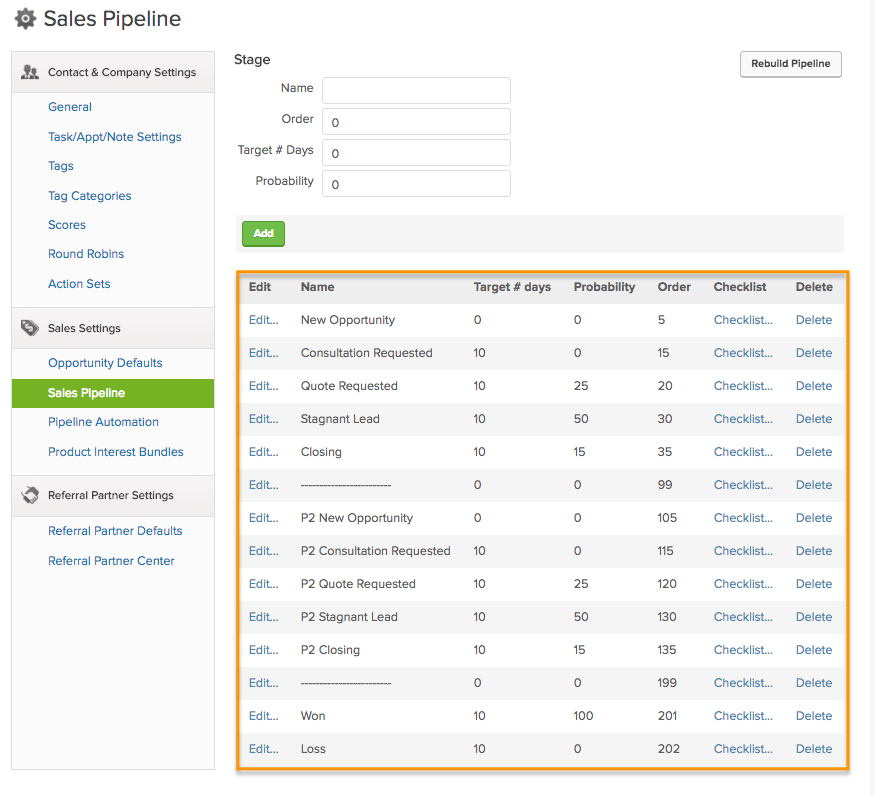
If you’ve defined your sales pipeline already, or even if you’re just looking at the defaults, you are probably looking at something like this:

Infusionsoft pipeline screenshot

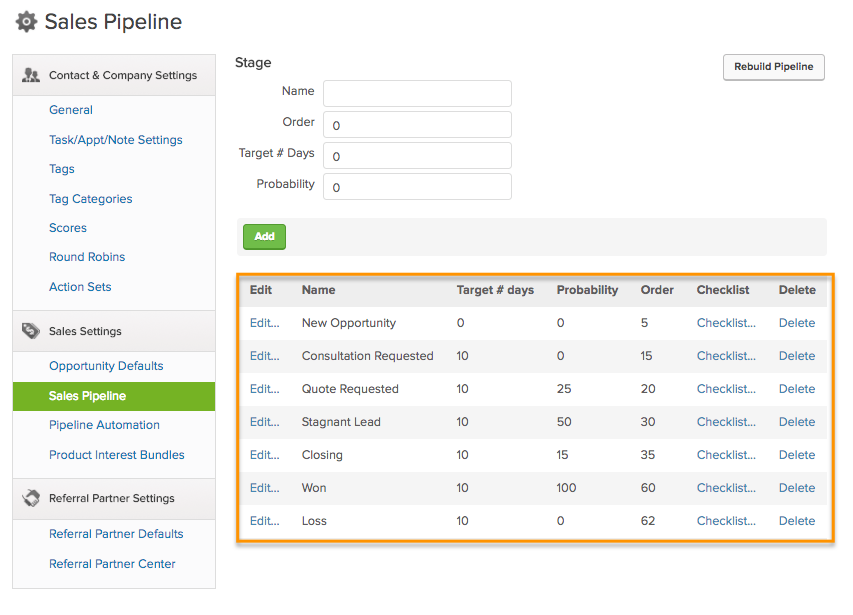
Each stage of your pipeline has an “order”. The order controls where it fits in your pipeline. If your pipeline stages are ordered between 1 and 100 (mine are between 5 and 62 above), then when you need to build your second pipeline, you’ll want to set the order for those stages between 100 and 200, or something like that.

Once you’ve added the stages for your second pipeline, then your pipeline should look something like this. You’ll also notice that I basically duplicated the first set of stages, but simply added 100 to the original “order”.

Sales pipeline module

Now, let’s look a little more closely at this. I want you to notice a few different things. First, you’ll see that I’ve added two stages (highlighted in green) as dividers. These stages don’t serve any functional purpose, they’re just there to help me visually separate my two distinct pipelines.

The second thing I want you to notice is the stages of the second pipeline (highlighted in orange) all have the prefix P2. This is my designation that they’re part of Pipeline 2, but you easily use your own internal acronym (for whatever that product or service might be, etc).

Pipeline Close Up

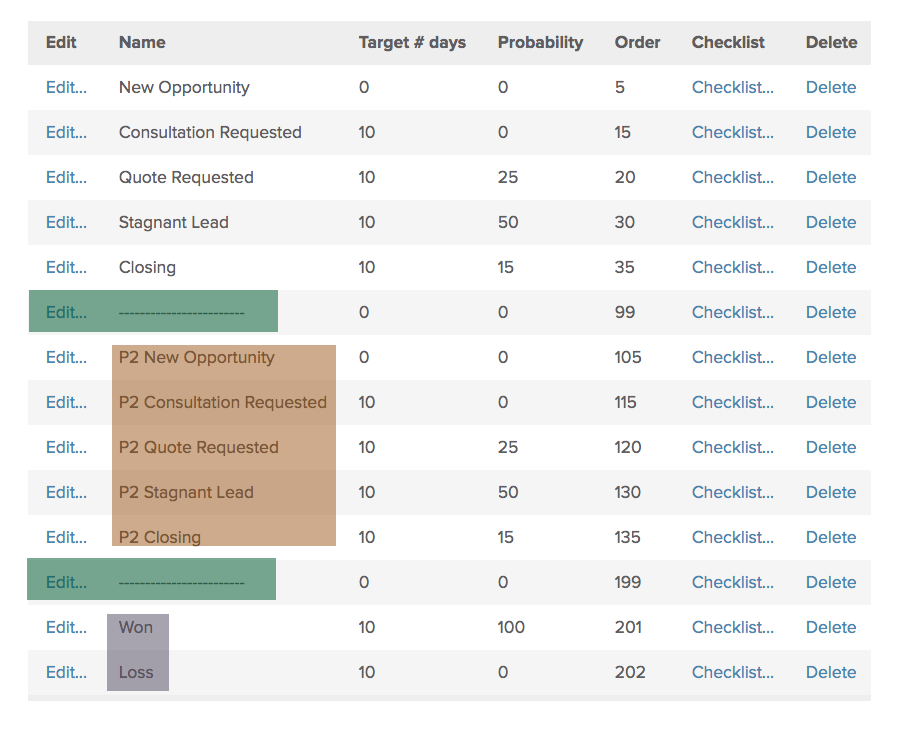
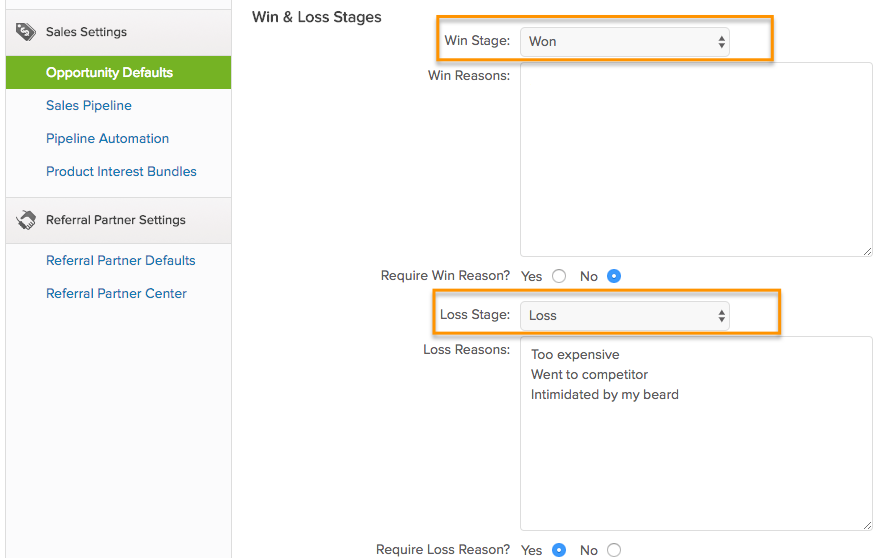
And the final thing to point out (highlighted in purple above), is that there is only one set of Won/Loss stages. Keap, by default, only allows you to define one stage for your “Won” and one stage for your “Loss”. But generally, these are the end of your pipeline anyway, so that may work just fine. If you are requiring won or loss reasons, just make sure that you have the right options for both (or all?) of your pipelines.

Won Loss Stages Module screenshot

Other Considerations

So, you can set up as many pipelines as you like. Right? You can stack them over and over, and each will operate independently.

However, this isn’t naturally how the pipeline was designed, so you may experience some challenges if you’re using it this way. I want to give you some tricks for making sure you are able to successfully navigate those hurdles.

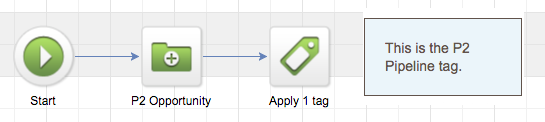
Tip 1: Apply unique tags when someone is active in one of your pipelines. So, when an opportunity record is created in stage P2 New Opportunity, apply a P2 Pipeline tag. This tag will allow you to easily filter the Opportunity Reports so you can use them to look only at results and metrics for that particular pipeline.

P2 Pipeline Tag

(Note: Watch out for situations where someone could be in more than one pipeline at the same time! You may need to get creative with your report criteria to make sure you’re including and excluding the right folks.)

One more tip…

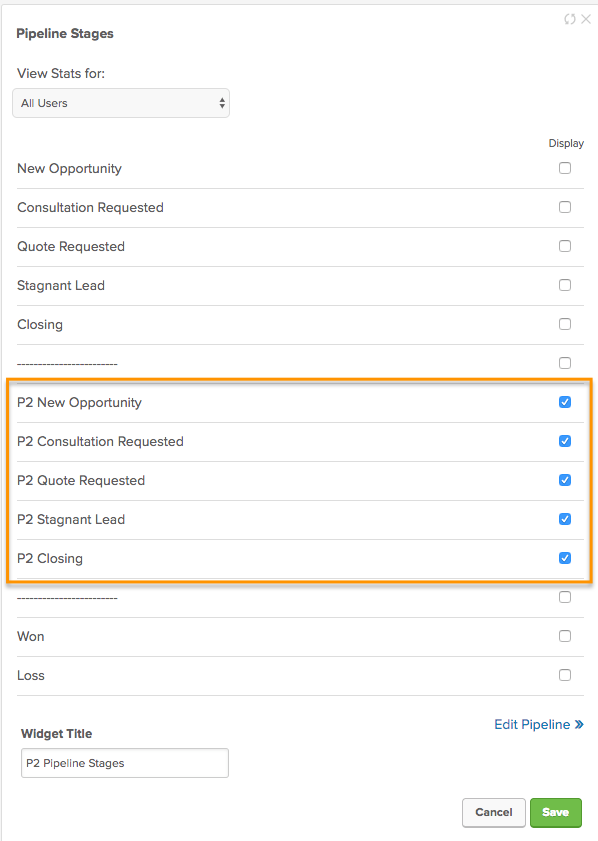
Tip 2: There is a Pipeline stages widget you can add to your dashboard. Once you add it, you can configure the different stages it will display – and here’s the trick, you can add this widget more than once. So feel free to add one widget for each of your unique pipelines.

Dashboard Widget

And finally…

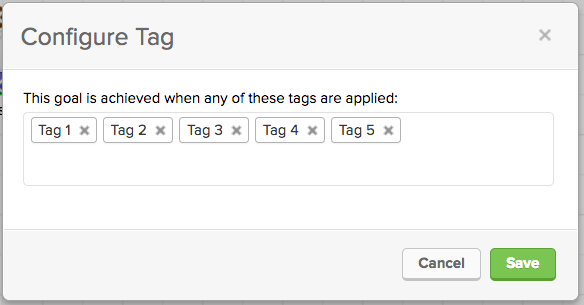
Tip 3: Because we only have one Won and Loss stage, if you plan to trigger automation with either of those stages, you’ll want to make sure you have things set up so that the right automation is triggered based on which pipeline the prospect came through before they reached the Won stage. Here’s how I’d handle this:


I hope you found these suggestions valuable, and feel comfortable building yourself one, two, or as many pipelines as your business needs.

If I overlooked something, or you’ve tackled this problem in other ways, please leave a comment and share your thoughts!

Facebook AD ROI in Infusionsoft

Facebook AD ROI in Infusionsoft

This post is about tracking Facebook Ad ROI in Keap – but let me tell you how we got here…

When I started Monkeypod I was optimistic. But I realize now that I was also fairly naive.

I think plenty of entrepreneurs feel this way. I started this venture after having worked at Keap HQ for 3+ years, helping and learning from businesses of all shapes and sizes. Before that, I had run a business for 5 years in my early twenties. I really felt like I was prepared to do it again, and better this time.

And while I’m pretty solid with marketing automation tools, I quickly learned just how much else I needed to know. And it was humbling. Right out of the gate I needed to learn WordPress, video editing, how to do my books, and the list goes on and on.

Among the new skill sets I was to acquire was how to use Facebook Ads. And I don’t mean, strategically how to use them, I just mean functionally “How do I get a paid ad in front of people”.

And I was proud when I figured it out.

I was even prouder when I figured out that I could use Keap (formerly Infusionsoft) to track my ROI from Facebook if I added my $100/monthly ad spend as an expense to the LeadSource in Keap (more on that here).

But here’s the problem – the LeadSource ROI report told me I was getting 1500% return on my investment.

Normally that’d be great, and I’d be pourin’ tequila shots for us all, but this wasn’t right.

I’m good – but not that good.

I knew that with my limited experience, and ability, this just couldn’t be right. And it wasn’t.

You see, I spend a lot of time on Facebook hanging out in various Facebook groups (heck, odds are that may be where we first connected!), and I regularly answer questions, or link people back to resources on my website.

And this ROI was giving my a total return on ALL my Facebook efforts, not just my paid ads.

For a while, I didn’t do anything about it. It was sort of technical, and intimidating, so I just didn’t prioritize it.

Dog FB Ad

But overtime, as I ran more Facebook ads, I developed an appetite to know how those ads were doing. I wanted to be able to definitively point to an ad and say “Here are the results it created for my business”.

Odds are you might want that too (we’re almost there).

Facebook Ad ROI in Keap:

  1. I started creating LeadSources in Keap for each specific Ad that I’d run.
  2. And then I’d append the LeadSource ID to the URL that I was sending traffic to (step-by-step tutorial), so that if those folks signed up, it’d attach them to the LeadSource I had created.
  3. I’d add my ad spend to the LeadSource as an expense.
  4. And then I’d watch the ROI to see how that ad was doing (and dial up or down the amount I was spending).

And it’s working.

I’m not convinced I’m doing everything right, in fact I’m sure I’m not, but at least I’ve got individual results on an ad-by-ad basis, and that’s progress.

And at the end of the day, progress is a win – I have more info now than I used to, which will give me a solid baseline to start improving on.

Current FB ROI

I put this off for too long, and my hope is that by publicly talking about it I can a) help you start if this sounds appealing to you, and b) hold myself accountable to keep doing this, and refining it as I learn more.

And as one final tip – if you’re running ads on Facebook you might want to set up custom audiences for various segments of your Keap database.

This lets you target hyper specific segments of your list, which means you can run an ad specifically for people who have started a free trial but haven’t bought the full course, or you can run an ad promoting your membership but make sure that you exclude your existing subscribers.

There are a few methods for syncing your Keap database with your Facebook custom audiences, and I outline my favorites in this post here.

Web Page Automation Goal (A to Z)

Web Page Automation Goal (A to Z)

The Keap Web Page Automation Goal was introduced in December of 2016 (back when Keap was called Infusionsoft).

This new goal for the Campaign Builder made an already powerful tool, even better.

Effectively this goal allows you to trigger something in your Keap campaigns when a contact visits a page on your website.

It’s a tactic larger brands have been using for a long time, and I was thrilled to see it make it’s way into the campaign builder that we know and love.

I’ve got a video today that’s going to show you how I use this goal to build a Cart Abandonment Follow-Up campaign, and then a few tweaks I recommend to solve for repeat visitors, or to limit the audience.

But before we dig into that, I wanted to mention a few other resources you may find valuable:

  • If you want the click-step instructions for how to use this goal, here’s the help article from Keap.
  • If you want a more detailed look at why this goal is important, and a handful of use cases where it might fit in your business, I recommend this post by my friend Brett over at Blick Digital.

I think the most obvious use case for this goal is to follow up with contacts who visit a sales page on your website, but don’t end up signing up.

This goal allows you to capture that buying moment, and help encourage those customers to sign up by offering additional value, answering questions, or addressing their concerns. The ability to interact with someone at such a pivotal juncture is really powerful.

After I walk through the basic campaign design and functionality, stick around as I put on the afterburners and adapt it for a few advanced scenarios:

The demo above was built using Keap Max Classic (which was called Infusionsoft at the time), but this same approach would work for Max, Pro, or any version of Keap with the campaign builder and this goal method.

Note: The Web Page Automation goal can only be achieved if Keap knows who the web page visitor is – and can find a corresponding contact record for that person.

So, for this to work, the visitor needs to have been cookied – meaning that Keap can track them. There are a few ways for a contact to be cookied, but here are the most common:

  • Clicks a link in an Keap email
  • Submits a Keap web form
  • Submits a legacy Keap landing page
  • Checks out through an Keap order form or the Keap shopping cart

More details here from the original release notes.

Tag Goal Hack

Tag Goal Hack

Tag goals are one of the most popular ways to trigger automation in Infusionsoft’s campaign builder, no doubt about that.

Tag goals are pretty simple to understand – you define which tag(s) they’re listening for, and then boom, any time any of those tags are applied, the goal is achieved and the actions you’ve built out are set in motion.

Sometimes you need a goal to listen for more than one tag, and that’s easy enough. For example, this goal would be achieved if any of the 5 listed tags are applied.

That’s all well and good if you want the resulting actions to run when any of those tags are applied, but what if you only want the goal to be achieved if ALL of those tags exist on the same contact?

That’s a scenario I’ve seen from time to time, and more frequently as of late.

Personally, I’d love it if Infusionsoft added a setting to this goal which would allow us to specify if we wanted it to listen for any or all of the tags we designate.

But for the meantime, here’s what you can do as an work-around.

Choose a Tagging System

Choose a Tagging System

One of the most powerful aspects of Keap (formerly Infusionsoft) is the ability to apply and remove tags. At their core, tags are a way to segment your database so you can send targeted messages to extremely specific portions of your list.

But as your business grows, keeping your tags organized becomes more and more important – here’s a course from Keap covering a system you can use called The Keap Way.

There are a number of tagging methodologies and best practices around the Keap ecosystem, so I created the following directory of some of the popular options (I’m sure I missed a few).

But before you explore those, let me just say that having any system matters more than which system you choose. So, pick one that makes sense to you and you can stick to:

An Insiders Guide to Mastering Tags and Tag Categories
Article from the Keap blog written by Paul Sokol – This article helps with the philosophy of thinking about tags, and makes some recommendations for the categories you might want to start out with.

Learn More

5 Rules for Naming Your Tags
Brett Farr, Blick Digital – This article gives you 5 rules you can follow that will help enforce good practices while you create and organize your tags. (Also, some really good conversation in the comments on this post.)

Learn More

How to Structure Tags & Tag Categories for Effective use in your Business
Mandy Brasser, Streamline For Success – This is a really good article which starts by defining the key terms you may want to know when starting this conversation, then Mandy outlines the tagging system she recommends, and why; and then it wraps up with other things to consider, and examples to illustrate why and how this works.

Learn More

Infusionsoft Tags: A template for creating your own system
Bandera Marketing – This article is designed to first answer “What are tags for” and “What tags do I need” and then it delves into the system Bandera uses, why they use it, and how you can craft your own structure that makes sense for your business.

Learn More

The Ultimate Campaign & Tag Categorization Protocol
Daniel Bussius – This is an extremely comprehensive article covering why you should, and how you can develop a naming convention to help keep your tags (and campaigns) as organized as possible. This article is rich with examples and diagrams to help make it as useful as possible.

Learn More

Sixth Division Tagging System
Sixth Division – As one of the biggest Keap partners, Sixth Division also has their own tagging system which they recommend for and implement with their clients. The above link is an opt-in (name and email) for their “Cheat Sheet” which covers what they call the Ultimate Guide to Tagging.

Learn More

Here a Tag, There a Tag, Everywhere a Tag-Tag
The API Guys  – This article talks about the two types of tags (as The API guys see it), best practices for creating and organizing tags, and then some tips for cleaning up and deleting your existing tags.

Learn More

ISMastery Tagging System
Troy Broussard, ISMastery and MyFusionHelper – here’s another solid system from a well known Keap partner. Thanks to Lenard for bringing this one to my attention in the comments below. This system follows the The Financial Chart of Accounts model, which apparently is a really well known organizational system for accounting. Full disclosure, this one also requires that you opt-in for the download.

Learn More

Keap and Infusionsoft Tag Best Practices
Kevin Mogavero – In this 30-minute video training Kevin covers the 3 primary uses of tags, the difference between tags and tag categories, the various naming convention options, and a handful of other resources he recommends for using tags in your business.

Learn More

I know there are plenty of quality resources out there that I may have missed (and more being created all the time), so if I didn’t include something that you think belongs on this list, let me know and I’ll add it!

Where do I learn more?

The Keap Academy platform features a course titled The Keap Way, covering a variety of best practices, including an organizational system for your tags.

Options on Order Forms

Options on Order Forms

If you use Keap to sell online, you likely do that with the built-in shopping cart, or with Keap order forms.

The shopping cart is great if you want your customers to be able to browse around, but if you want to create a more focused buying experience with fewer distractions, then an order form is probably a better fit.

(If you haven’t set up your Keap ecommerce yet, or just want to feel more confident, check out the sales courses from Keap Academy.)

Keap’s order forms are popular for a variety of reasons. Not only are they a little more targeted than a shopping cart, which means you can set more specific expectations for the traffic you send there, but there is also no limit to how many order forms you can create.

The theme, combination of products, and thank-you page configuration can all be tailored on a form-by-form basis. But despite all of the advantages to using an order form, there are still a handful of drawbacks.

(To help navigate some of these limitations I use Spiffy, wanna see a quick demo?)

One feature that causes a little frustration is that when you use a Keap order form, you are designating which products, subscriptions, or options go on that order form. That means that if you build an order form with three products, your customers checking out have to buy all three.

It means if you place a monthly subscription on an order form, your customers won’t be able to select the annual subscription option instead. In short, it means you’re limiting the flexibility you give your customers on checkout.

Sometimes limiting their options is a good thing, because it keeps them focused.

But sometimes it’s not so good, because if they don’t see the option they want then it’s possible they’ll change their mind and walk away from the purchase completely (see more on abandon cart options here).

So, now that we’ve demonstrated the issue, let’s talk about the solution.

Basically, you’re going to want to create an order form for each of the options you want to give them, and then use the custom html sections of the order forms to give the customer links to the other choices. Watch this video for a complete step-by-step walk through of the process:

If you need help creating the code to link back and forth between your order forms, here’s a tutorial you can use.

Or, you can copy this sample code and adjust it for your purposes.

If you found this useful, or have questions about this solution, feel free to pose them below.

If you need help getting your Keap e-commerce dialed in, check out the sales courses from Keap Academy.