You guys know the drill. Infusionsoft releases an update – I write a blog post geeking out on all the new features we have to play with. The February 2016 release is coming out this week, and this update brought the noise and the funk just in time for ICON. Let’s do this. Here are the 4 features I’m most excited about, AND the one feature that I really think they got wrong.
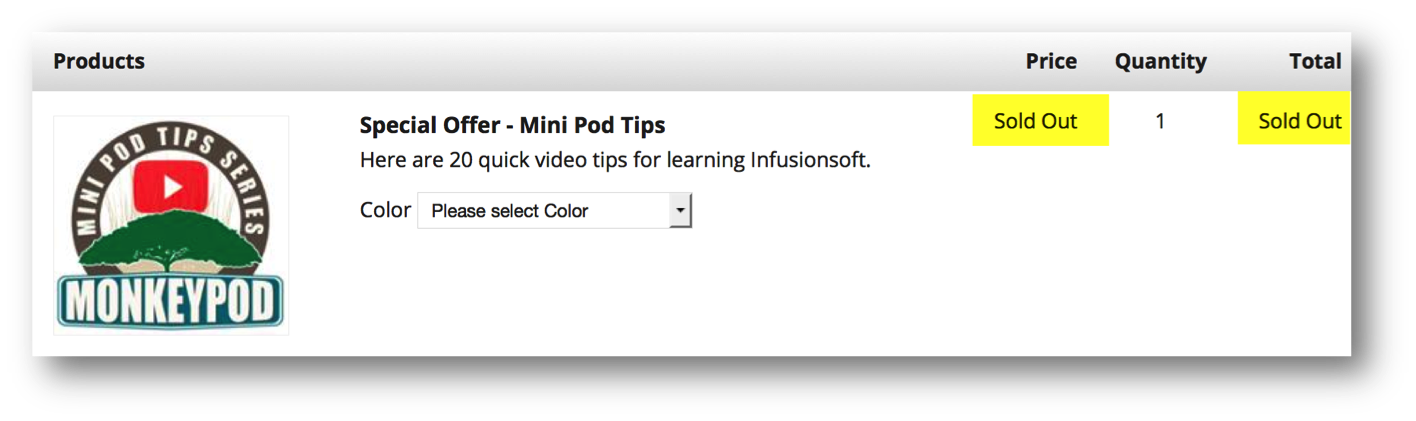
Update #1: Improved Inventory Management What it does: You can set an inventory for your physical products, and when that inventory is reached the product will be marked as “sold out” and Infusionsoft won’t process any additional orders. Why it matters: This is really straight forward e-commerce functionality – but until today, it hasn’t existed in Infusionsoft. Yes, Infusionsoft had an Inventory feature, but very few people actually knew about it or how it “worked”. This was probably the case because it didn’t really work. Basically you were able to set a notification limit and Infusionsoft would ping you when that limit was hit, then you’d have to manually go set the product to inactive to prevent it from being sold. This really didn’t do the trick if you were selling physical goods, or tickets to an event with limited seating.
Pro-tip: Turn this feature on under Ecommerce->Settings, then manage the inventory right from a new tab that appears on the contact record.
Update #2: Mobile Friendly Landing Pages What it does: New Landing Pages you created will be responsive when viewed on a mobile device. Why it matters: Yesssssss. Finally! I think most people know what this means, but yeah, any new landing pages you build using the Infusionsoft Landing Page builder will now be responsive when they’re viewed from a mobile device. That means that these landing pages have gone from borderline unusable (for a lot of people) to now being a reasonable tool to create a quick and dirty landing page. They’re much better looking right off the bat too.
Pro-tip: The features and sections of the landing page builder have been renamed, so spend a little time playing with the new sections to familiarize yourself with them.
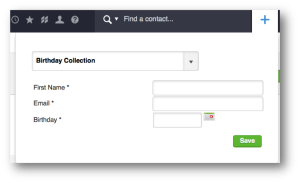
Update #3: Internal Forms available for Quick-Add What it does: You can now access internal forms from the Quick-Add feature in the top right. Why it matters: This matters because now you can quickly and easily add contacts AND trigger automation. Adding contacts has always been harder than it needed to be. That quick-add was a step in the right direction as far as making it easier to add contacts, but now it even goes one step further as it can be tied to automation which will save users lots of time.
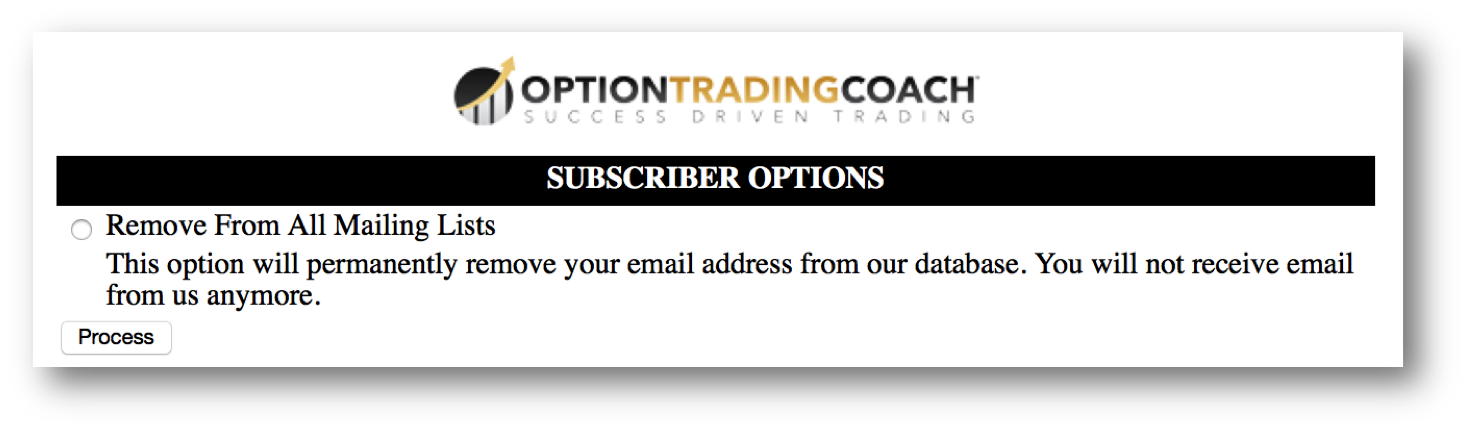
Update #4: New Opt-Out Confirmation Page What it does: They have updated the page that your prospects will see if they click opt-out. Why it matters: This matters because the page before was dated and not very aesthetically appealing. It was “off-brand” and wasn’t consistent with the customer experience anyone wanted to create. Oh, and after the click process – it prompted with “was this email spam?” – and lots of people felt that it was encouraging spam complaints (although to be fair, these would be internal ISP complaints).
Here’s the old opt-out page:
And here’s the new one:
Now that I’ve covered all the things I like, time for me to give Infusionsoft some tough love. If you read the fine print on the FAQs for the mobile landing pages, here’s the bit I’m upset about:They’re effectively removing the label for your radio snippets on a web form. This isn’t that big a deal if the question is “Are you right or left handed?” and the options are “Left, Right, or Ambidextrous”.
But it becomes a much bigger deal if you’re using radio options as survey questions (and I think many of us are). Let’s say you have a survey, and you ask multiple questions, and you ask people to answer on a scale of 1-5, or 1-10. Well, if you have labels, you can tell that they gave your customer service a 9, they gave your sales team a 8 and they gave their payment processing experience a 10.
Without labels, you’d just see that they gave you and 9, and 8 and a 10, but you’d have no context for what they were rating. Here are the three places that radio option labels are most important and why I feel they should revisit this:
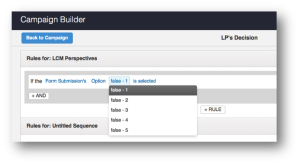
Labels are used when creating rules in decision diamonds. Labels were used to differentiate between the options on a landing page or web form. Without them, it just reads “false”, and as soon as you have multiple questions with the same set of answers (1-5 or 1-10, etc), then you’re unable to tell them apart.
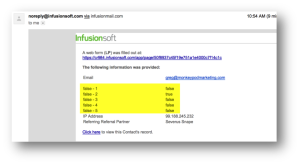
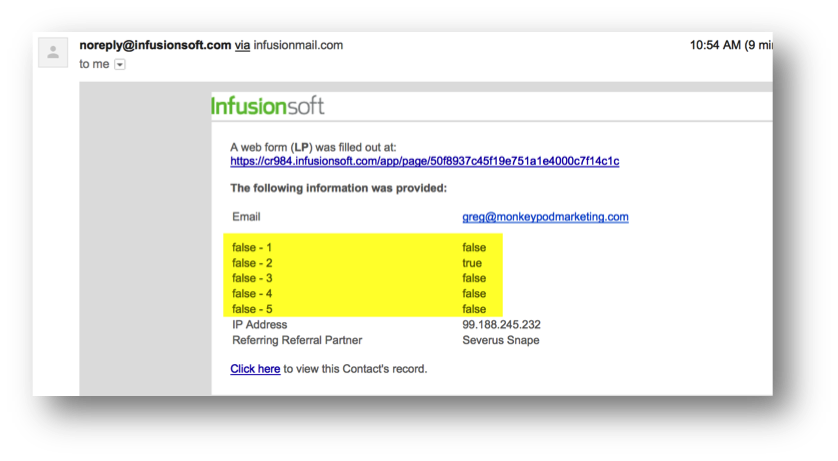
Labels are used in form notification emails – when a form is submitted you have the ability to have a notification sent to you that contains all the information they submitted. Well, without a label, the information that it sends just isn’t as useful.
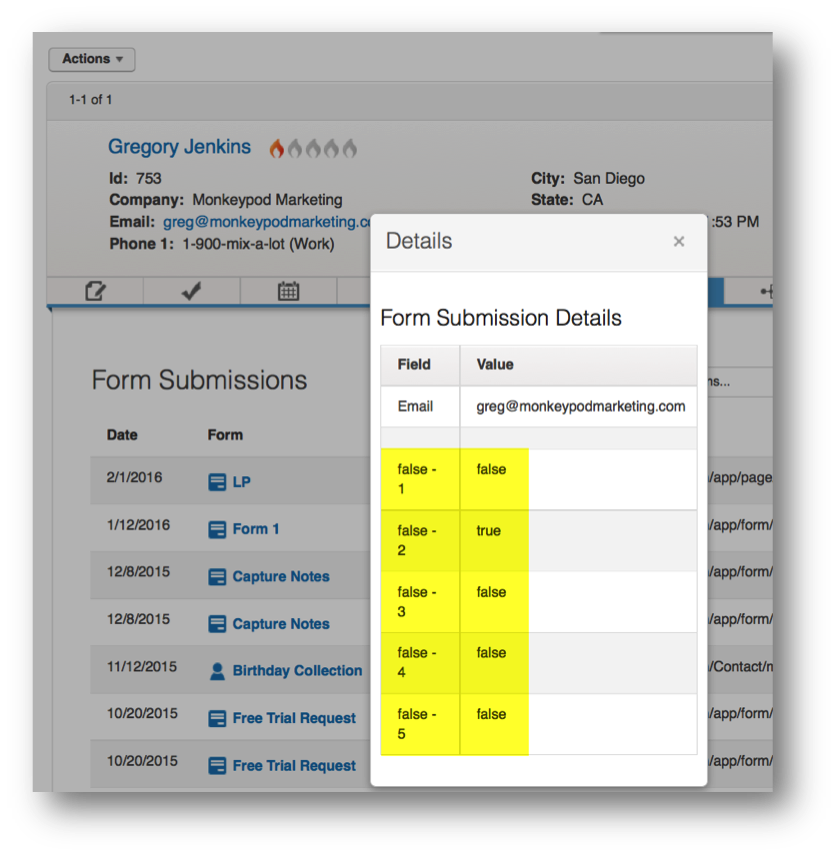
Labels are also used to help you understand context when reviewing form submission history on a contact record. I’ve noticed that without the label it simply says “False” where it used to say the label to that particular question. Presumably false means that there was no value provided.
Listen, I’m as big a fan of Infusionsoft as you’ll find, but I think they overlooked something on this one, and I trust that they’ll review it, and get it right. But for now, be aware that without labels you may run into some of the issues I just outlined.
Overall, this release was really solid, and I’d encourage you to check out the detailed release notes and FAQs they had on their release page. There are a few features (Partner User designation, Contact-Company creation, etc) that were included in this release that I didn’t break down in this post.
I’ve also heard some rumors that there will be another update in the days following this release that will give everyone the option of using the new mobile responsive Email Broadcast Builder. I’ve been using the beta version of the new builder for a few months now, and it’s sexy and keeps getting sexier. So, you can expect another post dedicated to just that feature once it’s rolled out as well.
I’d love to hear what you most excited about in the comments below!
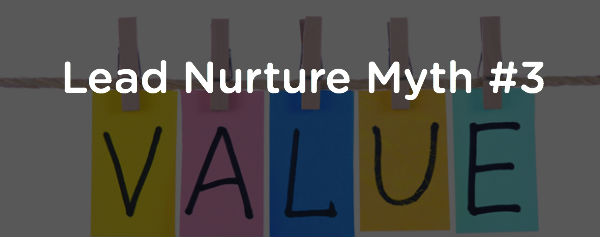
I think the first and second posts I wrote dispelling these myths probably gave you plenty of context, but in case you haven’t read them, or have forgotten: Nurture is really, really important.
Nurture Myth #3: Nurture is something you do for your business.
Sometimes this one takes a little while to sink in, but when it does, the shift it can cause is quite powerful. You see, most people build a nurture process to stay in touch with their prospects – and why do they want to stay in touch with their prospects? Well, probably because they want to make more sales. Or, because they want to keep that top-of-mind awareness. So what’s wrong with this, we all want more sales, right?
Of course we do. And there’s nothing wrong with it on it’s own. The reason I’m calling this out is because driving more sales is only part of what a nurture process should do. It’s only part of the purpose of creating a nurture funnel.
The other half of the equation is benefiting the prospect. That’s right, your nurture process should be something that the prospect derives value from. If you are emailing your prospects regularly and it’s self-serving, they’re going to be able to see right through it, and truthfully, you could be doing your brand a disservice.
Look at your own inbox, and look at the way you interact with emails – which ones do you dismiss right away? Which ones do you click on first? Usually there’s a theme among the emails that we open and read:
They’re from people we know and like.
They’re about topics that we are interested in.
They contain information that we need, or that we want.
They’re fun and/or engaging.
You may not be able to tackle all of these bullet points in every single email, but each email you send should touch on at least one of those themes.
If you’re looking back at your nurture strategy (and I would recommend it) and you’re wondering how you can spruce things up a bit, I’ve got a few recommendations for you. Pick one or a all of these and go to work:
Be convenient.
Your nurture can actually be really well received if it shows up at a time that is convenient for the recipient. I get a post card from my dentist every 6 months or so reminding me that it’s time to come in for a cleaning. If your business operates seasonally, or has any sort of service that people need more than once – think about how frequently they need it, and remind them when it’s time to purchase again. There’s a way to handle this that isn’t intrusive and that your customers will actually grow to appreciate (Just ask Jessica Maes).
Be informative.
Nurture at it’s core is just staying in touch with your prospects – but it’s really easy to forget why you’re staying in touch with them. The reality is that you should be building a relationship, and earning their trust. One method for doing this is by making them better every single time you show up. You can do this by delivering education through tips, videos, blog posts, etc.
Be useful.
As with the second bullet point, you want to show up with something that they need. This goes beyond just information, it could also be a resource. People love ebooks, best practices, or checklists. Think about the things that you learned while becoming an expert in your field, and find nuggets that you can package up to demonstrate your expertise, while also being useful to the prospect.
It all boils down to value. I’ll also let you in on a little secret – if every time you show up in my inbox you make my life better, then I’m going to want you to show up more and more often. Your prospects will too.
I’ve talked with plenty of people who are worried about spamming their list, or they don’t want to email too regularly because they don’t want to annoy people. I’m gonna call BS on that one.
If you’re worried about your prospects marking you as spam, or about annoying them, then it probably means you aren’t very confident in the value you’re providing. I’m a big email permission advocate, but I don’t think I’ve ever said “Wow, what a valuable email. Whelp, into the spam folder it goes.”
So, that’s Nurture Myth #3 – design your nurture funnel with delivering value as your primary focus. You might be surprised at how powerful this can be. If you use Infusionsoft and you’re curious how to design a nurture process, or where it fits in your Lifecycle Marketing strategy, then I’d recommend the step-by-step formula laid out in my LCM: Real Life course.
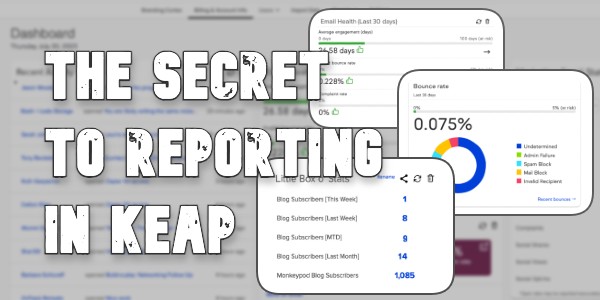
Have you ever felt that Keap’s reporting was lacklust, or just plain weak? Lots of people have.
I’ve heard that sentiment more than a few times.
It’s clunky, I’ll give you that. But I think that Keap’s reporting is actually much more powerful than most people give it credit for. In fact, I think that in all my years of working with Keap, formerly Infusionsoft, I can only think of three or four instances in which I truly couldn’t find the information I was looking for.
Listen, there are plenty of awesome ways to get information from Keaphere’s one for finding your open rates from campaign builder emails from my friend Brett at Blick Digital.
And if you want something more robust, there are tools like Graphly out there. I’m not trying to undermine or discredit any of the other resources out there, I just want to share a free trick of mine in case it helps you find the information you need faster or easier.
Okay, no more beating around the bush: Tags.
Yup, tags are the secret.
I use tags to give me nearly any number of stand-alone metrics that I want.
“But Greg, I already have a lot of tags.”
No big deal, you’re gonna have a few more.
Listen, you can’t have “too many” tags, you can only have tags that mean something to you, and tags that don’t. If you have tags that aren’t carrying valuable information – then yeah, maybe you should tidy those up. But if you have thousands of tags and they all carry meaningful data, then you’re doing just fine.
Lemme show you how I use tags for reporting by way of an example:
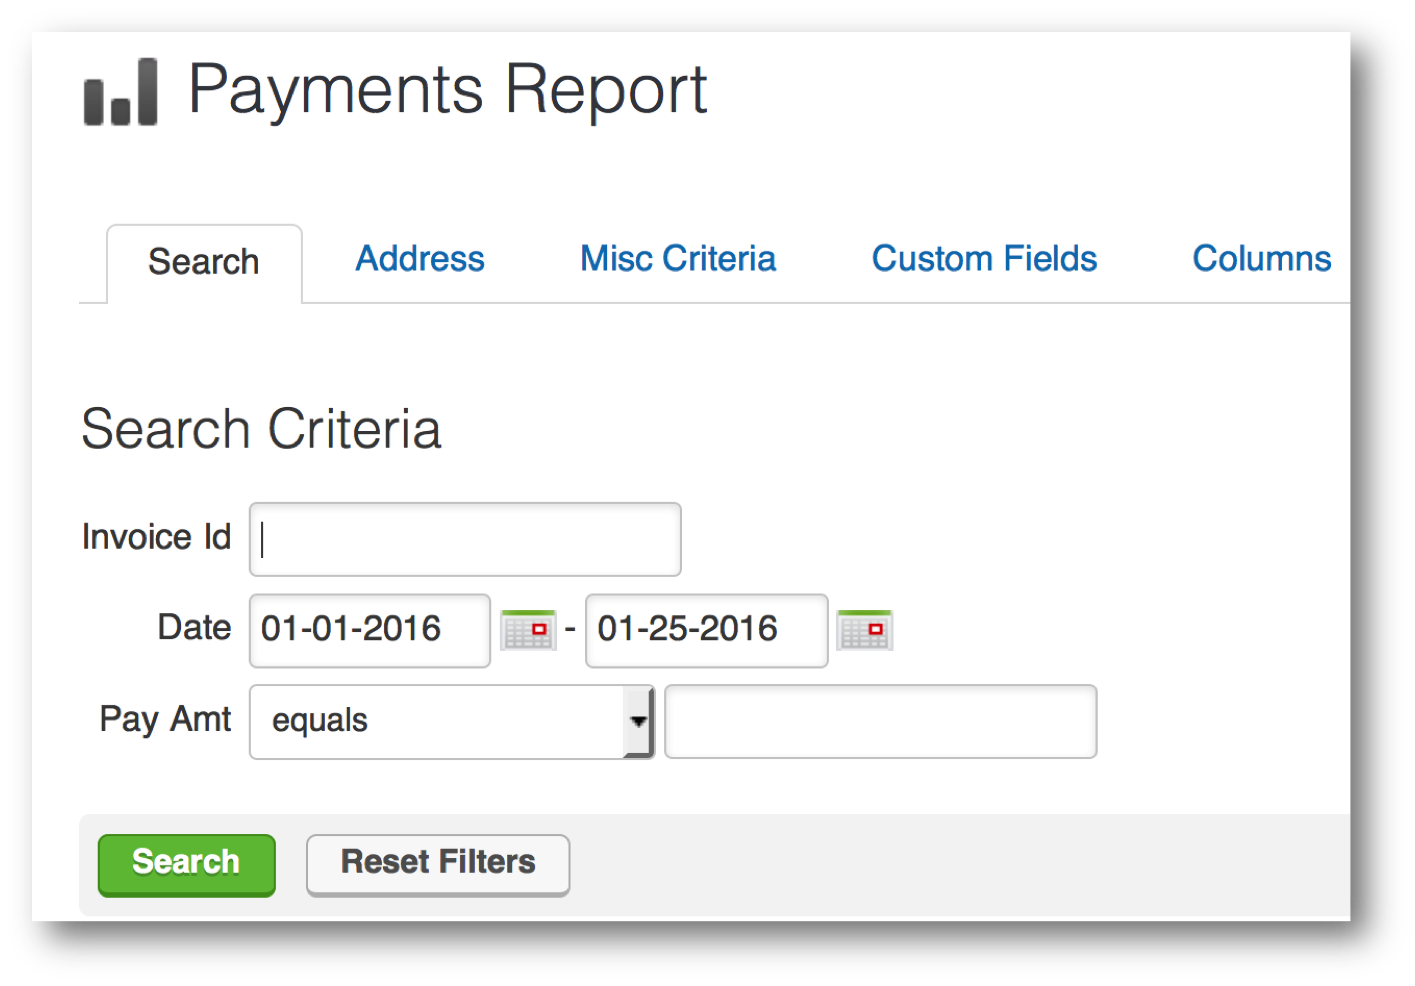
Let’s say that when you log in, you want to know how many sales you made last week. In fact, let’s say you want to know how many sales you’ve made each week for the last four weeks, and you want that data right when you log in, every single time.
Well, you can use the All Sales Report or Payments Report, but your only date criteria for those reports is a static date range. So, if I wanted to find out how many sales I made last week, or the three weeks before, I’d have to run the report four different times. And even then I still couldn’t save it because the calendar dates are static, and so the reports wouldn’t update, and in a week I’d have to come back in and run another report for the current week. Garbage. Not gonna work.
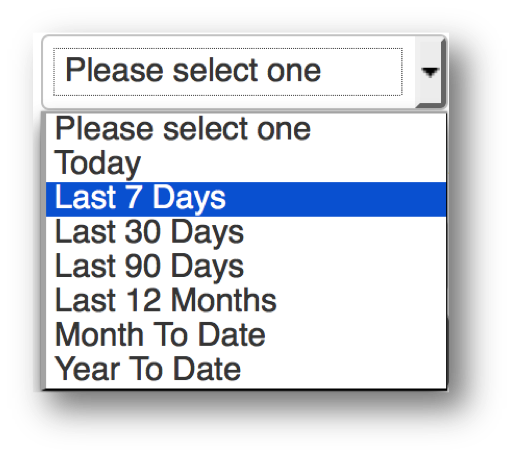
So, maybe you get a little creative, and you decide to use an Order Search. The orders section allows you to use some different date range logic. Now we’ve got the ability to run searches for any orders and use some dynamic date ranges.
So, this is a bit of an improvement. Now I can use a purchase date interval, and this will always be as it pertains to today. So, I have the choice of selecting Today, Last 7 Days, Last 30 Days, Month to Date, and Year to Date. But, even if you choose Last 7 Days, it doesn’t give you the choice to say Current Week. Or, The Week Before This Week. You can use the third option for date criteria, which is Purchase Date Custom Interval, and that lets you do X number of days ago and or X number of days after today.
Pro-tip: Did you know you can use negative integers in the Purchase Date Custom Interval fields? So, you can say 60 days ago and/or -30 days after today; which will show you purchases made between 60 and 30 days ago.
The Three Timer Types [in Keap]But, it’s still based off of today, and those numbers that you put in are fixed, they won’t adjust based on what day of the week you’re looking at the report, etc.
Conundrum, right?
Well, thanks for sticking with me, because I’ve got your answer. It’s tags. But not tags on their own, ya see, it’s more the strategic application and removal of tags. And the reason most people don’t do this is that they underestimate just how powerful the timers in the Keap campaign builder are.
So, if you want to track sales from this week, and sales from last week, and the week before that. Here’s how you do it. Build this campaign:
Okay, before anyone goes anywhere, that’s just the campaign structure – I promise there’s more. But honestly, it is this simple. This campaign is tracking ALL purchases – but you could easily adapt it so that you’re reporting on each of your products independently. Just set it up once, and then decide if you want to clone it.
Okay, so, the goal triggers the sequence, and then the sequence is where we manage our tags. Here’s how that looks:
So, when someone purchases it starts the top and the bottom line in this sequence. The top is tagging them as “Purchase this Week” and the bottom is tagging them as “Purchase this Month”.
Then I use timers to wait until the end of the week (Sunday morning at 12 am) and I remove the “Purchase This Week” tag and apply the “Purchase Last Week” tag, and on the bottom I do the same thing – I wait until the start of the next month (12 am on the 1st of any month) and I remove the “Purchase this Month” tag and apply the “Purchase Last Month” tag.
You guys, this isn’t terribly complicated, and I hope that doesn’t disappoint you.
But this tagging structure is so powerful because the timers allow someone who purchases on Monday to have the “Purchased This Week” tag for 5 days, but someone who buys on Saturday only has it for less than a day – it adjusts based on when someone enters the sequence.
The bottom line of logic does the same thing but on a monthly basis – if someone buys on the 5th of the month, they’re going to have the “Purchase This Month” tag until the 1st of the following month (no matter what month it is), but someone who buys on the 28th may only have that tag for a few days before it’s swapped out for the “Purchase Last Month” tag.
So all you need to do is run a saved search for contacts who have the “Purchased This Week” tag, and the “Purchased Last Week” tag and then let the campaign handle the application and removal of the tags so that the contact shows up on the right searches at the right times.
Or blog subscribers this week, vs blog subscribers last week, etc.
This type of flexibility allows you to compare apples to apples – it helps you identify trends in your business, and it gives you powerful data that can drive your marketing decisions. Oh, and if that wasn’t enough, of course these reporting tags can be used in conjunction with your other reports and searches to make them that much more targeted
Think about the metrics you want to track in your business, and start to put together some simple campaign structures to create that data. I’d love to hear any thoughts on this or other reporting tricks you’ve sorted out on your own.
Video Example:
And if you’re looking for specific reports to help you make the most out of your Keap data, here’s a great post on the Novak Solutions blog highlighting five of Paul Sokol’s favorites.
Pro-tip:
The example I’ve used was based on a purchase, but you can use this same tag based reporting set-up to track anything – I also use it for new opt-ins for my various e-books, and to track my blog subscribers as well. Create a tag category of it’s own just for Reporting Tags.
A few months back I wrote two blog posts about the importance of email permission, and the value of designing an email preferences center so that your prospects can tell you exactly what they want and what they don’t. Trust me, they’re more interesting than they sound.
Tactics like this are especially valuable for a number of reasons; but primarily because it helps ensure that your prospects are only hearing about the things they’ve told you they’re interested in, and as a result, your audience will be that much more engaged
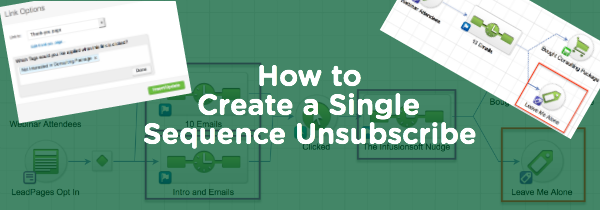
Well today I’d like to show you a simple way to take this concept one step further. I’m going to show you how to create an opt-out link for a single sequence, or a single campaign.
Yup, that means if you’ve got 10 emails promoting a special offer of yours, and after email number two the recipient decides it’s just not for them, this will allow them to opt-out of that particular promotion, while still remaining eligible for future specials and promotions you may offer.
It’s actually pretty simple, but most people don’t do it because they’re working hard enough to make the campaign builder function and this takes a little bit of extra planning.
Here’s our campaign – we’re taking everyone who attended our webinar, and we’re driving them toward buying our consulting package.
Pretty straight forward, but in this scenario if someone doesn’t want those emails, their only choice is to unsubscribe completely.
Even if we have an email preferences center, if they express their preferences it won’t pull them out of this campaign.
So what we need to do is something that’s becoming more and more common place in the Keap space – we need to add a “kill switch”.
This usually refers to a goal that you add at the end of the campaign, so that in the case of emergency you can achieve it in order to pull your contact(s) out of the campaign entirely.
But the twist in this case, is that we’re creating a kill switch, or stop trigger, that the contacts themselves can achieve if they decide they don’t want any more promotions.
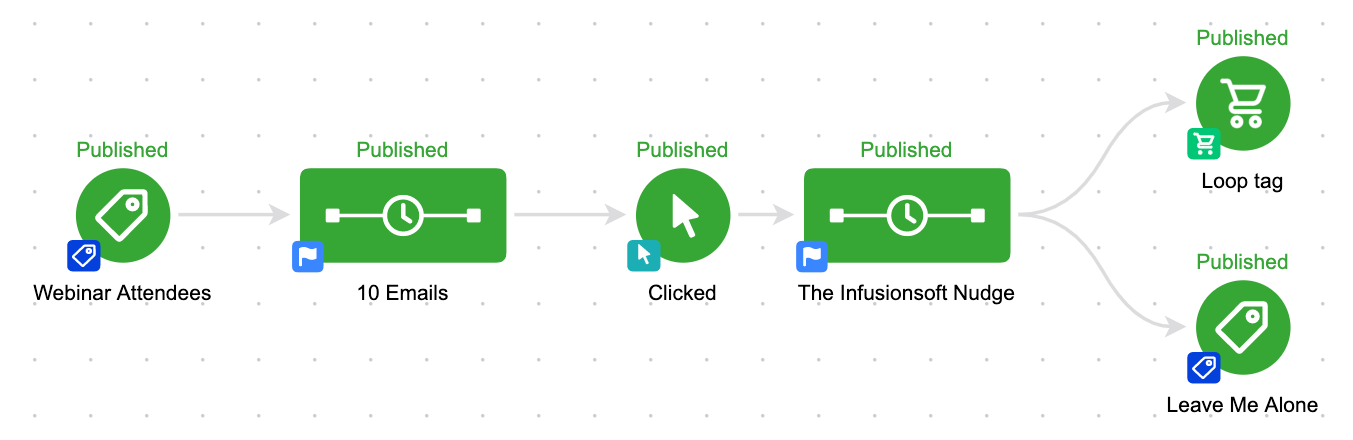
So there it is. We’ve added a second goal (labeled “Leave Me Alone”) listening for contacts who no longer want to be bothered by this sequence – and we’ve configured it to listen for a tag.
But wait…
Where and how does this tag get applied? Glad you asked.
Well, in each of the 10 promotional emails we have to add a link. It doesn’t really matter what the link points to (I usually link it to a generic thank-you page).
But the value of adding this link is that when it’s clicked, we can also apply a tag – and by applying the tag, we then achieve the goal, and pull them out of the campaign.
Yes, you’ll need to create a unique tag for each time you want to set this up. I usually create a category called “Trigger Tags” for things like this.
Now, for those of you reading along judging me because I decided to use a Tag Applied goal instead of using a Link Click goal, let me explain why. Yes, you could use a Link Click goal in the above scenario and it would have worked just fine.
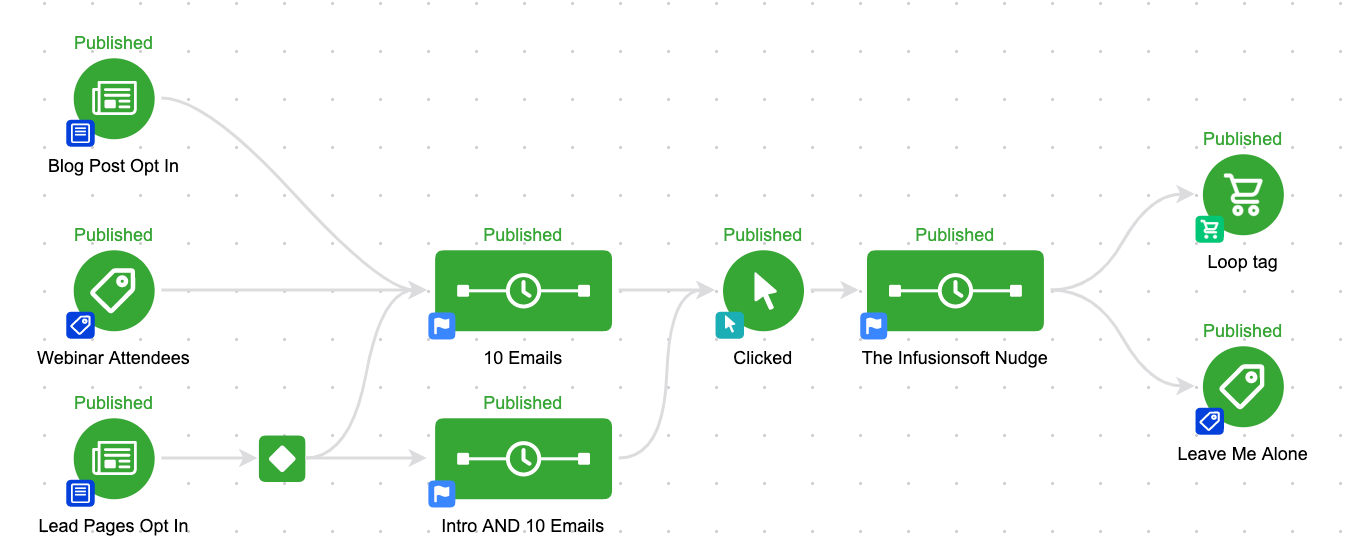
But, what if the campaign was a little more complex?
Good point. Link Click goals can only track links that are in a sequence they are directly attached to.
So, if your campaign was longer, or had a few extra sequences or steps, it’d quickly get difficult to keep everything organized. Like, let’s say you have been paying attention and you decided to include The Keap Nudge
Or maybe you’ve got a much more complex campaign, and multiple paths and entry points.
You contacts could be in either of the email sequences, and if they get tagged they’ll jump right to the “Leave Me Alone” goal, and they won’t get another email from this campaign at all.
As you might remember from Campaign Builder Gotcha 1: When a goal is achieved, by default, it will stop anything upstream from it. Even if it’s not directly connected.
The challenge in remembering this is that some goals (task, link click) can only measure or track the sequences to which they’re directly connected.
So, how do you use this? Well, I use this in pretty much all of my nurture campaigns. If you opt-in to learn about one of the courses on using Keap or the OG Membership, I have educational nurture sequences in place – but you’ll also notice that I give you the option to remove yourself from that process if it’s not providing value to you, without removing you from my blog updates list – or whatever else you may be getting from me.
More of a visual learner? Check out this quick video:
In the very near future Infusionsoft will be releasing their January 2016 update, and along with it a handful of features that I’m pretty excited about. Now, some of these are small, but for those of us who use Infusionsoft all day long, these can be massive time savers. I wanted to take just a few minutes to preview the four biggest changes associated with this release, and why these updates matter to you.
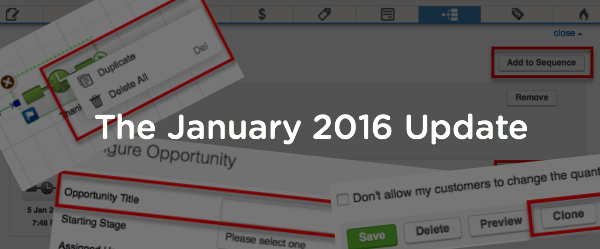
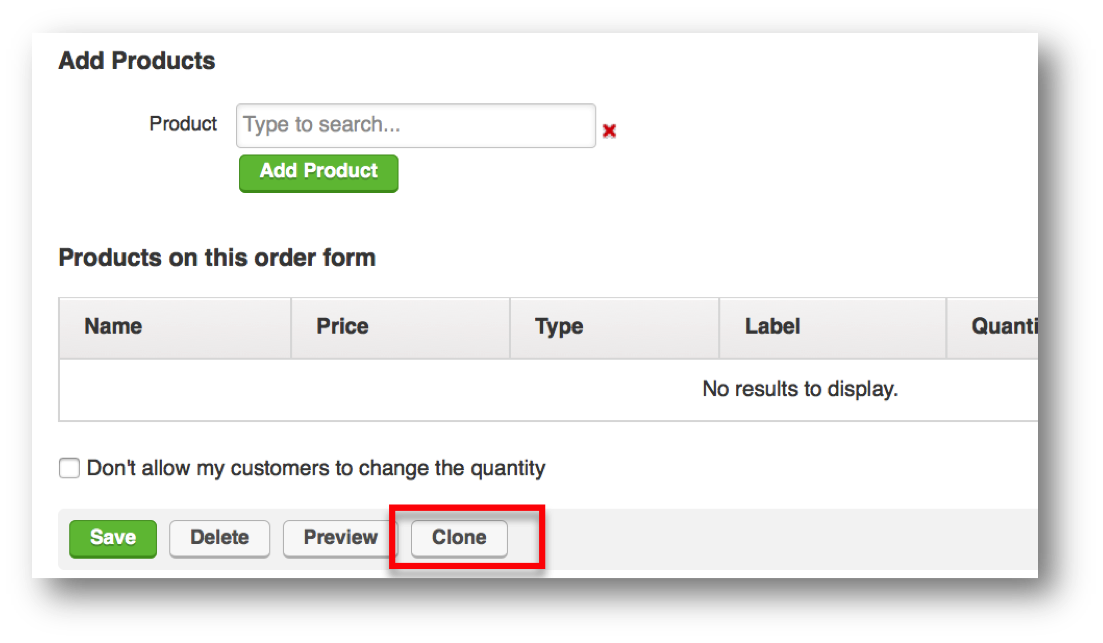
Update #1: Cloning Order Forms What it does: You’ll be able to clone order forms you’ve created with the click of a button. Why it matters: Previously, each time you created an order form you had to start from scratch. Now you’ll be able to quickly and easily duplicate order forms. This will save you the time of copying and pasting HTML from one form to another, configuring products and labels, or recreating thank you pages. I know, this probably should have been included from the get-go, but it’s here now.
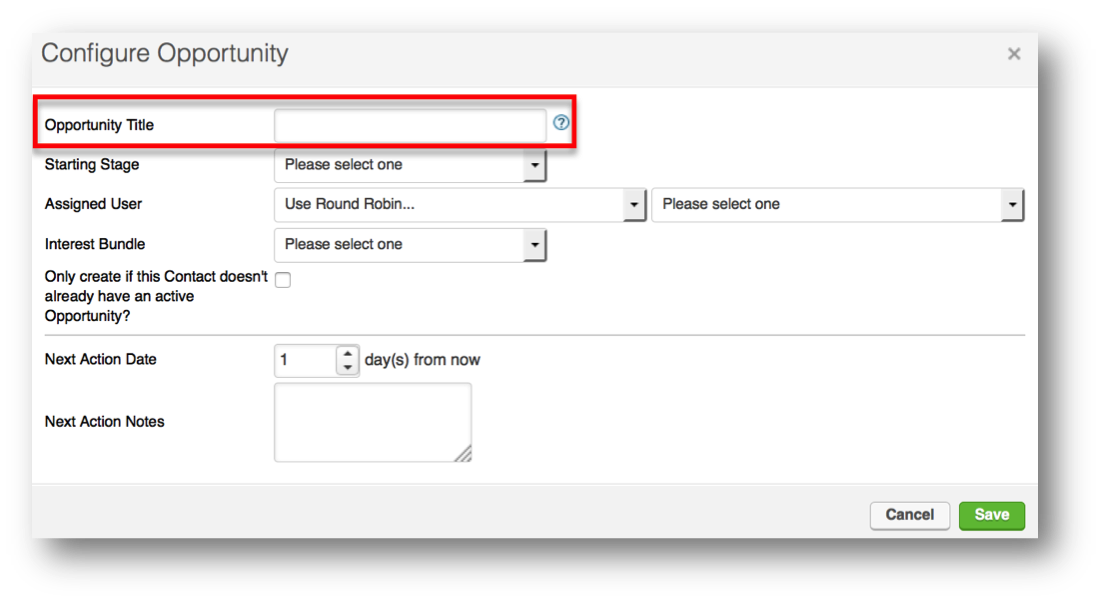
Update #2: Set an Opportunity Name What it does: You’ll now be able to set a static value as an Opportunity name when it’s generated in the campaign builder. Why it matters: Previously, the opportunity would be generated but would default to the company name. Now, you can designate where or why the opportunity was created, or for which product, which will dramatically help with opportunity searching, reporting and management.
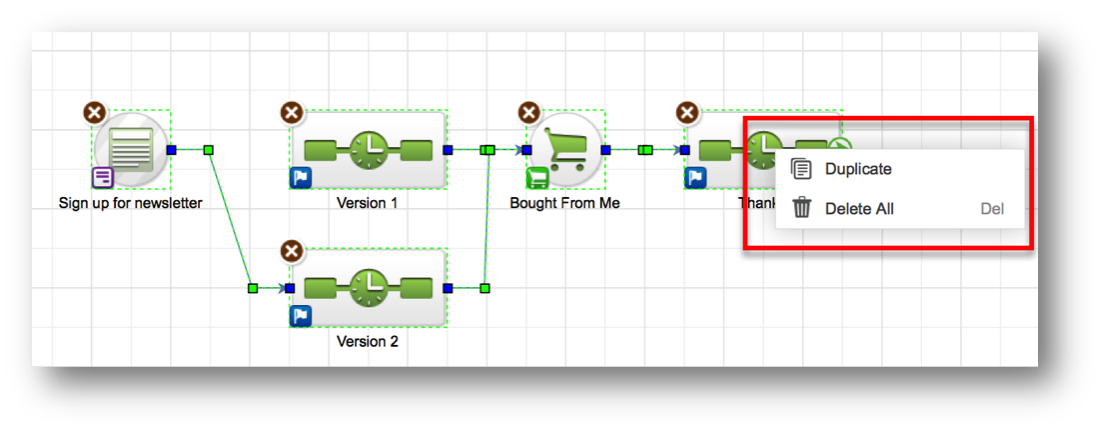
Update #3: Copy and Delete Campaign Items What it does: Well, you can easily copy and delete campaign items, individually or en masse. Why it matters: Yes, you’ve been able to do both of those things before, but not like this. Copying things was tricky – it took multiple clicks, and you have to have the order just right; in fact, some people didn’t even know you could do it. And deleting things has only been available for individual items. Now, you can easily duplicate groups of items, or, highlight and delete multiple icons. Caution: This could burn you if you delete more than you intend to.
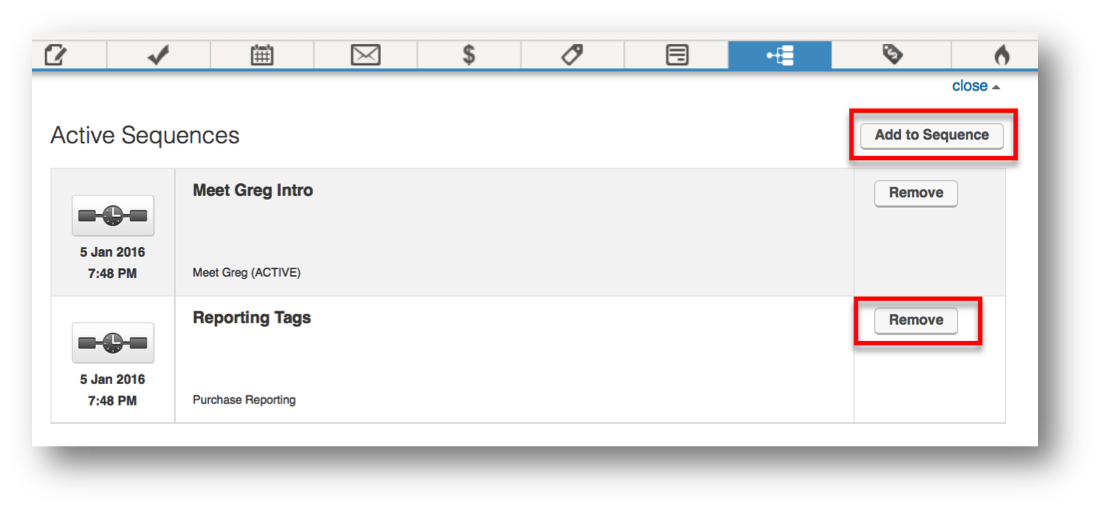
Update #4: Add to Sequence/Remove from Sequence What it does: From the contact record, you can easily add contacts to, or remove them from, sequences without needing to achieve a goal. Why it matters: Yes, you could do this previously with the actions drop down menu, but now you can interact with contacts right from the campaigns tab on the contact record. To be able to see what campaign sequences they’re currently in, add them to new ones, or remove them from unnecessary ones; this will make our lives so much easier. Note: This is only for interacting with individual contacts. If you need to do this for a group, you’ll still use this method.
All in all, this update isn’t groundbreaking, but it is really nice. All of these updates will make things incrementally easier on a day-to-day basis. I’d love to hear which of these update you’re most excited about below!
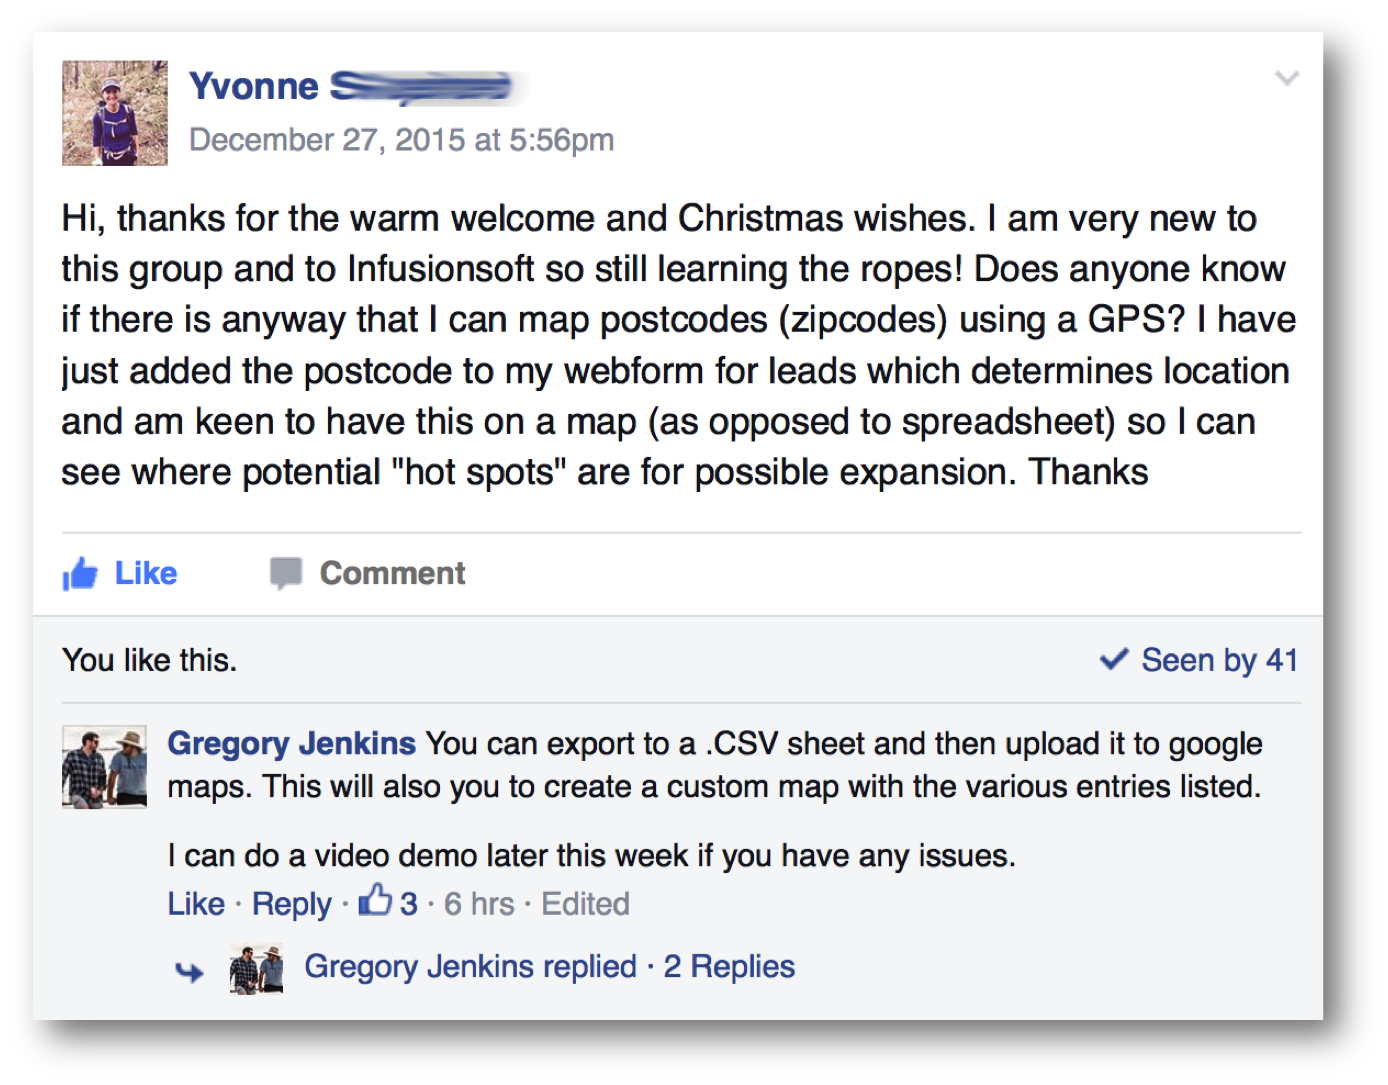
This is an awesome question about using a Heat Map to see your prospects or customers, and it comes from one of the Monkeypod OG Members, Yvonne. (Curious about membership?)
Anyway, Yvonne has been collecting information about her prospects and she wanted to view all of her prospects, but not in a list, rather she wanted to see them spread out geographically. This is commonly referred to as a Heat Map.
It’s a totally reasonable request, and heat mapping is a pretty common business practice. It’s a great way to identify trends in your business, or new markets that might be able to support an event, or in Yvonne’s case, what areas might be a good fit for a possible expansion.
Just to be clear, there are actually a few different definitions of Heat Mapping. For example, plenty of businesses will use a heat mapping plugin on their web site to give them data about where people are clicking.But in this case, I’m talking about taking a statistical set of data (like customer locations), and mapping it out geographically to see what you can learn.
This isn’t a feature that is built into Keap natively, but it can be done. Lemme show you:
Update: Just got a message from a good friend and award winning marketer, Brett Fairbourn, letting me know that the link to create a heap map has been updated since the original post was published – here’s the new one.
 Update #2: Mobile Friendly Landing Pages

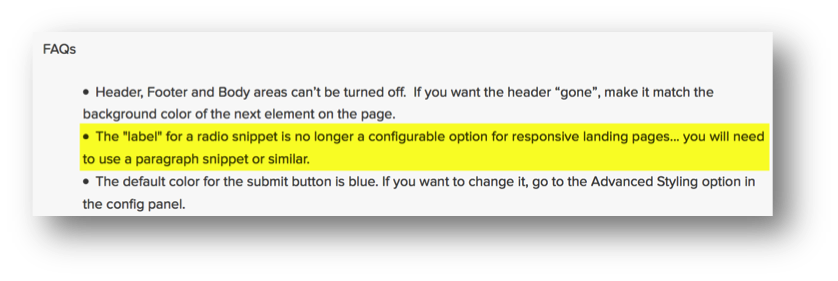 They’re effectively removing the label for your radio snippets on a web form. This isn’t that big a deal if the question is “Are you right or left handed?” and the options are “Left, Right, or Ambidextrous”.