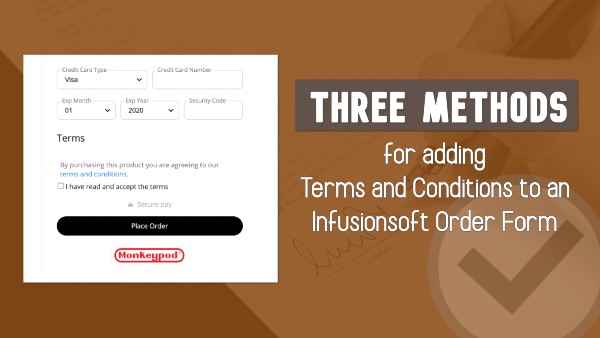
3 Methods for adding Terms and Conditions to an Infusionsoft Order Form
If you need to have your customers check a box agreeing to terms and conditions before they make a purchase, there are a few options for making that happen.
You can use a third-party tool, you can use custom code to modify your existing forms, and finally – there’s now a native option as well.
In this post I’ll show you all three.
Method One:
The first, is to use a tool like Spiffy.
Spiffy is an add-on that lets you level up your Infusionsoft order forms using their drag-and-drop builder. But beyond the improved look and feel, they also have a library of code snippets you can use to do more advanced customization.
This particular request is common enough that they’ve made it a simple toggle inside Spiffy.

Spiffy also offers more advanced options if you want to capture the date and time that they agreed to the terms and store it back to a custom field, or create an on-page scroll box where the purchaser can easily review your terms and conditions.
If you want to see more of what Spiffy offers in general, check out the demo I did in this post.
Method Two:
The second method for adding terms and conditions to your Infusionsoft order forms doesn’t require a third-party tool – but it does require a little familiarity with code.
The basic idea is that you’ll be adding code to the form using the HTML areas, and manually adding a “Terms and Conditions” section that your customer can agree to before completing their purchase.

My good friend Brett has done an excellent job documenting this method over on his Blick Digital blog.
If you’re interested in going this route, check out his post where he walks you through the steps, and gives you a download file with the code you’ll need.
Method Three:
And finally, the third option here is a totally native solution.
As you might have heard, Infusionsoft introduced a fully responsive order form theme option in April of 2020.
The new theme option is fairly basic – but modern, clean, and of course it’s fully responsive.
Well, more recently they added the option for easily adding terms and conditions to order forms that are using this new theme.
Here’s a video demonstrating how you can take advantage of this new feature:
Let me be abundantly clear – this is a win.
It’s absolutely an important step in creating more flexible and robust native order forms. So, bravo Infusionsoft product team. Thank you – keep it up.
And also….
There are a few changes and improvements that would make this even more powerful.
- I’d love to see the “terms” tab hidden from themes where it’s not available (or, have it work with all themes, rather than just the mobile responsive themes). Right now it’s confusing to have the terms tab show up on order forms where this won’t work as expected.
- I think it would be useful to be able to modify the section header, and the actual language on the checkbox itself – this would make the whole area more versatile in general, and accommodate for users who need to adapt this for languages other than English.
- It would be valuable to be able to trigger actions when someone checks this box, or to store a timestamp into a custom field on the contact record (or even on the order record).
Okay – lets leave it there for now.
I’m excited about the update – and I love to see this section of the software getting some attention.
In the comments below I’d love to hear if you guys find this valuable, or if you have questions, or have spotted anything I might have missed on this one.