If you run regular recurring events, then I think I can make your life a little easier.
Here’s how most businesses I work with handle repeating live events:
- Build out campaign for event 1
- Copy campaign for event 2
- Adjust email copy, and campaign timers for event 2
- Repeat for event 3, event 4, etc.
And heck, maybe you’ve even used campaign merge fields, and campaign links to make your life a little bit easier.
But this process is still heavily manual, and a little tiring. Right?
Right. So, I think I can make things a little easier for you, and your monthly workshop, or your meet-up every few weeks.
Let’s jump right in, shall we?
Context:
If you are promoting a live event then you likely want to put the date in the email(s) to your contacts, right? Totally normal request.
The way most people handle this problem is to use the campaign merge field. Campaign merge fields are managed centrally on the campaign level, so if you have to make a change, you only need to go to one place to update the date and it will automatically use the new value for every email that was using that merge field.
This is especially helpful when you’re copying the campaign too, because the campaign merge fields are all copied too, so you can use the same structure and quickly update the merge fields to save yourself time.
But even if you update the campaign merge fields, you still have to manually go through and adjust all the date timers for the new event, and for some people this is a dealbreaker.
So, I’m going to show you how you can set the campaign and never need to touch it (as far as dates are concerned).
Scenario:
You are advertising on Facebook for your live event. You have 4 events coming up in Jan and Feb.
Let’s Build:
Before the campaign:
For this campaign you’re going to need to set up an Event Date custom field (the field should be a Date Type), and then you’ll also need one tag, we use “Date Set” as the tag name.
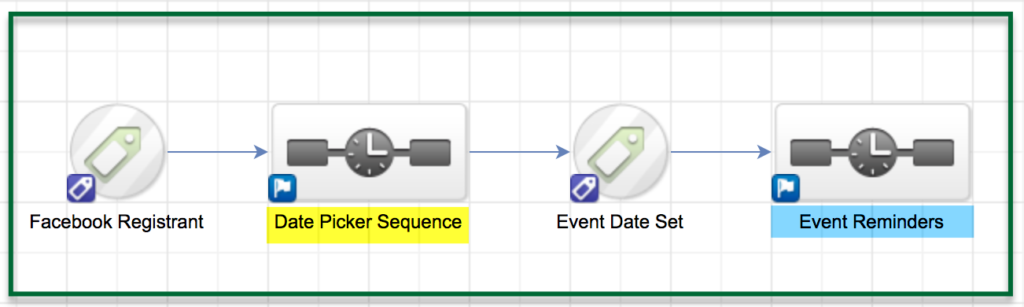
The campaign structure:
- Create a goal to trigger the campaign. In this case I used a tag as a goal for when people register for the event from Facebook.
- Create a Date Picker Sequence. (We’ll talk about what’s inside next)
- Create a Event Date Set Tag Goal
- Create an Event Reminder Sequence. (We’ll talk about this one in a moment too)
This is how your campaign structure should look:
Simple right? The magic happens inside the sequences. Let’s take a closer look at what is happening under the hood:
Inside the Date Picker Sequence:
- Use a new start element for every event date
(The first date timer should range from the date you will start the ads up to the date before the event. We are not going to let people register for this event on the day of, yet. For now, if they sign up on the day of the event, they will be registered for the next event.) - Add a Set Field Value widget and add the date of the event
- Apply the Date Set tag.
On the second Start element, add a new date timer that runs between the start date of the first event and the day before the next event. Then repeat steps 1-3.
Here’s how the inside of the Date Picker Sequence (highlighted in yellow above) will look:

Each of the individual “tracks” inside the sequence should look like the image below:
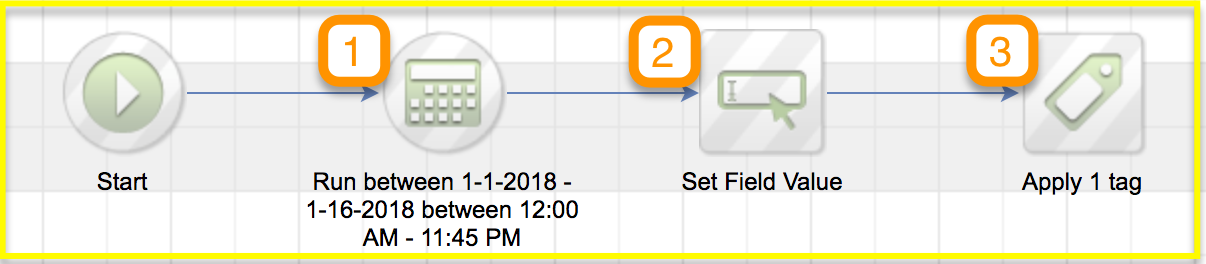
And here are the important things to note about this:
- The date range timer should include all dates leading up to the first event, but you can adjust the cut off date if you want last minute registrations to automatically be registered for the following event. So, choose a range that accommodates based on your own preference.
(Each “track” in this sequence will have a different date range, and they should not overlap.) - The “Set Field Value” is the widget responsible for recording the Event Date into a custom field on the contact record, this is important because it will be used in the next sequence to control the delivery of reminders.
(Note: The first track would have the date of event one, the second would have the date of event two, etc.) - This is the “Event Date Set” tag, and this will be the same for each track in this sequence. This tag is important because once the custom field has been updated with the event date, this ensures that the contact is extracted from the sequence by achieving the Tag Goal attached to it.
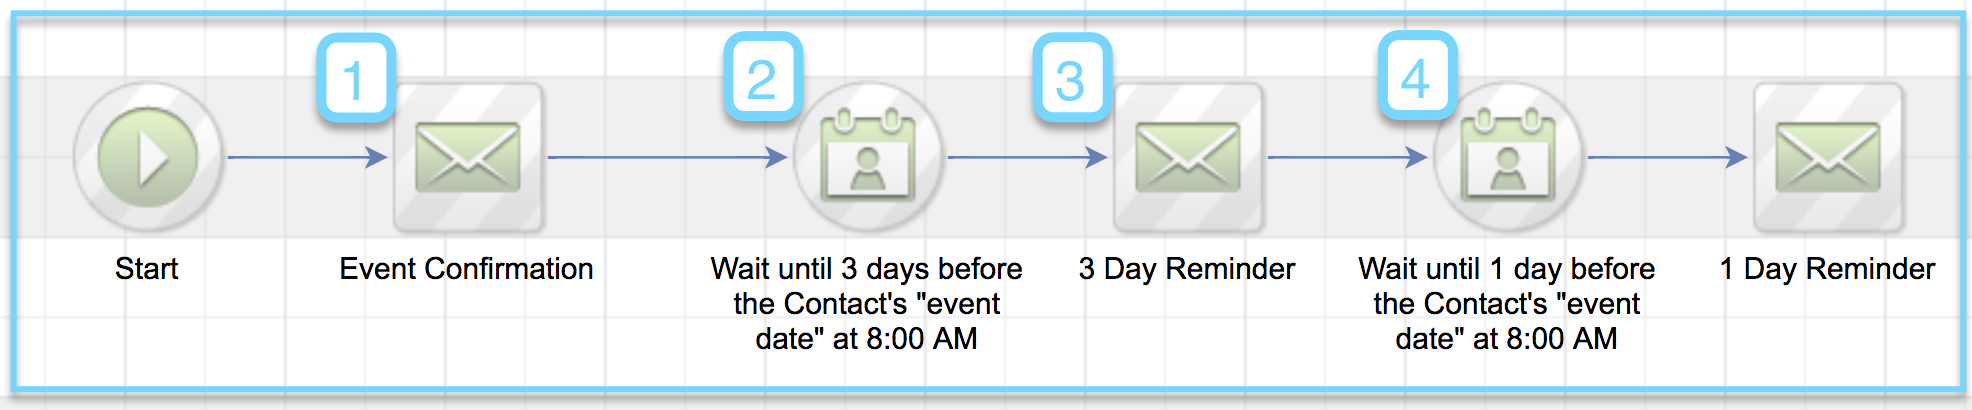
Inside the Reminder Sequence:
- Add the Confirmation email and merge in the Event date
- Use a field timer with the event date. Be sure to choose the option – “Use year from field”
- Add a reminder email to let people know when the event is approaching.
- Add another field timer, followed by another email, for as many reminders as you’d like.
Here’s how the inside of the Event Reminders Sequence (highlighted in blue above) will look:
———–
Okay, that’s about the size of things. You should now have a functional campaign designed to automatically assign registrants to the next upcoming event, and then send reminders as the event approaches.
One benefit of this campaign is that you can set it up for as many events as you have scheduled, so if you know the event dates for the next 6 months, you can build it out, launch, and you shouldn’t have to do any real upkeep to make sure things are current.
Hope this helps lend some automation to your recurring live events! If you have any questions, please feel free to comment below, or reach out to me directly!
Editor’s Note: Kevin’s solution is great, but it got me thinking about fringe scenarios where this might not be a good fit, so I recorded a quick video to demonstrate how you can adapt this to allow registrants to sign up ON the day of the event, or to allow them to choose their date of registration, and some automation to address what happens if people sign up after your events have taken place.
Here you can create the content that will be used within the module.


Great work Kevin. I think I can definitely make good use of this for a client or two. Wish I would have seen this about 3 months ago! I was stuck in the camp that does duplicating campaigns with campaign merge fields 🙂
One additional thing you could do is use funnel bots (or PlusThis/MFH) to format that custom date field for your emails/text reminders so they look friendlier to read.
Nice work!
Good point Brett! I think Zapier can do date formatting as well (just in case someone has that but not the other ones you listed). 🙂
Thanks for reading!
Brett, Great Point. In the live campaigns I’ve built with this process I actually use Novak Solutions to format that date. This campaign has surely saved my sanity, as the first customer I built it for had 4 different events every month!
Brilliant. Thanks Kevin and Greg ????
You got it Steve!
Steve, Glad it was useful!
Daaaaamn!!!!
Truly some genius wizardry. I bow to the almighty Mogavero for this super novel solution, that scales like a beast, and REALLY solves a hard problem many have suffered from.
Thanks, Paul – This issue had been plaguing me and one of my clients for a while.
To Give Credit where Credit is due – This problem had been bugging me for a while with a specific customer of mine. Then, I brought in Elias Borota and together we tweaked this until it turned into something that could be used.
Thanks, Elias.
Really nice, Kevin! I have to admit I don’t use or leverage the date timers enough so this is a great strategy. I was wondering…would there ever be a situation for someone to register for more than one and if so…would the Facebook Registrant start tag and the Date Set tag need to be removed?
Cheryl, yes. In fact, the actual campaign i built, there is a loop that pushes them back through and promotes the next event to them. So, as long as one event is over before you promote the second event all is good, otherwise the event date would get overwritten.
Awesome stuff, guys!
Scenario question: What if I don’t know the exact date up until a couple of weeks before the event, what would be best practice?
Well, I think I’d probably drop them into a “nurture” style sequence that keeps them engaged, and tells them more about the event, and reminds them why it is valuable – then once you have the date for the event, you could transition them into a “countdown” style sequence (using a field timer) as the event approaches.
To add one to what Greg said there if you know that you are having an event in “February” and another in “March” but you don’t have the exact dates yet… You can apply a “Feb” tag and a “March” tag respectively as they register. Then, once you have the dates, run them through 2 sequences that have a “Set Field Value” widget in them for the respective dates. Then, pass them into a final sequence that is exactly how Greg Described above with the Countdown style sequence run by Field Timers.
Cool! Thanks both 🙂
Great stuff, congrats and thanks to all.
I have an questions about Greg’s video that expands on a few points. In the example where you allow someone to register on the day of the event, the example was to set the timer for the time of the event ( I think 3PM in the example. What happens to people who might want to register for the next event but on the date of the event? Is it as simple as changing the ‘from date’ to that same specific time to handle that situation?
Great question Don, thanks for reaching out – so, I believe you can EITHER let them select, and give them the event choices, OR you can automatically register them for the next available event, and use the timer structure to ensure that the right event is selected.
Kevin’s demo doesn’t include allowing registrations for the event on the day of, and in many cases that makes a lot of sense – in the demo I showed a timer structure that would support “day of” event registrations right up until the event starts. I don’t know that it’s perfect, but it’s another option that may fit depending on the event type.
If you think the automatic timer situation is too rigid, then maybe giving the registrant the choice would a good compromise solution!