How to actually use the CRM Sales Reports in Infusionsoft

How to actually use the CRM Sales Reports in Infusionsoft

Hello there fellow MonkeyPodders!

If you didn’t know, I’ve been using Infusionsoft  (now Keap) since 2008. This means I have watched the software grow up and evolve.

Kind of like when you watch a dog or cat (or kid) grow up; you understand them better, and why certain things are the way they are.

Since I also worked at Keap (formerly Infusionsoft), I’ve got a unique view into how the system operates under the hood.

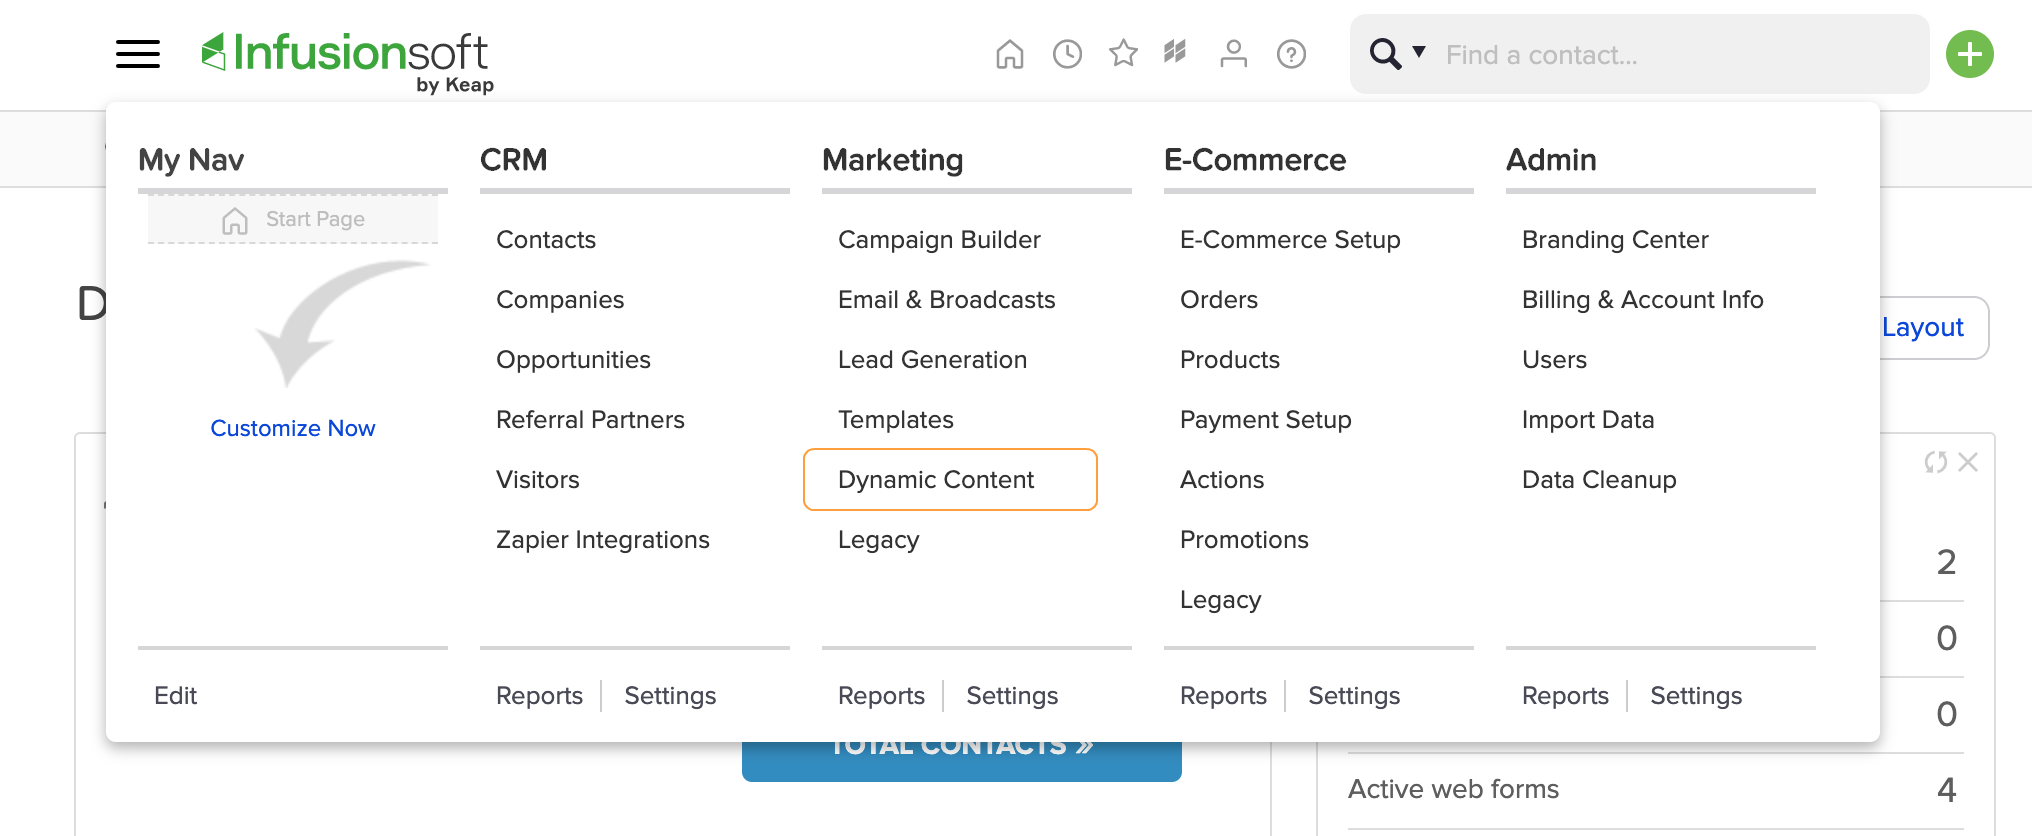
You are about to gain access into, arguably, one of the most nuanced parts of the software: the Keap CRM Sales reports.

The Keap CRM Sales Reports

For those unfamiliar, these are the reports you can use with the Opportunities function, the sales pipeline. Since that function itself is challenging for some users, it makes sense that the reporting is also a bit misunderstood.

Greg, being a former success coach like me, was super aware of this knowledge gap for most users.

And recently he reminded me of an old resource we once used as coaches, a cheat-sheet of sorts that has held true since 2013. A thorough breakdown and explanation of every CRM Sales report.

Sales Report GIF

Back in 2013, I was asked to speak at the annual user conference about this Opportunity function. (Have you heard IKON is coming back?)

So, it made sense to have the report explanations available as part of the presentation bonuses.

Now, for you and all the world to benefit, we wanted to unpack that juicy detailed artifact. I give you, the Sales Report Overview…

Using Sales Reports to Answer Questions

When it comes to running a business, asking the right questions is important. These sales reports are answering some specific questions that might not be apparent to the average user. Plus, these questions are being informed by sales management experience. So if you’ve never been a sales manager, you don’t even know this is a question (yet).

Below are the 12 sales reports, the main question they answer, and how you might use this to manage your sales team. Feel free to read through them, or jump to the reports you’re most interested in:

Sales Rep Conversion Percentages:
“What is the conversion rate from one sales stage to another?”

Having a solid close rate means more predictable sales. However, looking at the rates of movement from one state to the next gives insight into the efficiency of the sales process itself.

With this report, you can choose stages in your sales pipeline and can see the percentage of movement.

For example:

Sales Rep Conversion Percentages

I have had 19 opportunities that made it to the Qualified stage, and 6 of those moved to Assessment Scheduled. A 32% conversion from qualified to scheduled.

This does NOT mean there are 13 lost sales though.

Look at the movement from Qualified to Assessment Complete:

Sales Rep Conversion Percentages

10 people moved directly from Qualified to Assessment completed.

This report is good for looking at global pipeline velocity among all sales reps, or for digging into a specific rep’s performance.

Be careful comparing more than two sales stages though! Deciphering the data with multiple stages selected can be a pain. The report basically compares all possible stage move combinations, which is a daunting data set. You’ll see an example of this complexity in the next report. Dive into at your own risk!

Conversion Percentages (Created By):
“What is the conversion rate from one sales stage to another BASED ON who created the Opportunity originally?”

This report is a modified version of the previous one. You can see a stage-to-stage conversion report, broken down by users.

You’ll be able to see if automated leads (from a campaign) convert better than manual leads entered by each sales rep.

For example, my conversion rates are not much different from automated leads compared to the ones I enter by hand:

Conversion Percentages Created By

This also demonstrates the previous warning about comparing multiple stages. The data can be confusing. For example, how can you complete 141% of all assessments scheduled?

Well, there are technically 24 completed and only 17 scheduled. What this report doesn’t factor in is when people skip stages. For example if someone goes from Qualified right to Appointment Complete.

In any case, this can help you establish conversion baselines between your automated and human efforts.

Stage to Stage:
“What is the average number of days it takes someone to move from one stage to another?”

This report is short and sweet. Put in two stages and a date range. The report will calculate how long it takes, on average, to move from one stage to the next.

For example, for 2020 so far, there have been 9 leads that went from Qualified immediately to Assessment Complete:

Stage to Stage Report

In an average of 9 days.

However, if you look at people who went from Qualified to Proposal Sent, which only happened once, you’ll see it was a fast journey for that one lead.

Stage to Stage 2

If there were multiple sales reps in this application, each one would have a row in the report. This means the report is also great for establishing team baselines.

(Back to Top)

Opportunity Created Detail:
“Who is creating opportunities and/or who are they being assigned to?”

This report is a bit of a wild one. It deals only with opportunities created by a User, not automatically.

For every User-created Opportunity, who has been assigned to it?

As a one-man sales team (for now), this report tells me that I’ve manually assigned myself over 200 leads:

Opportunity Created Detail

That’s pretty wild. From a real-world standpoint, there might be some use cases for looking at who is creating and assigning. For larger sales teams, this could be super handy to track multiple managers and their teams. Especially if the managers are creating the leads for their team members.

Call History Summary:
“How many notes are my sales reps leaving?”

This report is great for managing a team.

When “properly working” an Opportunity, this report will show sales reps activity. We consider working an Opportunity with the following button “proper”:

Call History Summary

This is for 2 reasons:

  1. This function will leave a digital papertrail Note on the contact record. You’ll be able to see what was supposed to happen, and then what actually happened.
  2. This function will update the User’s calendar for easier pipeline management.

Please note that working an Opportunity from My Day view will also behave in such a way.

Ok, assuming your sales team has been been trained to use Opportunities “properly”, this Sales report will look like this:

Call History Summary Team

This screenshot above is for the entire app’s existence. In the close to a decade this app has existed, I’ve left over 10k contact notes of the ‘Call’ type; these are the default note type when working an Opportunity. You can see that a few other people have lightly used Opportunities in this app’s career.

As a sales manager, you can use this report to keep track of call volume per sales rep on a weekly, monthly, quarterly, etc. basis.

Call Log Report: “What notes are my sales reps leaving?”

This report is great for digging into sales rep performance and quality of call notes.

It is basically an expanded version of the previous report. Instead of spitting out the number of calls made, this allows you to look at the call notes directly.

For 2020, I’ve “made 811 calls” or rather, worked opportunities 811 times:

Call Log Report

It is important to understand that these reports are reporting on the Contact notes. So as long as your sales reps are leaving notes, this should show their activity.

(Back to Top)

Sales Pipeline Summary: “What pipeline movement happened during a certain date range?”

This report is pretty cool. You can see a breakdown of all stage moves INTO a stage, and then all the resulting moves OUT.

This is handy to see where people are getting stuck in the sales process. And with what velocity.

Sales Pipeline Summary

For 2020 so far, I’ve had 10 sales leads created in the New Opportunity stage that exited that stage. That doesn’t tell us much.

Could some leads be sitting in New Opportunity that haven’t moved? Yes. That would be the job of the sales manager: to monitor and make sure this isn’t the case; which it isn’t.

Look at the Engaging stage though. All 12 leads that entered that stage moved out of that stage. This means people aren’t getting stuck there. This can also be interpreted as no Opportunity was created in that stage. As long as nobody is still in Engaging (they aren’t), then, yes, that is the case.

For the Qualified stage , how can 26 move out when only 19 went into that stage? This means there were 7 opportunities created in the Qualified stage from the get-go. At least.

As you can see, this report starts to get down to the brass tacks of pipeline efficiency.

There are no search parameters besides the time range. This is global for all Opportunities in that time range.

However, you can filter by Team, which is a group of Users. If you wanted to see individual sales rep performance, you could create a unique Team per sales rep and use it in this report.

Sales Pipeline Detail:
“What specific pipeline movement happened during a certain date range between stages?”

This report is super insightful. You can get lost in rabbit holes for sure. This report is how you can search between the individual Stage Moves; the Sales History tab of the Opportunity record.

Sales Pipeline Detail

This report lets you see global stage movement, all movement FROM a particular stage or, all movement TO a particular stage.

For example, here are all the stage moves for 2020 that ended in the Deposit Secured stage:

Sales Pipeline Detail 2

You can see that most people were in a proposal stage before becoming a paying client. Which makes sense. This also shows what stage the Opportunity is in right now.

For this example, since two of the stages are in Win, that means those projects are closed out. Otherwise they would still be in a fulfillment stage.

Like the Sales Pipeline Summary report, you can only filter by Team. So if you wanted to look at individual sales rep activity, you’d have to make them into their own Team.

(Back to Top)

Opportunity Revenue Forecast:
“How much money is in the pipeline and what are the weighted chances of closing?”

This report is the most intricate of all the sales reports, in my opinion.

To get data from this report, you have to be doing three things:

  1. You have to be using proper Product and Subscription listings.
  2. Your sales reps have to be indicating what offers each lead is going to buy in the ‘Products/Subscription Plans’ tab of the Opportunity record.
  3. Your sales reps have to be using the Estimated Close Date field on the Opportunity record; ‘Commit to Forecast?’ is optional

For example, this Opportunity record has products listed and a close date:

Opp revenue forecast

The dollar value next to the name is a function of the products and subscriptions selected.

Assuming those three conditions, the Opportunity Revenue Forecast in Infusionsoft will spit out a report like this:

opp rev forecast 2

As you can see, I don’t use the Products/Subscriptions tab as good as I probably should. I am actually human after all 😉

But that works out for you, since it provides the perfect example for how this report works.

You can see the potential revenue and potential monthly subscription. This matches with the Opportunity record. You also have the option to filter based on the ‘Commit to Forecast?’ checkbox or not.

What’s with that weighted revenue stuff?

Glad you asked. That is a hidden fourth condition for the report to properly work. This is related to the Probability setting of each sales stage.

If you never noticed, there is a Probability field for each sales stage when setting it up:

Opp Revenue Forecast

This is the probability of the sale closing.

So the weighted revenue is the total Opportunity revenue times the probability of selling.

As an example, if someone was considering a $1,000/month service, and they were in the Qualified stage (with a probability of 50), the weighted revenue would only be $500; they are only half way through the sales process.

The reason both the potential and potential weighted revenue match in the screenshot above, is because they are an active client in the ‘Retainer Fulfillment’ stage; which has a probability of 100. They already bought and are a paying client.

This report is particularly helpful for sales manager dashboard stats that show pipeline volume.

Opportunity Sales Report:
“How much money did we actually make off closed opportunities?”

This report shows how many Order records exist for a Closed opportunity.

Which does not mean that every opportunity contributed to the sale.

That is what makes this report sometimes slippery. Especially if someone can buy on their own without talking to a sales rep for some Offers. There is a risk that an Order record is being “credited” to an unrelated Opportunity record.

With that in mind, here is how the report looks:

Opp Sales report

This means that I’ve got 45 closed Opportunities this year for a total of about $8,300 in orders. And about $5k of that came from upfront revenue.

Nearly every Order is a function of our assisted sales process, so this is pretty accurate.

There is an extra gotcha: this report only shows “Closed” opportunities. It has to be in either the Win or Lost stage. Because I use stages for Fulfillment, beyond the sale, this report isn’t 100% accurate.

To be accurate, all closed projects for 2020 have driven ~$8,300 so far. There are still a handful of open projects including retainers who technically never “close” until they cancel their subscription.

Still, this report gives some interesting data on sales results per rep.

Sales Cycle Report:
“How long do opportunities stay open by sales rep?”

This report shows how many opportunities have gone from creation to a closed sales stage, and the average time to get there.

For 2020, this is how the report looks for me:

Sales Cycle Report

45 Opportunities have been closed out in an average of 141 days.

This doesn’t exactly tell me, specifically, the sales length though. Remember, I use sales stages for Fulfillment, so technically the Opportunity is active throughout the whole process.

If I wanted to see the specific sales cycle, I would have to use other reports to see the average time to the Deposit stage.

For a more traditional use of Opportunities, where the record is closed upon sale, this report gives a fantastic high level view of sales process velocity and efficiency per rep.

(Back to Top)

Opportunity Pipeline Summary:
“How is my entire pipeline doing?”

This report is the big mamba jamba. It’s the closest thing you have to a speedometer for your sales pipeline.

There are no settings for the search. There are no extra columns to add. This is a raw “What is so?” right now about your sales pipeline:

Opp Pipeline Summary

Right now, as of this blog post draft, I have one person in Engaging for 12 days so far. 3 in Assessment completed. And so on.

You can see I’m not adding in the forecast revenue to those Opportunity records. This is a great reminder to get into this habit. Even as a one-man show, the more data I have, the better 🙂

This report gives you a high level view of everything, right now. If I was a sales manager, I might use this report as a Tool to build the team as a whole. Keep everyone all on the same bus. Everyone wins together, and everyone loses together.

(Back to Top)

You made it.

Whew!

So there you have it. From the annals of an esoteric PDF produced in 2013, you now have a full-blown explanation of every single Sales CRM report for Keap. All twelve of them.

Arguably, one of the most thorough and rigorous explanations of the topic to date. 🙂

What do you think? What’d you learn? What questions do you have? Let us know in the comments below.

Advanced Tactics to Level Up an Online Course

Advanced Tactics to Level Up an Online Course

In this blog post we’re going to show you two relatively advanced tactics for leveling up an online course.

The tools we’re going to use are Keap (formerly Infusionsoft), Plusthis, and Zapier.

In the video demo below we are using both of these tactics in a course of ours but I should point out that these tactics are not dependent on one another – so, feel free to use one, the other, or both.

1. Track the time between two events

So, the first tactic here is to measure the amount of time it takes for a contact to make their way through the virtual course.

But it’s worth pointing out that the tactic I’m about to outline could really be used to measure the amount of time between any two milestones.

To do this, you’ll want to use a PlusThis feature called “Calculate Time Between Events” (more on that feature here).

How this tactic works:

The feature is pretty straight forward – it lets you select the two milestones you’re tracking, it’ll crunch the numbers to find the amount of time between them – then you can choose the field you want to store the value in once it’s done.

Time Between Events
Time Between Events

In the video below, I used Tags as the two milestones, but this feature can also the date in a contact field (like an renewal date, or a meeting date, etc), or the date of a purchase (first, second, third, etc), the date the contact was created, and a few other options.

The first half of this video walks through the set-up process for using this feature:

The second half of the video covers tactic two – where we use Zapier and Google slides to automatically generate a certificate.

2. Automatically create and deliver certificates

Certificates has been the most common use case I’ve personally had for this trick, but really could be used in any number of ways (like, to merge text onto an image, etc).

How this tactic works:

You’ll want to set up a Google Slides Template for your certificate, and you’ll want to set up a custom field to store the certificate URL in once it’s been created.

You’ll trigger the Zap using an HTTP post (here’s how), and use the Zap to create a Google Slide presentation from the template you had set up – but you can personalize the template with info provided from the HTTP post (this is how we merge the contact’s name onto the certificate).

Time Between Events

Then, once it’s done its thing, you’re given a PDF version of this certificate, which you can send back to Keap, and store into the custom field on the contact record.

From there, you just need to email the contact, and give them a link so they can download their certificate and share it with the world.

If you wanna dig deeper into automated certificate creation, here ya go.

And if you’re wondering what else PlusThis might do for ya, here are a handful of our favorite features.

Hope you found this one valuable folks! Let us know if you have any questions in the comments below.

How to link Keap Campaigns

How to link Keap Campaigns

Update: In June 2020 Keap released a new feature that offers an additional option for moving your contacts between campaigns. Check out the new feature here.

Okay, so, you know it’s important to get clear on the specific journey you are creating for your customers, right?

And you know it’s important to use Keap’s campaign builder to design campaigns that support your customer journey. Right?

(Remember – Keap is the company that used to be called Infusionsoft.)

Which begs the question – where does one campaign stop and another begin?

My philosophy, and the one Mike Harris wrote about here, is to trend toward smaller more bite-sized campaigns.

Find the natural inflection points in their journey – those are usually good spots to break one unwieldy campaign into two more manageable ones.

Great – but…

How do I link Keap campaigns together?

Technically speaking – the answer is goals.

You remember goals, right? They’re the triggers that are used to start and stop campaigns (need a refresher?).

So to link two campaigns together, you would configure identical goals at the end of one campaign, and at the beginning of another.

Simple – right? If they achieve the goal then it will stop the first campaign – and automatically transition them to the second.

That’s all well and good if your contacts always do the thing you want them to do, but it starts to fall apart if they don’t take the action we wanted them to take.

And that is the most important part of this concept: People don’t always do what we want them to do.

Heck, sometimes they don’t even do what they say they want to do.

But if we know that, then we can plan for it. We can use automation to create a contingency plan.

This is important people – this is how you prevent leads from slipping between the cracks.

Ya see, the cracks only exist in the first place because we designed our automation based off of what we want our contact to do.

So for those people, the ones who do what we wanted – it’s seamless.

The goal is to create a cohesive customer experience that spans the entire journey.

(Here’s a case study on what that might look like.)

And with a little extra planning we can accommodate for anyone who veers off trail, does things out of order, or takes a longer than we expected.

Remember, your campaigns exist as segments of a broader comprehensive experience – like the transformers team up to form Voltron, your campaigns team up to form the customer journey.

And if you’d like more training on the campaign builder, check out the Advanced Automations Complete Collection from Keap Academy.

11 Steps to Launch an Online Course

11 Steps to Launch an Online Course

Recently I’ve seen a handful of questions in a variety of locations from businesses and individuals looking to take their expertise, and launch an online course.

I know this can be an intimidating process, and it absolutely is a robust undertaking – but I recorded this video with the goal of adding some structure to a process that might otherwise feel ambiguous.

How to launch an online course

Before you watch the video – I need to call out that this is not intended to be a comprehensive all-encompassing resource.

My goal with this video, and the following blog post, is to help you contextualize what it actually takes to launch a course (spoiler: it’s not easy).

That said, this video should help point you in the right direction, and raise some questions that will be important to think through. Enjoy.

Step 1: What problem are you solving?

You may already have a topic in mind for your course, but I would challenge you to think of it in terms of what this topic is valuable to people.

Does it solve a problem for them? Is that problem one people care about? Does it teach a skill? How will people use that skill?

Step 2: Define your avatar

Before you build the course content, it’s important to get crystal clear on the avatar – or avatars you expect this course to serve.

You might find that the content is resonating with folks who aren’t your avatar, and that’s fine, but getting clear on who the course is intended to serve will allow you to speak directly to them in the course content (and in any promotional messaging).

Step 3: Design the course outline

Once you know what you are teaching, the next step is to decide how you will teach it. Put another way – you’re designing the path that will take them from point A, to point B.

So, think about where you want someone to be when they complete the course – and then identify the milestones they would need to hit in order to get to that destination. Then, fill in the gaps with the different things they need to know in order to reach each milestone.

Try to be as specific as possible in this stage – so that nothing gets missed. And once you have a comprehensive list of things that need to be covered – you can organize them into topics that naturally fit together. The groupings can then be organized to form your larger course structure (and your outline for recording).

Step 4: Design the wait list and launch strategy

This step may feel out of order, but once you have the outline in place I recommend building a simple landing page where people can opt in for your wait list.

The reason I recommend doing this early in your process is so that you can talk about the course while you’re creating it, build interest with your audience, and give the folks who are interested a place to sign up and get notified when it comes time to launch.

Step 5: Record and edit course content

I know, this is a big one. But we also have a tendency to make this step harder than it needs to be – so, try not to get in your own head.

You’re creating the first version of your course – there will always be things you want to improve, or add to it.

My recommendation here is to think light and lean – I record most of my content (including the video above) on my Samsung Galaxy, using the tripod, cell phone holder, and lights pictured here.

For a long time I just recorded audio with the cell phone itself, but lately I’ve started using a simple lapel mic that plugs into the aux port on the phone. Then, I upload to google drive, download onto my computer, edit in Camtasia, and export as an mp4 file.

Step 6: Map out course delivery and fulfillment

Once you have your content recorded and edited, it’s time to shift your focus to how you’d like your customers to experience.

There are an infinite number of ways to structure your course, so I recommend drawing on examples from courses you’ve taken, or that you’ve seen. Will your videos be laid out in a grid, or will they be hosted one per page – will there be objectives for people to complete, or quizzes baked into the content – will they have access to the entire course at once, or will the modules be drip released.

There isn’t a right or wrong answer here – but the clearer you can get on what you’d like them to experience, the easier it’ll make the next step.

Step 7: Build site and automation

Again, this is a big one. There are experts who specialize in this part of the process, so if you’d like to work with a strategist just let me know and I’ll make some recommendations for you.

But here’s what I’ll say – I use and endorse AccessAlly, which is a wordpress plugin. I have found it to be robust and flexible (here’s why I chose it). Recently I worked on a project launching a course using Kajabi – and honestly, I was impressed with that platform as well. Kajabi wasn’t as powerful as AccessAlly, but I was pretty pleased at how intuitive the platform felt.

A Monkeypod Documentary

In 2018 I worked with Jamie Dubose to move my training courses (which are now free) from CustomerHub to AccessAlly.

We recorded our process and wound up creating The Migration – a feature length docuseries answering some of the most important questions for building a course platform.

(Note: CustomerHub has had a number of changes since I moved off of it, and their new platform is a complete overhaul. I haven’t used it personally, but the feedback I’m hearing is quite positive.)

Step 8: Test thoroughly

This might go without saying, but I’m gonna say it: Test, test, and test.

And even after you’ve tested – test again. Obviously this is only one pieces of the puzzle, but here are some tips for testing your Infusionsoft campaigns.

Step 9: Design survey loop

Before you launch, I recommend designing a process to capture feedback from people.

It could be something simple, like an automated email after 14 days that asks how things are going – or, it could be something more formal, link a link to a survey where they can share their feedback.

Capturing their feedback is the first step, but you’ll also want to think through how you will respond to it.

If the feedback is good, then you just need to thank them (and ask if you can use it in your marketing), but if the feedback is constructive – you’ll want to have a plan for how you’ll handle that as well.

Step 10: Think through support strategy

No matter how much planning you do, or how dialed in your automation is – there are bound to be customers who need a little more attention.

Take the time before you launch to think through how you’ll handle customer support requests as they come in – it could be as simple as assigning that responsibility to a team member, or hiring a virtual assistant to help (speaking of courses…), but one way or another you want to have a plan in place that helps your customers feel supported during (and after) the course.

Step 11: Design launch and promotion strategy

You’ve done the work, now its time to get your course in front of the people it can serve.

If you built the wait list early on, and you’ve been regularly updating your social channels throughout this process, then you can start by launching to your wait list. There are countless resources and experts who specialize in launch strategy, so I won’t pretend to have all the answers there – but I will share this dense resource, from Stu McLaren.

This guide talks about open and closed cart strategies, and general best practices for launching a profitable membership site – I’ve found that courses and membership sites often go hand in hand.

Annnnnnd that’s it.

Listen – I know this is a lot of work. I’m not trying to downplay that at all.

But the work is worth it.

And remember, not everything on this list needs to be done by you – so if you want help with any step of the process, just ask, and I’ll do my best to point you in the right direction.

Good luck – and happy course creating. If you have any questions (or feedback) just leave a comment below!

How to use Keap’s dynamic content feature

How to use Keap’s dynamic content feature

Update: If you have questions about using Dynamic Content then check out this Facebook group that started specifically as a place to share ideas and use cases for this feature.

You may have heard me say this before, but I believe Keap’s campaign builder is the world’s most powerful marketing tool for small businesses.

So, with that in mind, here’s the bold claim of the day:

Keap’s dynamic content is the most important feature since the campaign builder.

Simply put – because of the power of segmentation.

Segmentation is the key to turning generic mass marketing into targeted conversations that feel personal.

And the whole goal of this post is to encourage you to start using Keap’s dynamic content as soon as possible. Ideally, today.

If you haven’t discovered it, the dynamic content feature is currently located on the main dropdown menu, under the marketing section (for Max Classic Users).

I dug into the concept of dynamic content, also known as liquid content, in this blog post a few months ago; so for today I’m just going to focus on how you can start using it – now.

Before we get to the power of segmentation – I want to show you some easier ways it can be used to modify content.

Example One

So, you know how you can use ~Contact.FirstName~ to merge someone’s first name into an email, right?

Well, I think we’ve all seen contacts who enter their name in ALL CAPS (or  all lower case), and then when you merge it into an email, it displays as they’re entered it, which doesn’t jive with the copy you’ve written, and reeks of automation, right?

No problem. Dynamic content can fix that – just use this merge field to “Proper Case” their first name every time: [[ contact.first_name | downcase | capitalize ]]

Good: ~Contact.FirstName~

Better: [[ contact.first_name | downcase | capitalize ]]

Changes like these are known as modifiers, and there are countless adjustments like this that are now natively available for adjusting a merge field (capitalizing, truncating, formatting a date, multiplying a number, etc).

The options for manipulating the field vary based on the type of data stored there (date fields, text fields, whole number fields, etc).

Example Two

The second type of dynamic content is known as conditional content – and this is really where the segmentation power comes in.

Conditionals allow you to write a statement that display one sentence (or paragraph) if a contact has a tag, and display a different message if they don’t.

Here’s an example of the code – let’s say contacts who have bought a course have Tag ID 111. So, the following code would display the first message for them, and then display the second message for anyone without that tag:

[% if contact.tags.uids contains "111" %]
Here's your login info for the campaign builder course.
[% else %]
You should totally buy this course.
[% endif %]


Here’s another example – for this one let’s say Tag ID 222 represents my Blog Subscriber tag, and 333 represents my OG Member tag. This would allow me to send one email to a group of people, and the blog subscribers would see the first message, the OG Members would see the second sentence, and then anyone else would see the final part that just says thanks for being connected.

[% if contact.tags.uids contains "222" %]
Thanks for being a blog subscriber.
[% elsif contact.tags.uids contains "333" %]
Thanks for being an OG member.
[% else %]
Thanks for being connected to Monkeypod.
[% endif %]


To use either of the examples above you’d just copy the entire code, update the Tag IDs, and change the messages that are displayed.

Here’s an example from a recent webinar of mine where we demonstrated using Keap dynamic content.

If you’d like to see the rest of that webinar, and it was a good one, then you can check out the recording here.

Now then, go use this.

For real, as much as I want them to make it easier to use this, and to add the dynamic code generator directly to the email builder, don’t wait – the power behind this feature is already immense. I can’t say it’ll be flawless, but I can say that I’ve been using it for 4+ months now with nothing but positive experiences.

I also know, firsthand, that this will change the way you think about and design campaigns. And it takes a while to re-adjust, so the sooner you start using it, the sooner you’ll start spotting opportunities where this can simplify things for you, and improve the way you are communicating with your audience.

Speaking of designing campaigns, there’s a popular virtual training course covering the ins and outs of the campaign builder available for free in the Keap Academy platform.

Bonus Resources

Here are a few additional resources for using dynamic content in more advanced scenarios, like to hide/reveal buttons and images (rather than just text), or to modify dates beyond the default formatting options available (shout out to Jordan Hatch for that one).

Bonus Bonus Example

Here’s another real world example of how you can use Dynamic Content to display only the relevant parts of a email for your clients. Shout out to my friend Mallory Balnis for this explainer video.

How Referral Tracking Works in Keap

How Referral Tracking Works in Keap

There have been a few conversations in public groups lately on the topic of Keap’s referral partner tracking – and so I wanted to write a quick post just to cover how the partner tracking works (and how it doesn’t).

But first, I want to make sure we’re all on the same page: This blog post is about using the built-in Keap Referral Partner Program to track sales driven by your affiliates, so that you can pay them a commission.

Still with me?

How the Infusionsoft Referral Tracking Works

Just to be clear, it WAS called Infusionsoft – it’s now the Max Classic version of Keap.

The Referral Partner section of Keap is pretty robust, and I’m just going to focus on how the technical tracking piece works – but if you want to learn how the other features work, or you want to set up a partner program for your business, check out this Referral Partner Launch course from Keap Academy.

Now then – let’s get into it:

  1. A tracking link is sent to the contact by the affiliate
  2. Contact clicks the link
  3. A cookie tied to your Keap app name domain is set (your app name domain is something like xy123.infusionsoft.com)
  4. The cookie gets read by Keap. Since that cookie can only be read by a script living on that domain, there are only a few ways this can happen:
    • Keap Web Form Submission
    • Keap Order Form Submission
    • Keap Shopping Cart Submission
    • A little known and little documented feature (more on this in a sec)
  5. Once the cookie is read and the contact is created, Keap will associate that contact with the appropriate Affiliate (the one that sent the link in step 1)
  6. When an order comes in via the Keap Order Forms, Shopping Cart, or is manually entered for that contact (and is within the tracking time window) the affiliate will earn credit based on the commission program(s) in which they are enrolled
    Note: The order record has to be in Keap for a commission to be calculated.

Okay, did you follow all that?

This begs the question “What if I’m not using Keap’s order forms or web forms or shopping cart?”

What if I use a third-party checkout system?

If you’re using something else for those things then the Affiliate information for the order would need to be set via the API.

Since cookie’s can only be read by a script living on the domain or subdomain (this isn’t an Keap limitation, btw, it’s just how cookies work), Keap would need to be able to read the cookie and send the information along.

What do I do about it?

There is a little known and not-so-well-documented feature in Infusionsoft that will return the ID of the affiliate based on the cookie set on the device (computer, phone, etc) the contact is using. This article explains how you can use that feature.

Update: Here’s a video explainer of how you can track referrals for third-party cart systems:

So, if you’re using something other than Infusionsoft to process orders, then the integration that passes the details to Infusionsoft would need to also get the affiliate for the contact from the script referenced above, and set the affiliate for the order.

Most of the standard integrations don’t do this – I happen to know that my WooCommerce plugin does, but if you’re using an integration to add orders to Infusionsoft you’ll probably want to check before you launch a partner program.

What about Spiffy? If you’re using the original Spiffy for Infusionsoft to fancify your checkout pages then you’re all set – Spiffy works seamlessly with Infusionsoft referral partner tracking.

Key Vocabulary

Affiliate: An affiliate is an individual who has enrolled in your partner program because they want to earn commission by promoting your products or services, also known as a Referral Partner.

Commission Program: A commission program defines how and when commission can be earned by the partners who are enrolled in that particular program. You can define a default commission percentage, or establish unique override commissions on a per product basis.

Clawbacks: A “clawback” is the recovery of commission that was calculated or distributed in error, as in the case of a refund request.

Ledger: The Referral Partner Ledger, or “ledger” keeps track of the commissions earned by your partners so that when it’s time to distribute payments you have a clear record of who has earned what.

Partner Tiers: Infusionsoft’s referral partner module offers the ability to support a partner program with multiple tiers – meaning that your partners could recruit other partners, and then earn commissions as a parent affiliate for those they’re recruited.

Promotional Resources: To help your partners be successful Infusionsoft allows you to create promotional resources to educate your partners, or that they can use to promote your products. The resource types available are links, banners, and promotional pages.

Referral Partner: These are the individuals who are enrolled in your partner program – also known as affiliates. All referral partners must have a corresponding contact record – but all contacts are not necessarily going to be referral partners.

Referral Partner Center: To support your partners Keap offers a portal where your partners can log in and access their links, view their existing commissions, or consume training or resources you’ve created for them. Using the referral partner center is optional, but can be a good way to encourage partner engagement.

Tracking Links: Tracking links, or redirect links, are the links that your partners will use to send traffic to your website and landing pages. When these links are clicked they initiate the cookie on the contact’s device, report information back to Keap, and resolve to the URL you defined as you were setting the link up (usually an opt-in or check-out page).

Uh, I think I need this…

If you’re interested in launching a referral partner program for yourself, or just want to understand that part of the Keap platform better – then check out the Referral Partner Launch course in the Keap Academy Platform.