How to Split Up Complex Campaigns

How to Split Up Complex Campaigns

This blog post addresses a fairly specific Keap question about a relatively advanced scenario:

“How do I up split a complex campaign?”

It was prompted by a question Steven, an OG Member, asked yesterday when he realized the campaign he’d built had spiraled a bit out of control.

complex keap campaign

Is the campaign functional? Sure.

But it’s cumbersome – and when a campaign is that big it has a number of drawbacks; it’s harder to manage, to modify, and to report on.

And it takes forever to load (ever seen this horror show?).

campaign loading issue

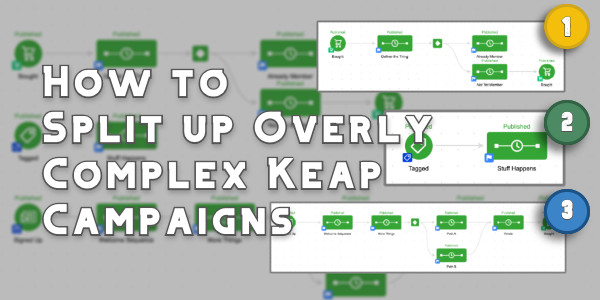
So, the answer is to generally build your campaigns in smaller more modularized structures, as Mike advises here.

And then chain those structures together, like this.

Great advice – but it doesn’t help Steven (or anyone who has an unruly campaign).

How do I break up a big Keap campaign?

But if you have an existing campaign that you want to divide into smaller campaigns you can – but there are some considerations.

First, you’ll want to decide what you want to happen to the contacts who are already in the automation.

And second, you’ll want to pay close attention to the functioning goals – some goal methods live in a singular campaign, and can’t easily be moved.

In this video I’ll show you the various ways to divide up a bloated campaign, and talk through those considerations as well.

So there you have it – now you (or Steven) have a process you can follow for making your goliath campaign more manageable.

And, in case this all feels a little advanced – here are two resources I recommend to keep exercising those campaign builder muscles:

Campaign Builder 101 [Blog Post]
CB Trilogy [Virtual Course]

The campaign builder is Keap’s automation engine – understanding how to harness this tool is the key to multiplying the ROI you get from Keap every month,

Keap’s AI Copy Generator [Sneak Peek]

Keap’s AI Copy Generator [Sneak Peek]

Update: All Keap Users can access the Copy Generator by visiting plays.keap.app and logging in with your Keap credentials.

And if you’d like a guided walkthrough, check out the build-a-play event replays in the Keap Academy platform.

What if I told you your emails could write themselves? Does that sound like something you might be interested in?

Designing automation that supports your customer experience is the core of Keap’s functionality, we all know that – but at the end of the day your automation is only as powerful as the content it delivers.

And for many small business owners, copywriting can be a roadblock. Until now. *dramatic reveal*

The Copy Generator

Keap has quietly been working on a new AI powered Copy Generator.

It isn’t live quite yet, but I got to take the beta for a test last week and it just about blew my mind. I think this new tool has the potential to be an absolute gamechanger.

Here’s a demo:

Not bad, eh?

(btw, the webinar referenced in the video above has already taken place, but the replay is available here if you’d like to follow along).

How does it work

Well, I’m not 100% clear on the witchcraft and/or technology behind this, but I do know it’s more than just standard AI.

This tool has been designed specifically to use AI while guided by marketing strategy and best practices, which is a big part of what differentiates it from other AI copy generators out there.

I’m stoked people – it’s early still, but I think this has the potential to be one of the most innovate improvements we’ve seen in years (my top two are currently the campaign builder in 2012, and dynamic content in 2019).

Like I said above, this is currently in beta testing so Keap can get some feedback on it – so just be patient and you’ll get notified when it’s ready for wider scale release.

If you are okay with some wrinkles, and are willing to offer feedback, drop me a message and I’ll see if I can get you into the beta trial.

Update: All Keap Users can access the Copy Generator by visiting plays.keap.app and logging in with your Keap credentials.

How to Trigger Automation on Two Contacts

How to Trigger Automation on Two Contacts

We had an interesting question pop up in the Monkeypod community the other day: How do I automatically send a thank you message when I receive a referral?

Automation on two contacts

This concept sounds straightforward, but it breaks the normal logic for how automation inside Keap works.

Generally we have automation happen on an individual basis – when someone does something, then this other thing happens to them as a result.

But, in this case, we need to be able to send a thank you to Person A when they refer Person B; which makes things a little trickier.

How can we do it?

There are effectively two ways to do it, a simple native way, and a more robust method that involves the Contact Creator tool from PlusThis.

In this video I’ll show you both, and call out the pros and cons for each.

So, the situation in this video is fairly specific to Tara’s question – but there are plenty of use cases where this type of functionality might be useful.

We outlined two methods for solving this, the first was totally native, and the second option uses PlusThis.

If you don’t yet use PlusThis you can start a free trial here.

Thanks for reading – hope you found this valuable. Please feel free to drop any comments or questions below.

Have your own questions?

If you would benefit from a place to ask automation questions when you get stuck, and get ideas and inspiration from other businesses, you can join us in the Monkeypod Membership.

Sending Contact Info to a Keap Landing Page

Sending Contact Info to a Keap Landing Page

This post covers using a query string to pass contact information from a Keap delivered email through to fields on a landing page.

This will pre-populate the fields on the page with the contact details, so they don’t have to re-enter their info.

Query String

In a perfect world, this would happen automatically (as it does with Keap Web Forms and Legacy Landing Pages), but I’ve seen some inconsistencies with the Keap Landing Pages, so to make sure it works reliably I’ve started building my own query strings.

Which begs the question…

What is a query string?

A query string is basically a way of adding extra info onto a link, to send additional details to the page that the URL is loading.

There are a few different reasons you might want to do this (like using Google UTM parameters or for LeadSource tracking), but in this scenario it’s to tell the page who is visiting it, so that the contact doesn’t have to re-enter information we already have about them, or to fill a hidden field on the page so that new information we capture is tied back to the correct person.

How does it work?

So, normally you’d link a page with the URL for that page – this method still does that, but it adds extra ‘value pairs’ onto the link.

A query string starts with a question mark, indicating the end of the link and start of the extra stuff.

And then you add the ‘value pairs’, which are basically putting info into parts of the page. So, an example value pair might be FirstName=Greg, telling the page to put “Greg” into the field for “First Name”.

Where this gets tricky is figuring out what the page calls each field. The field might have a different name depending on how the page was built (if you used Keap, ClickFunnels, TypeForm, Thrive, etc).

Can I see a demo?

I thought you’d never ask.

Here’s a demo for building the link structure to pass contact details from a Keap email to a Keap landing page:

So, there you have it. We’re all hackers now.

Seriously though, I know this can feel technical. But basically we’re just taking information from the contact record, and passing it through to the resulting page, with instructions for where to put that info.

“Put this person’s name into the name field”, etc.

And if this is outside your technical comfort zone, this is absolutely something you could hire a Keap partner to help with.

Thanks for reading/watching – feel free to drop a comment below with any questions or light bulb moments.

Exit Intent Pop-Up Forms

Exit Intent Pop-Up Forms

The experience someone has when they’re on your checkout page is crucial.

If someone decides not to purchase then they’re likely going to close the tab for the sales page, but that doesn’t necessarily mean they’re gone forever.

You can use a tactic known as an ‘exit intent’ pop-up form to capture leads who might have otherwise vanished.

exit intent forms in keap

I’ve been a long timer user (and fan) of the Modern Forms feature from PlusThis.

Originally it was just a tuxedo for Keap web forms – but then they added the ability to put the web form in a pop-up window behind a button, and then just a few weeks ago they added the exit intent functionality.

PlusThis Screenshot img

Now, we’ve never really sought out Exit Intent forms for Monkeypod – because I think it’s easy for them to annoy the website visitor.

But there are definitely use cases where they make a lot of sense – one logical scenario is offering someone a free trial of a course if they start to leave the checkout page they’re on.

Here’s a demo of what this might look like:

If you already have PlusThis, then have a look at this feature, and see if there are opportunities in your business where it could be useful.

But if you don’t yet have PlusThis, it might be time – check out the pricing and tiers here, or take it for a test drive with a free trial.

Questions? Comments? Beard compliments? Drop em below.

Keap Email Builders (New and Old)

Keap Email Builders (New and Old)

Updated: February 2023

If you’ve used Keap for a while, odds are you’ve noticed that there are multiple email builders in different sections of the software.

Keap is actively working to consolidate that (one email builder to rule them all, etc), but for the time being you might have as many as three email builders inside of your advanced automations alone.

three keap email builders

In the above image, the email builder marked as ‘A’ is the newest one – first released in Q4 of 2021 and currently being rolled out in stages to Keap users.

The email builder marked as ‘B’ is old trusty – that’s the builder we’ve grown to know and love and have had for the last decade or so (here’s a demo of that one pulled from the CB Trilogy course).

And ‘C’, is the actual legacy builder, who’s roots predate the campaign builder itself (newer Keap users may not see this one at all).

So, in summary – A is the builder of the future. B is the one you’ve likely been using. And C is only still around to yell at people to stay off his lawn or whatever.

Why a new builder?

The obvious question is ‘why are we adding another builder’, and it’s a good one – I’ve asked it myself.

The answer is this: They’re standardizing the builder experience throughout Keap.

The reason we’re seeing this new builder roll out is because over time this will be the builder experience we see for landing pages and emails throughout all versions of Keap.

Right now we may feel some turbulence, but in the long run I think the idea of having a streamlined builder tool that is consistent between different types of assets (landing pages and emails) and versions of Keap (pro, max, max classic) is wise.

In the meantime, here’s a quick demo of both builders and some key ways they differ:

A few things worth noting, first – they are actively rolling this out.

If you don’t have access to this email builder yet, stay tuned – it’s likely on it’s way.

The next thing to note is that they’re actively making improvements to this – so it’s entirely possible that by the time you see this video they may have added some of the features I called out as missing, or improved some of the things I felt were clunky.

For example, at the time it was rolled out the “to” options were Work, Personal, and Other; which didn’t make a whole lot of sense for Max Classic users who don’t see those designations.

email to options

But, that’s one of the improvements they’ve made since originally rolling this out.

Now, Max Classic users can select Email 1, Email 2, and Email 3 (or other) as they always have.

updated to send options

Here’s a post from Keap’s product team with more details about the plans for adding features and functionality.

And finally, my understanding is that they have no plans to remove the existing email builder – so this new one should only be an upgrade for those who want to start using it.

2/23 Update: This builder is the default for Keap Pro and Max and is now being rolled out to Max Classic (also known as Keap Ultimate) applications in phases.

Okay – enough from me, I’d love to hear what you all think. Do you have the new builder yet? Have you tried it out?